A 4-way switch wiring diagram with dimmer enables control of a single light fixture from four different locations. It involves implementing a dimmer switch to adjust the light’s brightness. The wiring plan outlines how to connect the switches, dimmer, and fixture.
This setup is commonly used in large spaces such as ballrooms, auditoriums, or hallways, where multiple entrances require light control. Its advantages include energy savings, enhanced convenience, and the ability to create different lighting ambiance by adjusting the dimmer. A significant historical development in this field was the invention of the solid-state dimmer in the 1960s, providing a compact and efficient way to control light intensity.
This article will delve deeper into the wiring diagram for a 4-way switch with dimmer, discussing its components, installation considerations, and practical applications. It will also address safety precautions and troubleshooting tips.
Understanding the essential aspects of a 4-way switch wiring diagram with dimmer is crucial for proper installation and operation. These aspects encompass various dimensions related to the diagram, ranging from its components to its applications.
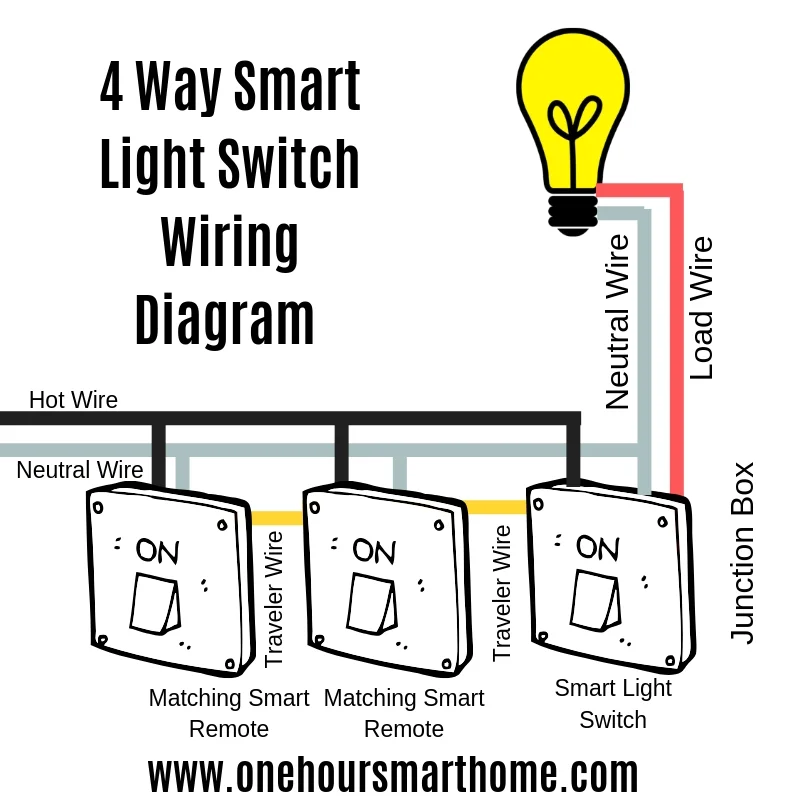
- Components: The diagram outlines the electrical components required, including switches, dimmer, wires, and the light fixture.
- Wiring: It specifies the connections between the components, ensuring proper functionality and safety.
- Switch Locations: The diagram indicates the placement of the four switches for controlling the light from different locations.
- Dimmer Functionality: It explains how to incorporate a dimmer switch to adjust the light’s brightness.
- Circuit Protection: The diagram includes circuit protection elements like fuses or circuit breakers to safeguard the system.
- Voltage and Wattage: It specifies the voltage and wattage requirements for the switches, dimmer, and fixture.
- Installation Considerations: The diagram provides guidelines for proper installation, including wire gauge, conduit usage, and switch box selection.
- Safety Precautions: It emphasizes safety measures during installation and maintenance, such as turning off power and using appropriate tools.
- Troubleshooting: The diagram may include troubleshooting tips to address common issues like switch malfunction or dimmer failure.
These key aspects are interconnected and essential for a comprehensive understanding of the 4-way switch wiring diagram with dimmer. Proper consideration of these aspects ensures a functional, safe, and efficient lighting control system.
Components
In the context of a 4-way switch wiring diagram with dimmer, the electrical components play a crucial role in enabling the control and adjustment of lighting from multiple locations. The diagram serves as a blueprint for connecting these components to achieve the desired functionality.
The switches, dimmer, and wires form the core of the wiring diagram. The switches allow for switching the light fixture on or off from four different locations, while the dimmer provides the ability to adjust the light’s brightness. The wires connect these components to each other and to the light fixture, forming a complete circuit.
Understanding the relationship between the components and their proper installation is vital for the successful operation of a 4-way switch wiring diagram with dimmer. Incorrect connections or faulty components can lead to malfunctioning of the system, posing potential safety hazards.
Real-life examples where this understanding is applied include homes, offices, and commercial buildings where it is necessary to control lighting from multiple locations with the added convenience of dimming functionality. Proper installation and maintenance of these components ensure reliable and efficient lighting control.
In summary, the components outlined in the 4-way switch wiring diagram with dimmer are essential for its functionality and safe operation. Proper understanding and handling of these components are crucial for effective lighting control and contribute to the broader goal of creating comfortable and functional spaces.
Wiring
In the realm of electrical systems, wiring plays a pivotal role in ensuring the seamless operation and safety of various components. This is particularly true in the context of a 4-way switch wiring diagram with dimmer, where precise connections are crucial for achieving efficient lighting control and dimming functionality.
- Circuit Design: The wiring diagram outlines the electrical pathways that connect the switches, dimmer, and light fixture. It specifies the type and gauge of wires, as well as the routing and termination points, ensuring proper current flow and minimizing voltage drop.
- Switch Interconnections: The diagram details the wiring connections between the four switches, creating a network that allows for switching the light fixture from different locations. Understanding these interconnections is essential for troubleshooting and maintaining the system.
- Dimmer Integration: The wiring diagram incorporates the dimmer switch into the circuit, specifying its connections to the switches and light fixture. Proper wiring ensures that the dimmer can effectively control the light’s brightness, providing the desired ambiance and energy savings.
- Safety Considerations: The diagram adheres to electrical safety codes and standards, incorporating elements such as proper grounding and circuit protection devices. These measures minimize the risk of electrical hazards, such as shock, fire, and damage to components.
These aspects of wiring in a 4-way switch wiring diagram with dimmer underscore the importance of precise connections and adherence to electrical principles. Proper installation and maintenance of these wiring connections ensure reliable and safe operation of the lighting control system, contributing to the overall functionality and safety of the electrical environment.
Switch Locations
In the realm of electrical wiring, the placement of switches holds significant importance, particularly in the context of a 4-way switch wiring diagram with dimmer. This aspect of switch locations directly influences the functionality, convenience, and overall effectiveness of the lighting control system.
- Strategic Positioning: The diagram specifies the optimal placement of the four switches, ensuring ease of access and intuitive control from different parts of a room or space. This strategic positioning enhances user experience and promotes efficient lighting management.
- Multiple Control Points: The placement of multiple switches provides convenient control over a single light fixture from various locations. This is particularly beneficial in large areas such as hallways, ballrooms, or open-concept living spaces, allowing users to adjust lighting from the most convenient point.
- Architectural Considerations: The diagram takes into account architectural features and the aesthetics of the space. Switches are often placed in discreet locations, blending seamlessly with the dcor, while still maintaining accessibility and functionality.
- Safety and Accessibility: The placement of switches adheres to electrical safety codes and regulations, ensuring they are easily reachable and positioned away from potential hazards. Switches are often placed at standard heights for ease of use, considering the needs of individuals with limited mobility.
These facets of switch locations in a 4-way switch wiring diagram with dimmer highlight the importance of thoughtful planning and precise execution. Optimal switch placement contributes to the overall usability, convenience, and safety of the lighting control system, enhancing the functionality and ambiance of the space.
Dimmer Functionality
In the realm of electrical wiring, dimmer functionality is a crucial aspect of a 4-way switch wiring diagram with dimmer. The dimmer switch plays a pivotal role in providing variable control over the light’s brightness, enhancing the ambiance and functionality of a space.
The dimmer switch works by varying the amount of electrical power reaching the light fixture. This allows users to adjust the light’s intensity, creating the desired lighting levels for different activities or moods. The dimmer is typically installed in one of the four switch locations, enabling convenient adjustment from any of the control points.
Real-life examples of dimmer functionality within a 4-way switch wiring diagram include home theaters, where users can adjust the lighting to create an immersive viewing experience; conference rooms, where the lighting can be tailored to suit the needs of the presentation; and restaurants, where the ambiance can be altered to match the dining experience.
The understanding of dimmer functionality is essential for designing and installing efficient lighting control systems. It allows electricians, interior designers, and homeowners to create customized lighting solutions that cater to the specific needs and preferences of each space.
In summary, dimmer functionality is a key component of a 4-way switch wiring diagram with dimmer, providing users with the ability to adjust the light’s brightness and create the desired ambiance. This understanding is crucial for designing effective lighting control systems that enhance the functionality, comfort, and aesthetics of various spaces.
Circuit Protection
Within the context of a 4-way switch wiring diagram with dimmer, circuit protection plays a critical role in ensuring the safety and reliability of the electrical system. Circuit protection elements, such as fuses or circuit breakers, are incorporated into the diagram to safeguard the system from electrical faults and potential hazards.
The connection between circuit protection and a 4-way switch wiring diagram with dimmer is essential because electrical faults or overloads can occur due to various factors, such as short circuits, loose connections, or faulty components. These faults can lead to excessive current flow, overheating, and even electrical fires if left unprotected.
Circuit protection elements act as safety barriers within the electrical system. When an electrical fault occurs, fuses or circuit breakers promptly interrupt the current flow, preventing damage to the wiring, switches, dimmer, and light fixture. This immediate response helps to minimize the risk of electrical shocks, fires, and other hazards.
Real-life examples of circuit protection within a 4-way switch wiring diagram with dimmer can be found in residential, commercial, and industrial settings. In homes, circuit protection safeguards lighting systems from potential electrical hazards, ensuring the safety of occupants and the property. In commercial buildings, such as offices and retail stores, circuit protection helps prevent electrical faults from disrupting business operations and minimizing the risk of damage to equipment and inventory.
Understanding the importance of circuit protection in a 4-way switch wiring diagram with dimmer is crucial for electricians, contractors, and homeowners alike. Proper installation and maintenance of circuit protection elements ensure a safe and reliable electrical system, minimizing the likelihood of electrical hazards and safeguarding the integrity of the lighting system.
In summary, circuit protection is an indispensable component of a 4-way switch wiring diagram with dimmer, providing critical safety measures against electrical faults and hazards. By incorporating fuses or circuit breakers into the design, electrical systems are protected from potential damage and risks, ensuring a safe and reliable operation of the lighting system.
Voltage and Wattage
Understanding the voltage and wattage requirements for the switches, dimmer, and fixture is critical when designing and installing a 4-way switch wiring diagram with dimmer. Voltage and wattage are closely related, as they determine the amount of electrical power consumed by the lighting system.
The voltage requirement specifies the electrical potential difference between the live wire and neutral wire in the circuit. Common voltage levels for residential and commercial applications include 120 volts (V) and 240 V. The wattage requirement, on the other hand, indicates the amount of power consumed by the lighting fixture. Higher wattage fixtures consume more power and produce brighter light.
When designing a 4-way switch wiring diagram with dimmer, it is essential to ensure that the switches, dimmer, and fixture are compatible with the voltage and wattage requirements of the electrical system. Mismatched components can lead to electrical hazards, such as overheating or damage to the equipment.
For instance, in a 120 V electrical system, the switches, dimmer, and fixture must be rated for 120 V operation. Using a 240 V fixture in a 120 V system can result in overheating and potential fire hazards. Similarly, exceeding the wattage rating of the dimmer or switches can overload the circuit, causing damage to the components and potentially triggering a circuit breaker.
Therefore, careful consideration of voltage and wattage requirements is essential for the safe and efficient operation of a 4-way switch wiring diagram with dimmer. Proper matching of components ensures optimal performance, prevents electrical hazards, and extends the lifespan of the lighting system.
Installation Considerations
Within the context of a 4-way switch wiring diagram with dimmer, installation considerations play a vital role in ensuring the safety, reliability, and functionality of the electrical system. The diagram provides detailed guidelines for proper installation, encompassing aspects such as wire gauge, conduit usage, and switch box selection.
- Wire Gauge: The diagram specifies the appropriate wire gauge for the circuit, considering factors like current carrying capacity and voltage drop. Selecting the correct wire gauge is crucial to prevent overheating, voltage loss, and potential electrical hazards.
- Conduit Usage: The diagram may recommend the use of conduit to protect wires from damage and environmental factors. Conduit provides an additional layer of safety, particularly in areas with exposed wiring or high traffic.
- Switch Box Selection: The diagram specifies the type and size of switch boxes required to accommodate the switches and dimmer. Proper switch box selection ensures adequate space for wire connections and prevents overcrowding, which could lead to overheating and electrical issues.
- Grounding: The diagram emphasizes the importance of proper grounding to protect against electrical shock and ensure the safe operation of the lighting system.
Adhering to these installation considerations is essential for a safe and efficient electrical system. Improper installation can compromise the performance of the 4-way switch wiring diagram with dimmer and pose potential hazards. By following the guidelines provided in the diagram, electricians and homeowners can ensure the reliable and long-lasting operation of their lighting system.
Safety Precautions
When working with electrical systems, safety should always be the top priority. This is especially true when installing or maintaining a 4-way switch wiring diagram with dimmer, as improper handling can lead to electrical shocks, fires, or other hazards.
- Turn off power: Before starting any electrical work, it is crucial to turn off the power at the circuit breaker or fuse box. This de-energizes the circuit, preventing the flow of electricity and minimizing the risk of shock.
- Use appropriate tools: Always use tools that are specifically designed for electrical work, such as insulated screwdrivers and pliers. These tools help protect against electrical shock and prevent damage to components.
- Follow the wiring diagram: Carefully follow the wiring diagram to ensure that all connections are made correctly. Incorrect wiring can lead to short circuits, overloads, and other electrical hazards.
- Test the system: Once the installation or maintenance is complete, thoroughly test the system to ensure that it is functioning properly. This includes checking for proper switching and dimming operation.
By adhering to these safety precautions, you can minimize the risks associated with installing and maintaining a 4-way switch wiring diagram with dimmer, ensuring a safe and reliable electrical system.
Troubleshooting
The aspect of troubleshooting, often included in 4-way switch wiring diagrams with dimmer, plays a critical role in maintaining the functionality and safety of the electrical system. These diagrams provide guidance on identifying and resolving common issues that may arise with switches and dimmers, ensuring a reliable and efficient lighting control system.
- Switch Malfunction: The diagram may offer troubleshooting tips for addressing faulty switches, such as loose connections, worn-out contacts, or internal component failures.
- Dimmer Failure: Troubleshooting tips may cover issues related to dimmer malfunction, including incorrect dimmer type, overloading, or component failure due to power surges or overheating.
- Wiring Faults: The diagram may provide guidance on identifying and fixing wiring faults, such as broken wires, loose connections, or incorrect polarity, which can affect switch and dimmer operation.
- Dimming Range Issues: The diagram may include troubleshooting steps for resolving problems with the dimmer’s dimming range, such as flickering or insufficient dimming, which can be caused by incompatible bulbs or incorrect dimmer settings.
By incorporating troubleshooting tips into the wiring diagram, electricians and homeowners can effectively diagnose and resolve common issues with 4-way switch and dimmer systems, ensuring uninterrupted lighting control and minimizing the need for costly repairs or replacements.


Related Posts


