Nest Thermostat Wiring Help concerns assistance with connecting a Nest Thermostat to an HVAC system. For instance, a homeowner may need guidance on wiring the thermostat to correctly control their heating and cooling.
Understanding Nest Thermostat Wiring Help is crucial for ensuring the thermostat functions effectively. It promotes efficient energy usage, optimizes home comfort, and prevents potential safety hazards. A significant historical development in this domain was the introduction of wireless thermostats, which eliminated the need for complex wire connections.
This article delves into the nuances of Nest Thermostat Wiring Help by providing detailed instructions, troubleshooting tips, and safety precautions. It aims to empower homeowners with the knowledge and confidence to successfully install and maintain their Nest Thermostat.
Understanding the essential aspects of Nest Thermostat Wiring Help is key to ensuring a successful installation and maintaining optimal performance.
- Compatibility: Verifying compatibility between the thermostat and HVAC system.
- Safety: Following safety precautions and electrical codes during installation.
- Tools: Gathering the necessary tools and materials for wiring.
- Wiring Diagram: Interpreting the wiring diagram provided with the thermostat.
- Terminal Identification: Identifying the correct terminals on the thermostat and HVAC system.
- Wire Connections: Making proper connections between the thermostat and HVAC system.
- Powering Up: Safely restoring power to the system and testing the thermostat.
- Troubleshooting: Resolving common wiring issues and error codes.
- Maintenance: Ensuring proper maintenance to extend the thermostat’s lifespan.
These aspects are interconnected and play a crucial role in the overall functionality of the Nest Thermostat. Compatibility ensures that the thermostat can communicate with the HVAC system, while safety precautions minimize the risk of electrical hazards. Proper wiring and terminal identification guarantee accurate control of heating and cooling, while troubleshooting helps resolve any issues that may arise. Regular maintenance prolongs the thermostat’s life and ensures optimal performance, maximizing energy efficiency and home comfort.
Compatibility
Compatibility between the Nest Thermostat and the HVAC system is a cornerstone of successful wiring and operation. Ensuring compatibility encompasses several key aspects:
- Thermostat Model: Different Nest Thermostat models may have varying compatibility requirements. It is essential to check the manufacturer’s specifications to determine compatibility with the specific HVAC system.
- HVAC System Type: Nest Thermostats are designed to work with various HVAC system types, including forced air, heat pumps, and radiant heating. Verifying compatibility ensures that the thermostat can effectively control the heating and cooling functions.
- Wiring Configuration: The wiring configuration of the HVAC system must be compatible with the Nest Thermostat’s terminal connections. Mismatched wiring can lead to incorrect operation or damage to the thermostat.
- Power Requirements: The Nest Thermostat requires a specific voltage range for operation. Compatibility verification includes ensuring that the HVAC system provides the necessary power to the thermostat.
Verifying compatibility between the Nest Thermostat and HVAC system is crucial for proper functionality, safety, and energy efficiency. By carefully considering these aspects, homeowners can ensure a seamless and optimal heating and cooling experience.
Safety
Safety precautions and adherence to electrical codes are paramount when installing a Nest Thermostat. Neglecting these vital aspects can lead to electrical hazards, property damage, and compromised personal safety.
- Turn Off Power: Before initiating any wiring, it is imperative to turn off the power to the HVAC system at the circuit breaker or fuse box. This crucial step eliminates the risk of electrical shock and prevents potential damage to the thermostat or HVAC components.
- Proper Wiring: Meticulously follow the provided wiring diagram and ensure secure connections. Loose or incorrect wiring can result in malfunctioning thermostats, inefficient system operation, and even electrical fires.
- Grounding: Grounding the thermostat is essential for safety. Improper grounding can lead to electrical shocks and damage to the thermostat or HVAC equipment. Verify that the thermostat is correctly grounded according to electrical codes.
- Professional Assistance: If uncertain about any aspect of the installation process, do not hesitate to seek professional assistance from a qualified electrician. They possess the expertise to ensure a safe and code-compliant installation.
By prioritizing safety and adhering to electrical codes during installation, individuals can safeguard their homes and families from potential hazards. These precautions contribute to the longevity and optimal performance of the Nest Thermostat, ensuring a comfortable and energy-efficient indoor environment.
Tools
In the context of Nest Thermostat Wiring Help, assembling the right tools and materials is fundamental for a successful installation and seamless operation. This encompasses various facets, each playing a crucial role in ensuring accuracy, safety, and efficiency.
- Screwdriver: Essential for tightening terminal screws and securing the thermostat faceplate. Both Phillips and flathead screwdrivers may be necessary depending on the thermostat model.
- Wire Strippers: Used to remove insulation from wires, ensuring proper electrical connections. Choose wire strippers designed for the specific wire gauge being used.
- Electrical Tape: Insulates and protects wire connections, preventing short circuits and ensuring safe operation. Use high-quality electrical tape that conforms to electrical codes.
- Level: Ensures the thermostat is mounted straight, maintaining a professional appearance and aiding accurate temperature readings. A small bubble level or torpedo level is suitable for this task.
Having the appropriate tools and materials on hand not only streamlines the installation process but also contributes to the overall safety and reliability of the Nest Thermostat system. By carefully gathering these essential components, individuals can confidently undertake the wiring process, ensuring optimal performance and peace of mind.
Wiring Diagram
When undertaking Nest Thermostat Wiring Help, interpreting the wiring diagram provided with the thermostat is a critical component that ensures a successful installation and optimal performance. It serves as a roadmap, guiding individuals through the process of connecting the thermostat to the HVAC system. Without a clear understanding of the wiring diagram, attempts to wire the thermostat may result in incorrect connections, system malfunctions, or even electrical hazards.
Real-life examples within Nest Thermostat Wiring Help illustrate the importance of wiring diagram interpretation. For instance, misinterpreting the terminals for the heating and cooling wires can lead to reversed functionality, where the thermostat triggers heating during cooling cycles and vice versa. Additionally, failing to identify the common wire, which provides a continuous power supply to the thermostat, can result in intermittent operation or complete system failure.
Practically, understanding the wiring diagram empowers individuals to troubleshoot and resolve common wiring issues. By tracing the connections depicted in the diagram, homeowners can identify loose wires, damaged terminals, or incorrect wire sizing, enabling them to make the necessary adjustments and restore proper functionality. Moreover, the ability to interpret wiring diagrams allows for customization and integration with other smart home devices, enhancing the overall home automation experience.
In summary, interpreting the wiring diagram provided with the thermostat is a fundamental aspect of Nest Thermostat Wiring Help. It provides a visual representation of the electrical connections, enabling individuals to install, troubleshoot, and customize their thermostats effectively. By understanding the wiring diagram, homeowners can ensure the safe, efficient, and optimal operation of their Nest Thermostats, contributing to a comfortable and energy-efficient indoor environment.
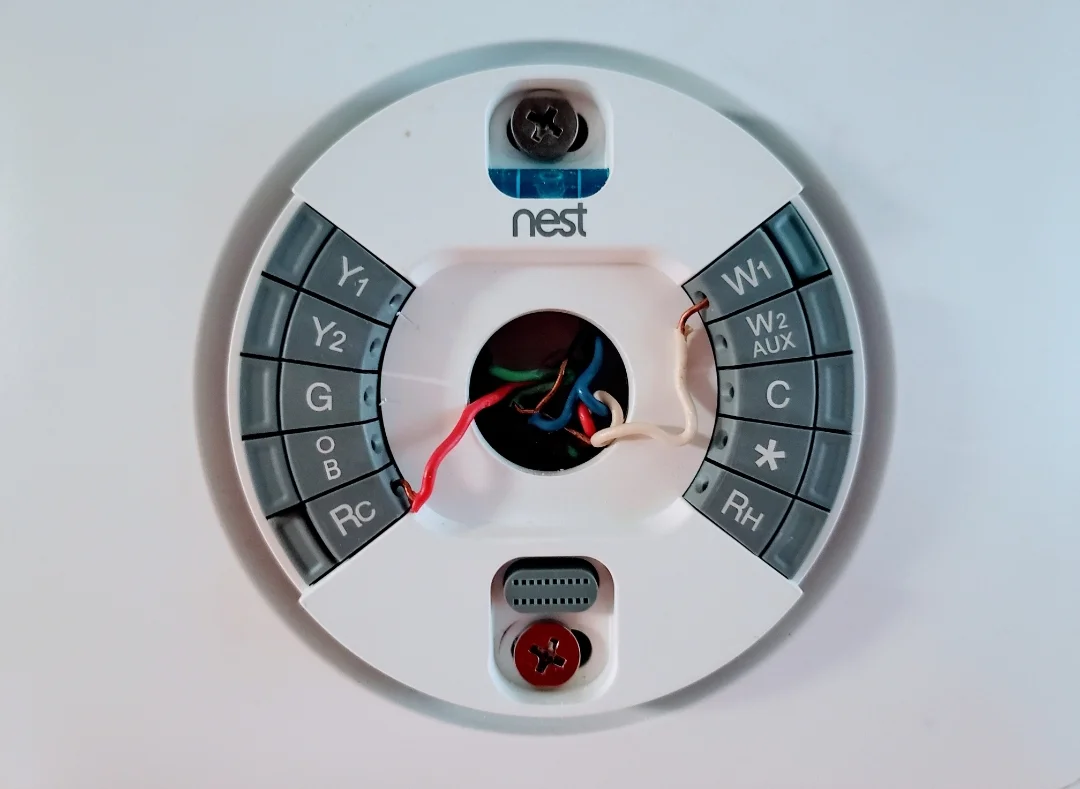
Terminal Identification
Within the context of Nest Thermostat Wiring Help, identifying the correct terminals on both the thermostat and the HVAC system is a crucial aspect that lays the foundation for successful installation, efficient operation, and accurate temperature control. Misidentification or incorrect wiring of terminals can lead to system malfunctions, diminished performance, or even safety hazards.
- Terminal Types: Understanding the different types of terminals found on thermostats and HVAC systems, such as R, C, G, Y, and W, is essential for proper wire connections. Each terminal serves a specific function, and matching the wires to the corresponding terminals ensures the thermostat can correctly control heating, cooling, and other system operations.
- Wire Color Codes: Many HVAC systems use color-coded wires to simplify the identification process. Matching the wire colors to the corresponding terminals, as specified in the thermostat’s wiring diagram, eliminates guesswork and reduces the risk of errors during installation.
- Compatibility Check: Verifying the compatibility between the thermostat and the HVAC system’s terminal layout is crucial. Some thermostats may require specific terminal configurations or jumper wires for proper functionality. Failing to consider compatibility can result in incorrect wiring and system malfunctions.
- Troubleshooting: Accurate terminal identification is also vital for troubleshooting common wiring issues. By tracing the wires from the thermostat to the HVAC system and ensuring they are connected to the correct terminals, homeowners can isolate and resolve problems related to incorrect wiring, loose connections, or faulty components.
In summary, terminal identification is an integral part of Nest Thermostat Wiring Help, ensuring proper system operation, preventing malfunctions, and enabling effective troubleshooting. By carefully identifying and connecting the terminals on the thermostat and HVAC system, homeowners can ensure their thermostats function optimally, delivering efficient temperature control, energy savings, and a comfortable indoor environment.
Wire Connections
Establishing proper wire connections between the thermostat and the HVAC system is a crucial aspect of Nest Thermostat Wiring Help. Correctly connecting wires ensures seamless communication, accurate temperature control, and efficient system operation. Oversights in this area can lead to malfunctions, inaccurate readings, or even safety hazards.
- Terminal Tightening: Verifying secure connections at the thermostat terminals is essential. Loose wires can cause intermittent operation, false readings, or even electrical hazards. Using a screwdriver to tighten the terminal screws ensures a snug fit and reliable contact.
- Wire Stripping: Proper wire stripping is crucial to establish good electrical connections. Removing too much insulation can expose bare wire, leading to shorts or arcing. Conversely, insufficient stripping may result in poor contact and connection failures. Using wire strippers designed for the specific wire gauge ensures precise and consistent stripping.
- Correct Wire Gauge: Utilizing wires with the appropriate gauge is essential for safe and efficient operation. Undersized wires may overheat and pose a fire hazard, while oversized wires can be difficult to work with and may not fit properly in terminals. Referring to the thermostat’s specifications and following electrical codes ensures the use of appropriate wire gauges.
- Wire Routing: Proper wire routing minimizes interference and ensures a clean and organized installation. Keeping wires separated from high-voltage lines, sharp edges, and heat sources prevents damage and potential hazards. Using wire loom or cable ties helps bundle and protect the wires, improving aesthetics and safety.
By carefully considering and addressing these facets of wire connections, individuals can increase the likelihood of a successful Nest Thermostat installation. Proper wire connections contribute to accurate temperature control, efficient energy usage, and overall system reliability. Overlooking these aspects can lead to frustrations, system malfunctions, and the need for costly repairs. Therefore, meticulous attention to wire connections is a fundamental aspect of Nest Thermostat Wiring Help, ensuring a safe, efficient, and comfortable indoor environment.
Powering Up
Within the context of “Nest Thermostat Wiring Help,” “Powering Up: Safely restoring power to the system and testing the thermostat” represents a critical step that ensures the proper functioning of the thermostat and HVAC system. It involves meticulously restoring power to the system and conducting thorough testing to verify accurate operation.
- Power Restoration: After wiring is complete, power must be restored to the system by turning on the circuit breaker or fuse associated with the HVAC equipment. Failing to do so will prevent the thermostat from receiving power and operating correctly.
- Initial Power-Up: Once power is restored, the thermostat should power up and initiate its startup sequence. During this phase, the display will typically illuminate, and the thermostat will go through self-checks to ensure proper functionality.
- Testing Basic Functions: Basic thermostat functions, such as adjusting the temperature setpoint and switching between heating and cooling modes, should be tested to verify if they are working as intended. This ensures that the thermostat has been wired correctly and is communicating effectively with the HVAC system.
- System Response: Observe the response of the HVAC system when commands are issued from the thermostat. For instance, when the thermostat calls for heating, the furnace or heat pump should turn on and start heating the space. Similarly, when cooling is requested, the air conditioner or heat pump should activate and begin cooling the space.
By carefully following the steps outlined above, individuals can safely restore power to the system and test the thermostat, ensuring it operates as expected. This comprehensive approach minimizes the risk of electrical hazards, optimizes system performance, and contributes to a comfortable and energy-efficient indoor environment.
Troubleshooting
Within the realm of “Nest Thermostat Wiring Help,” troubleshooting plays a crucial role in addressing common wiring issues and error codes that may arise during the installation or operation of a Nest Thermostat. This comprehensive process involves identifying potential problems, understanding their causes, and implementing appropriate solutions to ensure seamless system functionality and user satisfaction.
- Error Code Interpretation: Nest Thermostats display error codes when they encounter operational issues. Troubleshooting involves understanding the specific meaning of each error code, which often indicates a particular wiring problem or system malfunction. By cross-referencing the error code with the manufacturer’s documentation or online resources, users can quickly identify the underlying cause and proceed with the appropriate troubleshooting steps.
- Loose Connections: Loose wire connections are a common source of problems in Nest Thermostat installations. Troubleshooting involves physically inspecting all wire connections at the thermostat and the HVAC system, ensuring they are secure and making good contact. Loose connections can lead to intermittent operation, incorrect temperature readings, or complete system failure. Tightening loose connections often resolves these issues and restores proper thermostat functionality.
- Incorrect Wiring: Incorrect wiring is another common issue that can trigger troubleshooting. This may occur due to misidentification of terminals, reversed polarity, or incorrect wire sizing. Troubleshooting incorrect wiring involves carefully checking the wiring against the thermostat’s wiring diagram and the HVAC system’s documentation. Correcting any wiring errors and ensuring proper connections are made resolves these issues and allows the thermostat to operate as intended.
- Faulty Components: In some cases, troubleshooting may reveal faulty components within the Nest Thermostat or the HVAC system. This could include malfunctioning sensors, damaged wires, or failed circuit boards. Troubleshooting involves isolating the faulty component through a process of elimination and replacing it with a new one. Replacing faulty components restores system functionality and ensures accurate temperature control and efficient operation.
By understanding the common wiring issues and error codes associated with Nest Thermostats, and by following a systematic troubleshooting approach, users can effectively resolve problems, ensure optimal thermostat performance, and maintain a comfortable and energy-efficient indoor environment. Troubleshooting empowers users to take control of their Nest Thermostat systems, minimizing the need for costly professional assistance and maximizing the benefits of their smart home technology.
Maintenance
Within the comprehensive realm of “Nest Thermostat Wiring Help,” “Maintenance: Ensuring proper maintenance to extend the thermostat’s lifespan” stands as a crucial aspect that often goes overlooked yet holds significant implications for the longevity, efficiency, and overall user experience of a Nest Thermostat system. By understanding and implementing proper maintenance practices, users can effectively prolong the lifespan of their thermostats, minimize the risk of costly repairs or replacements, and ensure optimal performance over an extended period.
- Regular Cleaning: Regular cleaning of the Nest Thermostat, including its display and sensors, is essential to maintain its accuracy and functionality. Dust accumulation and dirt buildup can interfere with sensor readings, leading to incorrect temperature readings and inefficient system operation. Using a soft cloth and mild cleaning solutions, users should gently wipe down the thermostat’s surfaces to remove any dirt or debris that may have accumulated over time.
- Battery Replacement: Nest Thermostats utilize batteries as a backup power source in the event of a power outage. Regular battery replacement ensures that the thermostat retains its settings and continues to operate seamlessly even during power interruptions. Users should refer to the manufacturer’s recommendations for the specific battery type and replacement schedule to ensure uninterrupted thermostat operation.
- Firmware Updates: Nest Thermostats receive periodic firmware updates that introduce new features, improve functionality, and address potential bugs or security vulnerabilities. Installing these updates is crucial to keep the thermostat operating at its best and taking advantage of the latest advancements in smart home technology. Users can check for available updates through the Nest app or by visiting the manufacturer’s website.
- Professional Inspection: In addition to regular user maintenance, scheduling periodic professional inspections is recommended to ensure the overall health and performance of the Nest Thermostat system. A qualified HVAC technician can thoroughly inspect the thermostat, wiring connections, and HVAC equipment, identify any potential issues, and perform necessary maintenance or repairs to prevent minor problems from escalating into major ones.
By embracing a proactive approach to maintenance and incorporating these key practices into their routines, users can significantly extend the lifespan of their Nest Thermostats, ensuring years of reliable and efficient temperature control in their homes. Regular cleaning, timely battery replacement, firmware updates, and professional inspections empower users to take ownership of their smart home systems, maximize their benefits, and create a comfortable and energy-efficient indoor environment.


Related Posts


