Wiring a Mini Split entails connecting electrical wires to an indoor and an outdoor unit of a mini-split air conditioning system. This process ensures proper communication and power supply between the units to maintain a comfortable indoor environment.
Mini splits offer several advantages: they are energy-efficient, provide zone-specific cooling or heating, and are relatively easy to install. A notable historical development was the introduction of inverter technology, which significantly enhanced energy efficiency and reduced operating noise.
This article will delve into the specific steps involved in wiring a mini split, discussing safety precautions, wire gauge selection, and troubleshooting tips. It will also explore advanced features such as Wi-Fi connectivity and multi-zone control, empowering readers with the knowledge to effectively wire and manage mini-split systems for optimal performance.
Wiring a mini split is a crucial aspect of installing and maintaining a mini-split air conditioning system. It involves connecting electrical wires between the indoor and outdoor units, ensuring proper communication and power supply for efficient operation.
- Electrical Safety: Adhering to electrical codes and safety guidelines is paramount to prevent electrical hazards.
- Wire Gauge Selection: Choosing the correct wire gauge is essential for handling the electrical load and minimizing voltage drop.
- Conduit and Cable Management: Properly routing and securing wires within conduit or cable trays ensures protection and longevity.
- Indoor Unit Wiring: Connecting wires to the indoor unit involves handling electrical terminals and ensuring proper polarity.
- Outdoor Unit Wiring: Connecting wires to the outdoor unit requires weatherproofing and protection from the elements.
- Refrigerant Line Connection: Wiring is closely coordinated with the installation of refrigerant lines to maintain system integrity.
- Power Supply: Establishing a reliable power source is crucial for stable operation of the mini split system.
- Control Wiring: Wires facilitate communication between the indoor and outdoor units, enabling remote control and temperature adjustment.
- Troubleshooting: Understanding wiring principles aids in diagnosing and resolving electrical issues.
- Maintenance: Regular inspection and maintenance of wiring connections ensure optimal performance and longevity.
These aspects are interconnected and essential for the safe, efficient, and reliable operation of a mini split system. Proper wiring practices contribute to energy efficiency, system longevity, and a comfortable indoor environment. Understanding these aspects is crucial for HVAC technicians, installers, and homeowners alike.
Electrical Safety
When wiring a mini split system, adhering to established electrical codes and safety guidelines plays a critical role in preventing electrical hazards that could compromise the safety of individuals and property.
- Grounding: Proper grounding ensures a safe electrical path for excess electrical current, minimizing the risk of electric shock and electrical fires.
- Circuit Protection: Circuit breakers or fuses protect electrical circuits from overcurrent, preventing overheating and potential fires.
- Wire Insulation: Insulated wires prevent electrical shock and short circuits, ensuring safe operation of the mini split system.
- Qualified Electrician: Hiring a qualified electrician ensures adherence to electrical codes and safe installation practices.
By following electrical safety guidelines and using appropriate materials and techniques, individuals can minimize electrical hazards associated with wiring a mini split system, ensuring a reliable and safe operation.
Wire Gauge Selection
When wiring a mini split, selecting the appropriate wire gauge is crucial for ensuring efficient and safe operation. Inadequate wire gauge can lead to voltage drop, power loss, and potential electrical hazards. Conversely, selecting a wire gauge that is too large can result in unnecessary material costs and wasted space.
- Electrical Load: The electrical load determines the current that will flow through the wires. Heavier electrical loads require larger wire gauges to handle the higher current without excessive voltage drop.
- Wire Length: Longer wire runs experience greater voltage drop compared to shorter runs. Therefore, longer runs require larger wire gauges to compensate for the increased resistance.
- Wire Material: Different wire materials have varying resistance properties. For example, copper wire has lower resistance than aluminum wire, allowing for smaller gauge sizes for the same electrical load.
- Ambient Temperature: High ambient temperatures can increase wire resistance, leading to greater voltage drop. In such cases, larger wire gauges may be necessary to mitigate the impact of temperature.
By considering these factors and selecting the appropriate wire gauge, individuals can ensure that their mini split system operates efficiently and safely, minimizing energy losses and potential electrical issues.
Conduit and Cable Management
In the context of wiring a mini split system, conduit and cable management play a crucial role in safeguarding the electrical wires and enhancing the longevity of the installation. Proper routing and securing of wires within conduit or cable trays offer several advantages:
- Protection against Physical Damage: Conduit and cable trays provide a physical barrier, protecting wires from accidental damage, crushing, or cuts that could compromise their integrity.
- Prevention of Electrical Hazards: By keeping wires organized and separated, conduit and cable management minimize the risk of short circuits and electrical fires, ensuring a safer operating environment.
- Improved Aesthetics: Concealing wires within conduit or cable trays enhances the visual appeal of the installation, contributing to a cleaner and more professional finish.
- Simplified Maintenance: Well-organized and accessible wiring erleichtert future maintenance and troubleshooting, reducing downtime and costs.
Real-life examples of conduit and cable management in mini split installations include:
- Routing wires through conduit along walls or ceilings to protect them from physical damage and maintain a clean appearance.
- Using cable trays to organize and support multiple wires running between the indoor and outdoor units, ensuring proper separation and preventing tangles.
- Enclosing wires within flexible conduit when passing through walls or tight spaces to protect them from sharp edges or abrasion.
Understanding the importance of conduit and cable management in wiring a mini split is essential for ensuring a safe, reliable, and long-lasting installation. By adhering to proper routing and securing techniques, individuals can protect the electrical wires, prevent hazards, and enhance the overall quality of the mini split system.
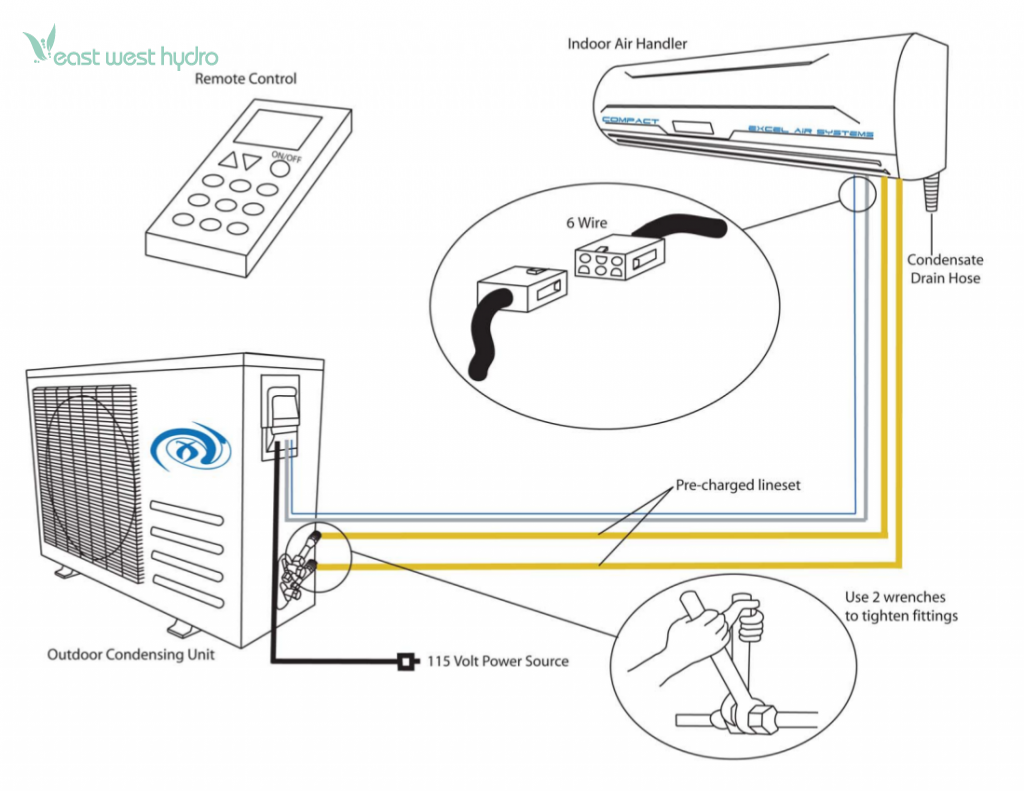
Indoor Unit Wiring
Indoor unit wiring is a crucial component of wiring a mini split system. It involves connecting electrical wires to the indoor unit, ensuring proper polarity, and handling electrical terminals. Incorrect wiring can lead to system malfunctions, safety hazards, and reduced efficiency.
When connecting wires to the indoor unit, it is essential to follow the manufacturer’s instructions carefully. Each wire must be securely connected to the correct terminal, and the polarity must be correct. Reversing the polarity can damage the system or prevent it from operating correctly.
Real-life examples of indoor unit wiring include connecting wires to the power supply, the control board, and the compressor. These connections must be made properly to ensure that the indoor unit receives power, communicates with the outdoor unit, and operates efficiently.
Understanding indoor unit wiring is essential for technicians and homeowners who are installing or maintaining mini split systems. By following proper wiring practices, individuals can ensure a safe, reliable, and efficient mini split system.
Outdoor Unit Wiring
In the context of wiring a mini split system, outdoor unit wiring plays a critical role in ensuring the system’s durability and reliable operation. Unlike indoor wiring, outdoor wiring is exposed to various environmental elements that can cause damage or interfere with the system’s performance. Therefore, proper weatherproofing and protection of the electrical wires and connections are essential.
- Weatherproofing: Outdoor unit wiring must be weatherproof to withstand exposure to rain, snow, and moisture. This involves using waterproof connectors, sealing wire entry points, and employing weather-resistant insulation materials.
- UV Protection: Direct sunlight can degrade wire insulation over time, leading to potential electrical hazards. UV-resistant insulation or conduit should be used to protect wires from sun exposure.
- Temperature Fluctuations: Outdoor temperatures can vary significantly throughout the year. Wires and connections should be rated to withstand extreme temperatures without compromising their integrity.
- Physical Protection: Outdoor unit wiring may be exposed to physical damage from wind, debris, or accidental impact. Conduit or other protective measures should be used to safeguard the wires from these hazards.
By implementing proper weatherproofing and protection measures for outdoor unit wiring, individuals can ensure the longevity and reliability of their mini split system. Neglecting these aspects can lead to premature failure, electrical issues, or safety hazards, ultimately compromising the system’s performance and user safety.
Refrigerant Line Connection
In the process of wiring a mini split system, refrigerant line connection plays a crucial role in ensuring the system’s efficient and reliable operation. Proper wiring is closely coordinated with the installation of refrigerant lines to maintain system integrity, encompassing various aspects that demand attention to detail and precision.
- Line Set Connection: Connecting the indoor and outdoor units requires precise alignment and tightening of refrigerant lines to prevent leaks and ensure proper refrigerant flow. This involves using specialized tools and techniques to achieve a leak-proof connection.
- Electrical Wiring Coordination: Refrigerant line installation often involves running electrical wires alongside the lines to power components such as the compressor and expansion valve. Coordinating the wiring with the refrigerant lines ensures proper communication and control of the system.
- Condensate Drain Installation: During the cooling process, condensation forms on the evaporator coils and must be properly drained away. Refrigerant line installation includes the installation of a condensate drain line to direct the condensate to a designated drain point.
- Insulation and Protection: Refrigerant lines are insulated to minimize heat gain or loss and protect them from external elements. Wiring is often bundled together with the refrigerant lines and insulation to provide additional protection and organization.
These facets of refrigerant line connection highlight the interconnectedness of wiring and refrigerant lines in a mini split system. Proper coordination and attention to detail during installation are essential to maintain system integrity, prevent leaks, and ensure efficient cooling or heating operation.
Power Supply
In the context of wiring a mini split system, establishing a reliable power supply is a fundamental requirement for ensuring stable and efficient operation. The power supply provides the electrical energy necessary to drive the system’s components, including the compressor, fan motor, and control circuitry.
The wiring of a mini split system involves connecting the indoor and outdoor units to a dedicated electrical circuit. This circuit must be properly sized to handle the electrical load of the system and should be protected by a circuit breaker or fuse to prevent overcurrent conditions. The wiring must also be installed in accordance with local electrical codes and regulations to ensure safety and reliability.
Real-life examples of power supply considerations in mini split installations include:
- Selecting the appropriate wire gauge and circuit breaker rating based on the electrical load of the system.
- Running dedicated electrical lines from the main electrical panel to the indoor and outdoor units.
- Installing surge protectors or uninterruptible power supplies (UPS) to protect the system from power surges or outages.
Understanding the importance of a reliable power supply in wiring a mini split system is essential for ensuring the system’s proper operation, energy efficiency, and longevity. Neglecting this aspect can lead to system malfunctions, premature failure, and potential safety hazards.
Control Wiring
Control wiring is a critical component of wiring a mini split system. It provides the communication pathway between the indoor and outdoor units, allowing for remote control and temperature adjustment. Without proper control wiring, the system would not be able to function effectively or efficiently.
The control wiring typically consists of several wires that transmit signals related to the desired temperature, fan speed, and other operating parameters. These wires are connected to a control board or thermostat, which interprets the signals and sends commands to the outdoor unit. The outdoor unit then adjusts its operation accordingly to meet the desired settings.
Real-life examples of control wiring in a mini split system include:
- Connecting wires between the indoor unit and the outdoor unit to transmit temperature and fan speed signals.
- Wiring a remote control to the indoor unit to allow for wireless control of the system.
- Connecting a thermostat to the indoor unit to provide centralized temperature control and scheduling.
Understanding the role of control wiring in wiring a mini split system is essential for ensuring proper system operation and user convenience. By ensuring that the control wiring is properly installed and maintained, homeowners and technicians can optimize the performance and comfort of their mini split systems.
Troubleshooting
In the context of wiring a mini split system, troubleshooting is a crucial aspect that ensures the system’s reliable operation and longevity. Understanding wiring principles empowers individuals to diagnose and resolve electrical issues, minimizing downtime and maintaining optimal performance.
- Identifying Faulty Components: By understanding wiring principles, technicians can systematically test and identify faulty components, such as loose connections, damaged wires, or malfunctioning relays.
- Interpreting Electrical Codes: Troubleshooting electrical issues often involves interpreting electrical codes and standards. Understanding these codes enables individuals to trace wiring circuits, identify potential hazards, and ensure compliance with safety regulations.
- Using Diagnostic Tools: Specialized diagnostic tools, such as multimeters and voltage testers, can aid in troubleshooting electrical issues. Understanding wiring principles is essential for using these tools effectively and interpreting the readings they provide.
- Resolving Electrical Problems: Armed with the knowledge of wiring principles, individuals can safely resolve electrical problems, such as repairing damaged wires, replacing faulty components, or adjusting electrical connections. This proactive approach minimizes the risk of further damage and ensures the system’s efficient operation.
Troubleshooting electrical issues in a mini split system requires a combination of theoretical knowledge and practical skills. By understanding wiring principles, technicians and homeowners can approach troubleshooting with confidence, ensuring the reliable and efficient operation of their mini split systems.
Maintenance
Regular inspection and maintenance of wiring connections are crucial components of wiring a mini split system to ensure its optimal performance and longevity. Neglecting maintenance can lead to various issues that compromise the system’s efficiency, reliability, and lifespan.
Loose connections, for instance, can result in increased electrical resistance, leading to energy loss, overheating, and potential fire hazards. Corrosion and wear over time can also weaken wire insulation, increasing the risk of short circuits and electrical shocks.
Real-life examples of maintenance tasks include periodically checking and tightening all electrical connections, inspecting wires for damage or fraying, and cleaning terminals to prevent corrosion. Regular maintenance also involves monitoring refrigerant levels and ensuring proper airflow to prevent icing and other performance issues.
Understanding the importance of maintenance empowers homeowners and technicians to proactively address potential problems before they escalate into costly repairs or system failures. By adhering to maintenance schedules and addressing issues promptly, individuals can extend the lifespan of their mini split systems, minimize energy consumption, and maintain a safe and comfortable indoor environment.


Related Posts


