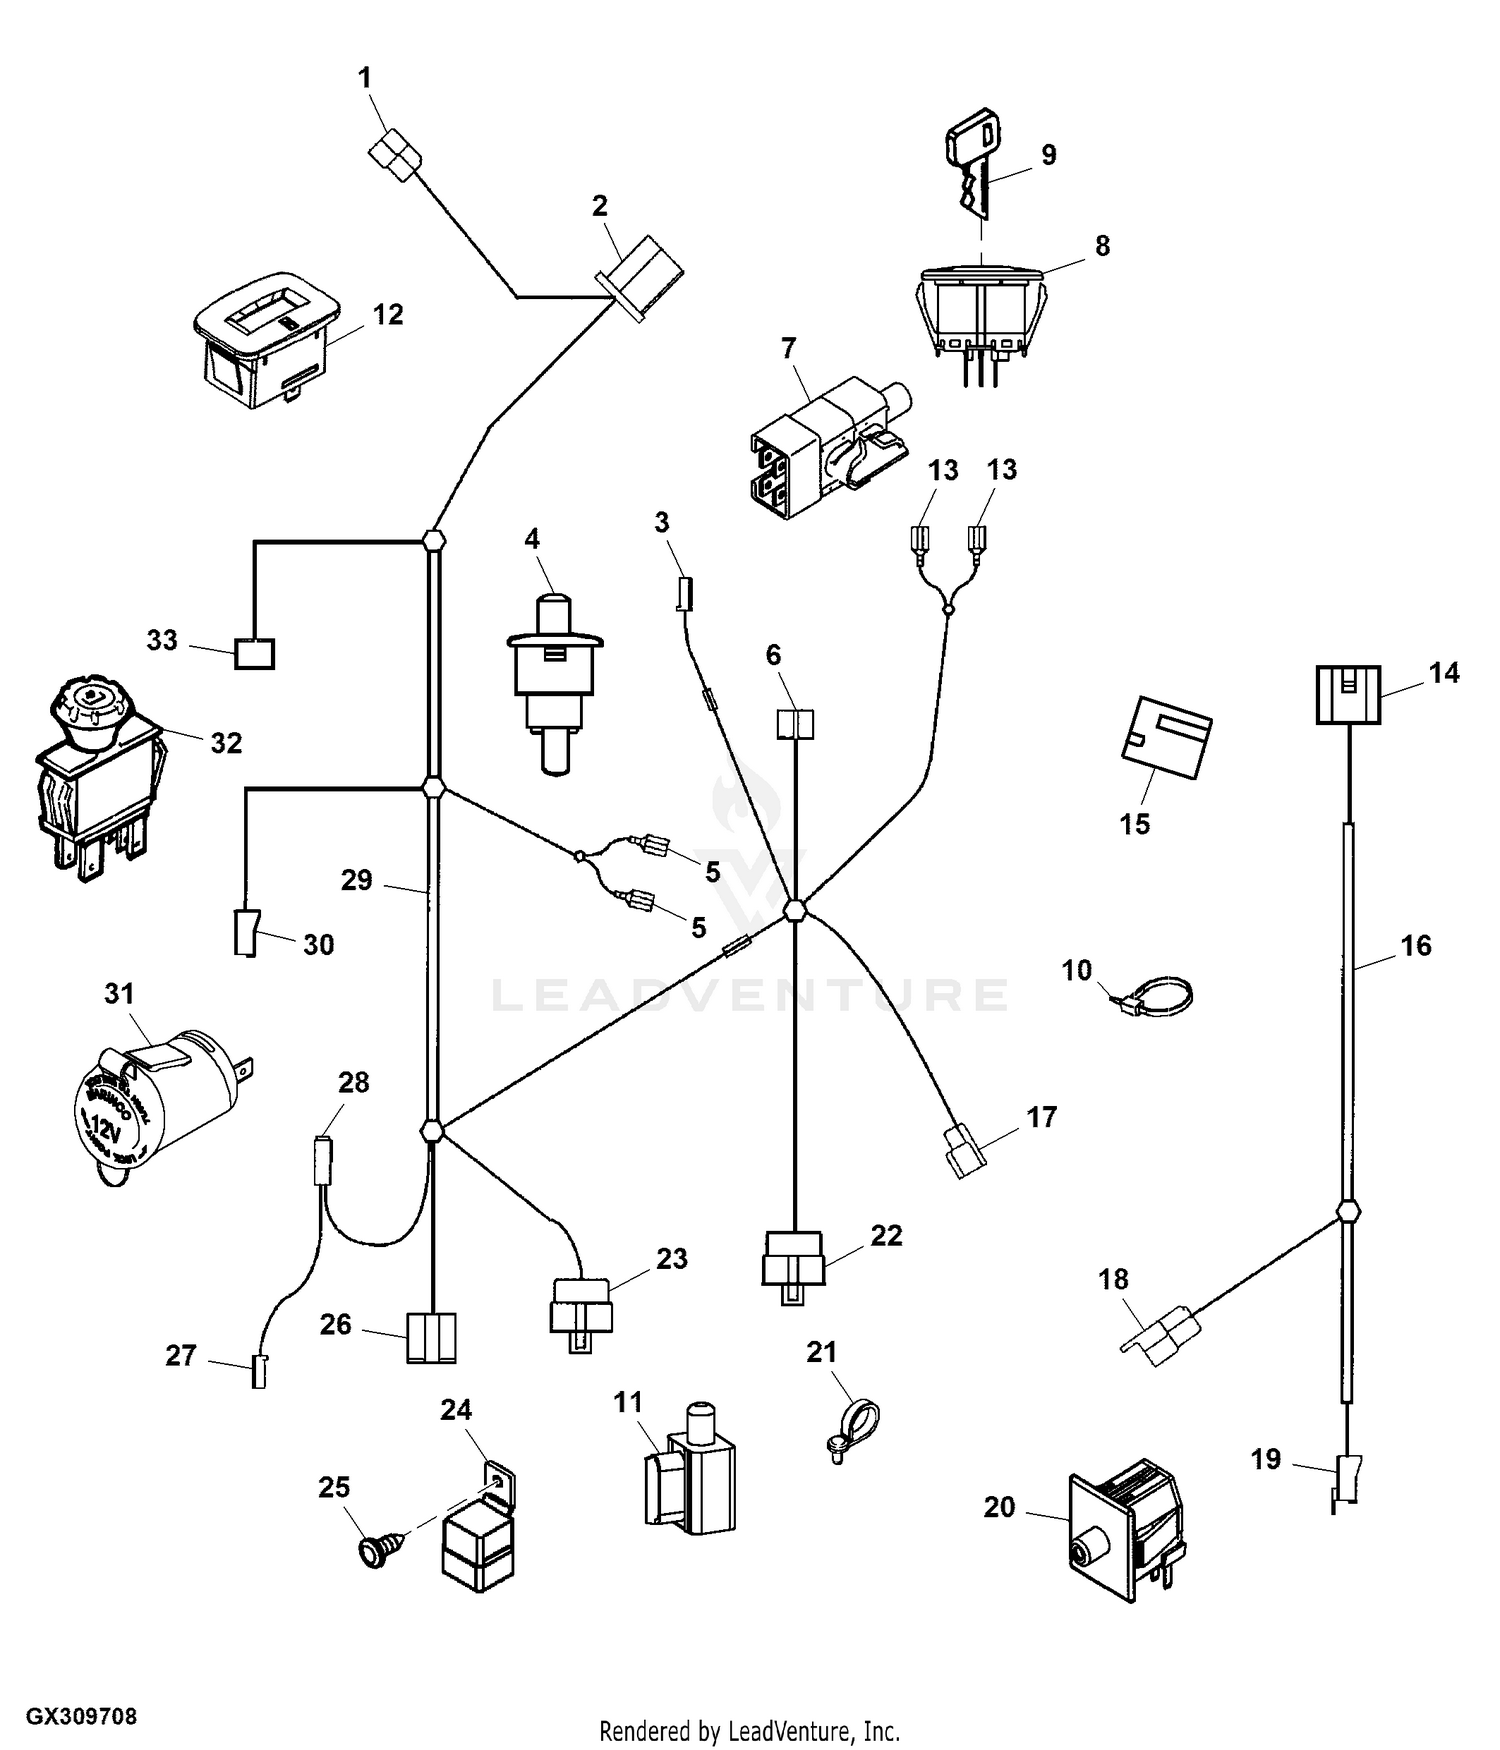
A John Deere L120 wiring diagram is a detailed plan that shows the electrical connections of the L120 lawn tractor. It illustrates the flow of electricity through the tractor’s various components, including the engine, ignition system, lighting, and safety features.
Wiring diagrams are essential for troubleshooting electrical problems, as they allow technicians to trace the flow of electricity and identify any points of failure. They are also helpful for understanding the function of the tractor’s electrical system and making modifications or repairs.
One key historical development in the field of electrical diagrams was the standardization of symbols and conventions. This standardization made it easier for technicians to interpret diagrams across different manufacturers and models. Today, wiring diagrams are an indispensable tool for anyone working on electrical systems.
The John Deere L120 Wiring Diagram is a crucial document that provides a visual representation of the electrical connections within the L120 lawn tractor. Understanding the various aspects of this diagram is essential for troubleshooting electrical problems, performing maintenance, and making modifications to the tractor’s electrical system.
- Components: The diagram identifies all of the electrical components in the tractor, including the battery, starter, alternator, ignition coil, and various sensors and switches.
- Wiring: The diagram shows the routing of all of the electrical wires in the tractor, including their color coding and gauge.
- Connectors: The diagram shows the location of all of the electrical connectors in the tractor, including their type and pinout.
- Grounding: The diagram shows how the tractor’s electrical system is grounded, which is essential for safety and proper operation.
- Fuses and Circuit Breakers: The diagram shows the location of all of the fuses and circuit breakers in the tractor, which protect the electrical system from damage in the event of a short circuit or overload.
- Testing Points: The diagram shows the location of all of the testing points in the tractor, which can be used to troubleshoot electrical problems.
- Troubleshooting: The diagram can be used to troubleshoot electrical problems by tracing the flow of electricity through the system and identifying any points of failure.
- Maintenance: The diagram can be used to perform maintenance on the tractor’s electrical system, such as replacing fuses, cleaning connectors, and checking for loose wires.
- Modifications: The diagram can be used to make modifications to the tractor’s electrical system, such as adding accessories or upgrading components.
- Safety: The diagram can be used to ensure that the tractor’s electrical system is safe and operating properly.
These aspects of the John Deere L120 Wiring Diagram are all essential for understanding and working on the tractor’s electrical system. By having a thorough understanding of the diagram, you can troubleshoot problems, perform maintenance, and make modifications safely and effectively.
Components
Within the John Deere L120 Wiring Diagram, the identification of electrical components forms a crucial aspect, providing a comprehensive view of the tractor’s electrical system. The diagram serves as a roadmap, visually representing the interconnections and functionality of each component.
- Battery: The battery serves as the electrical energy reservoir, supplying power to the starter and other electrical components. Its voltage and capacity are critical factors in ensuring the tractor’s starting capability and overall electrical performance.
- Starter: The starter motor is responsible for cranking the engine, initiating the combustion process. Its power and durability are essential for reliable engine starts, especially in challenging conditions.
- Alternator: The alternator generates electrical power while the engine is running, recharging the battery and supplying electricity to the tractor’s electrical system. Its output capacity and efficiency are crucial for maintaining a stable electrical supply.
- Ignition Coil: The ignition coil amplifies the electrical current from the battery, creating a high-voltage spark that ignites the air-fuel mixture in the engine’s cylinders. Its performance directly impacts the engine’s starting and overall combustion efficiency.
Understanding the location, function, and interconnections of these components through the wiring diagram empowers technicians and operators to troubleshoot electrical issues, perform maintenance, and make informed decisions regarding electrical system upgrades or repairs. The comprehensive nature of the diagram ensures that all electrical components are accounted for, providing a holistic view of the tractor’s electrical architecture.
Wiring
In the context of the John Deere L120 Wiring Diagram, the aspect of “Wiring” holds significant importance, providing a detailed representation of the electrical pathways within the tractor. This information is essential for understanding the flow of electricity and diagnosing any electrical issues that may arise.
- Wire Types: The diagram identifies the different types of wires used in the tractor’s electrical system, including their gauge (thickness) and insulation. This information is crucial for selecting the appropriate wire for repairs or modifications, ensuring proper current carrying capacity and preventing electrical hazards.
- Color Coding: The diagram uses color coding to differentiate between different wires, making it easier to trace electrical circuits and identify their purpose. This color coding follows industry standards, allowing technicians to quickly identify wires, even in complex wiring harnesses.
- Wire Routing: The diagram shows the exact routing of all electrical wires throughout the tractor, including their entry and exit points for each component. This information is essential for troubleshooting electrical problems, as it allows technicians to visually trace the path of electricity and identify any potential breaks or shorts.
- Connector Types: The diagram also includes information about the types of connectors used in the wiring system, such as bullet connectors, spade connectors, and Deutsch connectors. This information is important for proper maintenance and repairs, as it ensures that the correct connectors are used to maintain a secure and reliable electrical connection.
Understanding the wiring aspect of the John Deere L120 Wiring Diagram is crucial for anyone working on the tractor’s electrical system. The detailed information provided in the diagram enables technicians to troubleshoot problems, perform maintenance, and make modifications with confidence, ensuring the safe and reliable operation of the tractor.
Connectors
Within the extensive details of the John Deere L120 Wiring Diagram, “Connectors” stands out as a vital aspect, providing a comprehensive overview of electrical connection points throughout the tractor. Understanding the types, locations, and pinouts of these connectors is essential for troubleshooting, maintenance, and modifications.
- Connector Types: The diagram identifies the various types of connectors used in the tractor’s electrical system, including bullet connectors, spade connectors, and Deutsch connectors. Knowing the specific type of connector is crucial for proper mating and secure connections, preventing electrical issues.
- Connector Locations: The diagram pinpoints the exact location of each electrical connector, making it easy to identify and access them during troubleshooting or maintenance. This information is especially valuable when tracing electrical circuits or diagnosing faults.
- Pinouts: The diagram provides detailed pinouts for each connector, specifying the function of each pin. This information is critical for proper wiring, ensuring that signals and power are routed correctly, preventing damage to components or incorrect operation.
- Connector Compatibility: By providing the type and pinout information, the diagram ensures that technicians can select compatible connectors for repairs or modifications. This compatibility is crucial for maintaining proper electrical connections and preventing malfunctions.
The detailed information on connectors in the John Deere L120 Wiring Diagram is invaluable for anyone working on the tractor’s electrical system. It empowers technicians to troubleshoot problems, perform maintenance, and make modifications with confidence, ensuring the reliable and efficient operation of the tractor.
Grounding
Grounding is a crucial aspect of the John Deere L120 Wiring Diagram, ensuring the safe and proper operation of the tractor’s electrical system. It provides a reference point for electrical circuits, allowing current to flow safely and preventing electrical shocks or damage to components.
- Chassis Ground: The tractor’s chassis serves as the primary ground point, providing a low-resistance path for current to flow back to the negative terminal of the battery. This ensures that all electrical components are properly grounded and protected from electrical faults.
- Ground Wires: Ground wires are used to connect electrical components to the chassis ground. These wires are typically green or black in color and provide a dedicated path for current to flow, preventing it from taking unintended paths through the tractor’s frame or other components.
- Grounding Points: The wiring diagram identifies specific grounding points on the tractor’s frame where ground wires should be connected. These points are carefully chosen to ensure optimal grounding and minimize electrical noise and interference.
- Safety Features: Proper grounding is essential for the proper operation of safety features such as circuit breakers and fuses. These devices rely on a good ground connection to function correctly and protect the electrical system from damage.
Understanding the grounding aspect of the John Deere L120 Wiring Diagram is crucial for ensuring the safe and reliable operation of the tractor. By following the diagram and using proper grounding techniques, technicians can prevent electrical problems, protect components from damage, and ensure the longevity of the tractor’s electrical system.
Fuses and Circuit Breakers
The aspect of “Fuses and Circuit Breakers” in the John Deere L120 Wiring Diagram holds great significance in ensuring the safety and reliability of the tractor’s electrical system. These components play a crucial role in protecting the electrical system from damage caused by electrical faults and overloads.
- Fuse Types: The diagram identifies the different types of fuses used in the tractor’s electrical system, including blade fuses, cartridge fuses, and thermal fuses. Each type has specific characteristics and applications, and understanding their differences is essential for proper fuse selection and replacement.
- Circuit Breaker Locations: The diagram shows the exact location of all circuit breakers in the tractor’s electrical system. Circuit breakers are resettable devices that protect circuits from overloads, and knowing their location is crucial for quick troubleshooting and resetting in case of a tripped breaker.
- Amperage Ratings: The diagram provides the amperage rating for each fuse and circuit breaker. The amperage rating indicates the maximum current that the device can safely handle before opening the circuit. Selecting the correct amperage rating is essential to prevent nuisance tripping or, more importantly, damage to electrical components.
- Protection Zones: The diagram groups fuses and circuit breakers based on the electrical zones they protect. This grouping helps technicians quickly identify the affected circuit in case of an electrical fault, reducing troubleshooting time.
Understanding the location, types, and functions of fuses and circuit breakers is essential for maintaining the integrity of the John Deere L120’s electrical system. By following the diagram and using proper electrical practices, technicians can prevent electrical fires, protect components from damage, and ensure the safe and efficient operation of the tractor.
Testing Points
Within the context of the John Deere L120 Wiring Diagram, “Testing Points” emerge as a critical component, facilitating efficient troubleshooting and ensuring the reliable operation of the tractor’s electrical system. These testing points provide access to specific electrical circuits and components, allowing technicians to measure voltage, current, and other parameters to identify and resolve electrical faults.
The strategic placement of testing points throughout the tractor’s electrical system enables technicians to quickly and accurately pinpoint the source of electrical problems. By using a voltmeter or other diagnostic tools, technicians can check for power at specific points in the circuit, measure voltage drops, and identify any interruptions or shorts in the wiring. This targeted approach to troubleshooting minimizes downtime and prevents unnecessary component replacements.
For instance, if a technician encounters an electrical issue with the tractor’s lighting system, they can refer to the wiring diagram to locate the testing points associated with the headlights, taillights, and other lighting components. By measuring voltage at these points, the technician can determine if the problem lies in the power supply, the wiring, or the lighting components themselves.
Understanding the location and purpose of testing points is crucial for effective troubleshooting of the John Deere L120’s electrical system. By utilizing these testing points in conjunction with the wiring diagram, technicians can diagnose electrical problems accurately, saving time and ensuring the safe and reliable operation of the tractor.
Troubleshooting
Within the comprehensive John Deere L120 Wiring Diagram, the aspect of Troubleshooting emerges as a vital component, empowering technicians and operators to diagnose and resolve electrical issues swiftly and effectively. By tracing the flow of electricity through the system and pinpointing any points of failure, the diagram serves as an invaluable tool for maintaining the optimal performance and safety of the tractor.
- Component Identification: The diagram provides a comprehensive overview of all electrical components within the tractor, including their location, function, and connectivity. This detailed representation enables technicians to quickly identify the specific components involved in an electrical problem, narrowing down the troubleshooting process.
- Circuit Analysis: The diagram allows technicians to analyze the flow of electricity through each circuit, tracing the path of current from the power source to the load. By understanding the intended flow of electricity, technicians can identify points where the circuit may be interrupted or shorted, leading to electrical malfunctions.
- Voltage and Continuity Testing: The diagram includes testing points strategically placed throughout the electrical system, enabling technicians to measure voltage and continuity at specific locations. These tests help identify open circuits, short circuits, or high resistance connections that may be causing electrical problems.
- Fault Isolation: The diagram facilitates the isolation of electrical faults by providing a visual representation of the system’s connectivity. By systematically testing each component and circuit, technicians can isolate the faulty component or connection, allowing for targeted repairs or replacements.
In summary, the Troubleshooting aspect of the John Deere L120 Wiring Diagram is an indispensable resource for diagnosing and resolving electrical problems. By providing a detailed representation of the system’s components, circuits, and testing points, the diagram empowers technicians to trace the flow of electricity, identify points of failure, and restore the electrical system to optimal functionality.
Maintenance
Within the comprehensive framework of the John Deere L120 Wiring Diagram, the aspect of Maintenance stands out as a cornerstone for ensuring the optimal performance and longevity of the tractor’s electrical system. The diagram serves as an invaluable resource for technicians and operators, providing detailed guidance on various maintenance tasks that are essential for maintaining the system’s reliability and efficiency.
- Fuse Replacement: The diagram clearly identifies the location and type of each fuse within the electrical system, enabling technicians to swiftly and accurately replace any blown fuses. This proactive maintenance step helps prevent electrical faults and ensures the proper functioning of various electrical components.
- Connector Cleaning: Over time, electrical connectors can accumulate dirt, corrosion, or moisture, leading to poor electrical contact and potential malfunctions. The diagram provides a visual representation of each connector’s location, allowing technicians to easily identify and clean these connections, ensuring optimal current flow and preventing electrical issues.
- Loose Wire Inspection: The diagram helps technicians systematically inspect the entire electrical system for any loose or damaged wires. Loose connections can cause intermittent electrical problems or even complete system failures. By following the diagram, technicians can thoroughly check all wire connections, ensuring they are secure and properly insulated.
- Battery Maintenance: The diagram provides detailed information about the tractor’s battery, including its location, type, and maintenance requirements. This information empowers technicians to perform regular battery checks, such as measuring voltage and electrolyte levels, and to take appropriate actions to maintain battery health and prevent premature failure.
These maintenance tasks, guided by the John Deere L120 Wiring Diagram, contribute significantly to the overall reliability and performance of the tractor’s electrical system. By proactively addressing potential issues through regular maintenance, technicians and operators can minimize downtime, enhance safety, and extend the lifespan of the electrical system.
Modifications
Within the comprehensive framework of the John Deere L120 Wiring Diagram, the aspect of Modifications emerges as a key component for customizing and enhancing the tractor’s electrical system. The diagram serves as a detailed guide, enabling technicians and operators to safely and effectively make modifications that suit their specific needs and preferences.
- Accessory Integration: The diagram provides a clear understanding of the electrical system’s architecture, allowing technicians to seamlessly integrate additional accessories, such as work lights, GPS receivers, or sound systems. By following the diagram, they can identify suitable connection points, ensuring proper power supply and functionality.
- Component Upgrades: The diagram facilitates the upgrading of existing electrical components to improve performance or reliability. For instance, technicians can refer to the diagram to replace halogen headlights with LED equivalents, enhancing visibility and energy efficiency.
- Custom Wiring: The diagram empowers technicians to create custom wiring harnesses for unique applications or modifications. By understanding the electrical system’s layout, they can design and implement custom wiring solutions that meet specific requirements, such as adding a winch or a hydraulic lift.
- Electrical Troubleshooting: Modifications to the electrical system can introduce complexities, making troubleshooting more challenging. However, the wiring diagram remains an invaluable tool during troubleshooting, as it enables technicians to trace modifications and identify potential issues.
The Modifications aspect of the John Deere L120 Wiring Diagram empowers users to tailor the tractor’s electrical system to their specific requirements. By understanding the system’s architecture and utilizing the diagram as a guide, technicians can confidently make modifications, ensuring optimal performance, enhanced functionality, and reliable operation.
Safety
The John Deere L120 Wiring Diagram plays a critical role in ensuring the safety and proper operation of the tractor’s electrical system. By providing a comprehensive overview of the system’s components, circuits, and connections, the diagram empowers technicians and operators to identify and address potential electrical hazards, preventing accidents and ensuring the longevity of the tractor.
One of the most important aspects of electrical safety is ensuring proper grounding. The wiring diagram clearly indicates the grounding points throughout the tractor’s electrical system, allowing technicians to verify that all components are properly grounded. This is essential for preventing electrical shocks, short circuits, and fires.
Additionally, the diagram helps identify potential overload conditions and provides guidance on selecting appropriate fuse ratings and circuit breakers. By following the diagram and using the correct electrical components, technicians can prevent overloading and overheating, which can lead to component damage or even electrical fires.

![[DIAGRAM] John Deere L120 Carburetor Diagram Wiring](https://i0.wp.com/patentimages.storage.googleapis.com/pages/US4869102-3.png?w=665&ssl=1)


Related Posts


