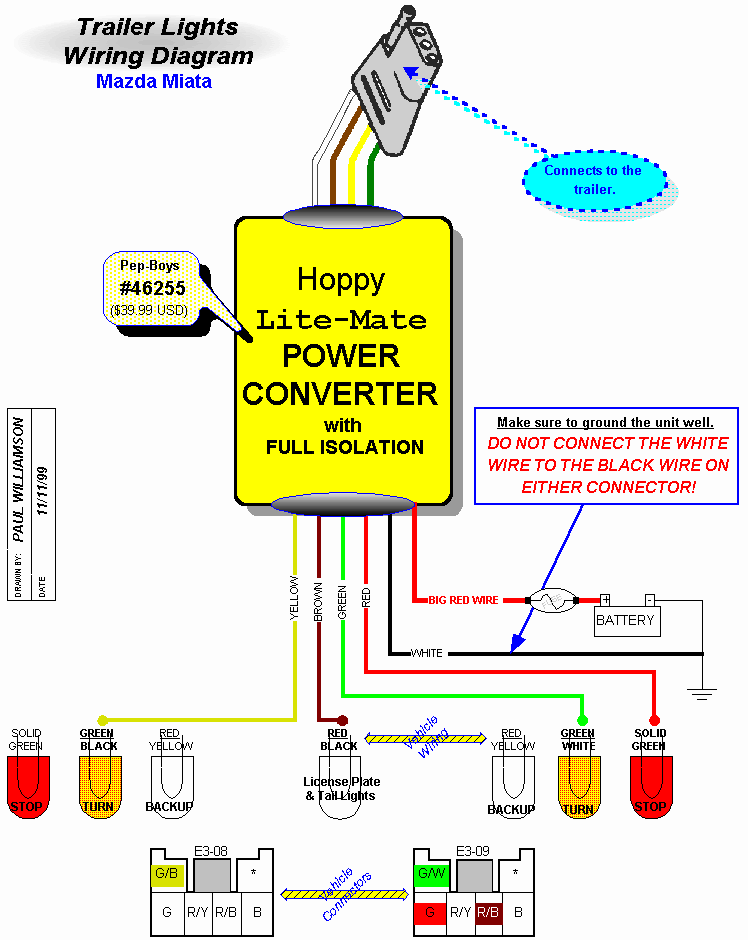
A “Trailer Light Wiring Diagram 4 Wire” is a schematic representation of the electrical connections between the tow vehicle and a trailer, featuring four wires for the necessary lighting operations. It illustrates the wiring and color-coding, typically including a white ground wire, a yellow left turn/brake wire, a green right turn/brake wire, and a brown tail/clearance light wire.
This wiring diagram ensures proper electrical communication for the trailer’s brake lights, turn signals, and tail lights. It enhances safety by ensuring that the driver’s intentions are clearly communicated to other motorists, reducing the risk of accidents. The standardized color-coding facilitates consistent wiring practices, simplifying troubleshooting and repairs.
The development of the four-wire trailer light wiring system marked a significant milestone in the evolution of trailer safety. It enabled the implementation of separate circuits for brake lights and turn signals, providing improved visibility and functionality. This innovation has paved the way for safer and more reliable towing operations.
When considering “Trailer Light Wiring Diagram 4 Wire,” identifying its part of speech helps us discern its function and significance. As a noun phrase, it represents a blueprint for the electrical connections between a tow vehicle and a trailer. Its essential aspects encompass various dimensions that affect the safety, functionality, and overall effectiveness of the wiring system.
- Grounding: Ensures a complete circuit for proper current flow.
- Wire Gauge: Determines the current-carrying capacity and voltage drop.
- Color Coding: Facilitates consistent wiring and troubleshooting.
- Circuit Protection: Prevents damage from electrical overloads.
- Connector Types: Ensures proper connection and weather resistance.
- Splicing Techniques: Maintains electrical integrity and prevents shorts.
- Testing Procedures: Verifies the functionality of the wiring system.
- Load Capacity: Determines the maximum power consumption supported.
- Compliance with Regulations: Adheres to industry standards for safety and legality.
- Compatibility with Tow Vehicle and Trailer: Ensures proper communication between the electrical systems.
Understanding these aspects is crucial for designing, installing, and maintaining a reliable trailer light wiring system. Proper grounding prevents electrical hazards, while adequate wire gauge ensures sufficient current flow. Color coding simplifies wiring and troubleshooting, and circuit protection safeguards against electrical overloads. Proper connector selection and splicing techniques ensure reliable connections and longevity. Testing procedures verify the system’s functionality, while load capacity considerations prevent overloading and potential failures. Compliance with regulations ensures adherence to safety standards and legal requirements. Finally, compatibility with the tow vehicle and trailer ensures seamless electrical communication for safe and effective towing operations.
Grounding
In the context of “Trailer Light Wiring Diagram 4 Wire,” grounding plays a pivotal role in completing the electrical circuit for proper current flow. Without proper grounding, the electrical system cannot function, and the trailer lights will not operate correctly.
- Frame Ground: The trailer’s metal frame is often used as the grounding point. This provides a low-resistance path for current to return to the tow vehicle’s electrical system.
- Grounding Wire: A dedicated grounding wire may also be used to connect the trailer’s electrical system to the tow vehicle’s chassis. This ensures a reliable ground connection, even if the trailer frame is not properly grounded.
- Grounding Block: A grounding block provides a central point for connecting multiple grounding wires. This simplifies the wiring and ensures that all electrical components are properly grounded.
- Grounding Rod: In some cases, a grounding rod may be used to establish a ground connection in areas where the trailer frame or other grounding points are not suitable.
Proper grounding is essential for the safe and reliable operation of a trailer’s lighting system. It ensures that the electrical system is complete, allowing current to flow properly and preventing electrical hazards. When installing a trailer light wiring system, it is crucial to pay attention to grounding and ensure that all electrical components are properly grounded.
Wire Gauge
In the context of “Trailer Light Wiring Diagram 4 Wire,” wire gauge plays a critical role in the system’s ability to carry electrical current and minimize voltage drop. The wire gauge, measured in American Wire Gauge (AWG), indicates the thickness of the wire. Thicker wires (lower AWG numbers) can carry more current and experience less voltage drop over a given distance.
For trailer light wiring, the wire gauge must be carefully selected to ensure that the wires can handle the current draw of the trailer lights without overheating or causing excessive voltage drop. If the wire gauge is too small, the wires may overheat and pose a fire hazard. Additionally, excessive voltage drop can lead to dim lights, which can compromise safety. For example, a 12-volt taillight with 2 amps of current draw should use at least 16 AWG wire to ensure minimal voltage drop and prevent overheating.
Understanding the relationship between wire gauge, current-carrying capacity, and voltage drop is essential for designing and installing a safe and effective trailer light wiring system. By selecting the appropriate wire gauge, you can ensure that the electrical system can handle the power demands of the trailer lights without compromising safety or functionality.
Color Coding
Within the context of “Trailer Light Wiring Diagram 4 Wire,” color coding plays a critical role in ensuring consistent wiring and simplifying troubleshooting. By assigning specific colors to different functions, color coding enables easy identification of wires and reduces the risk of incorrect connections or mismatched polarity.
- Standardized Colors: The use of standardized colors, such as white for ground, yellow for left turn/brake, green for right turn/brake, and brown for tail/clearance lights, ensures consistency across different wiring systems and makes it easier to identify the purpose of each wire.
- Reduced Wiring Errors: Color coding helps to reduce wiring errors by providing a visual cue that guides the installer during the wiring process. By matching the color of the wire to the corresponding terminal or connector, the installer can minimize the risk of incorrect connections.
- Simplified Troubleshooting: When troubleshooting electrical issues, color coding allows technicians to quickly identify the affected circuit or component. By tracing the colored wires, they can easily locate the source of the problem and perform the necessary repairs.
- Improved Safety: Proper color coding enhances safety by ensuring that the electrical system is wired correctly. Incorrect wiring can lead to electrical hazards, such as shorts or fires. Color coding helps to prevent these hazards by providing a clear and consistent method for wiring the trailer light system.
In summary, color coding is an essential aspect of “Trailer Light Wiring Diagram 4 Wire” that promotes consistent wiring, reduces errors, simplifies troubleshooting, and enhances safety. By adhering to standardized color codes, installers and technicians can ensure the reliable and efficient operation of trailer lighting systems.
Circuit Protection
Within the context of “Trailer Light Wiring Diagram 4 Wire,” circuit protection plays a critical role in safeguarding the electrical system from damage caused by electrical overloads. An electrical overload occurs when excessive current flows through a circuit, potentially leading to overheating, wire damage, and even fire.
To prevent such hazards, circuit protection devices are incorporated into the trailer light wiring diagram. These devices, such as fuses or circuit breakers, act as safety switches that automatically interrupt the electrical current when it exceeds a predetermined safe level. By doing so, they effectively protect the wiring, electrical components, and the trailer itself from damage.
Real-life examples of circuit protection in “Trailer Light Wiring Diagram 4 Wire” include:
- Fuse Protection: Fuses are commonly used as circuit protection devices in trailer light wiring. When an excessive current flows through the fuse, its thin wire melts, breaking the circuit and preventing further current flow.
- Circuit Breaker Protection: Circuit breakers are another type of circuit protection device that can be reset after they trip due to an overload. They provide a convenient and reusable method of protecting electrical circuits from overloads.
Understanding the importance of circuit protection in “Trailer Light Wiring Diagram 4 Wire” is crucial for ensuring the safe and reliable operation of trailer lighting systems. By incorporating appropriate circuit protection measures, installers can minimize the risk of electrical overloads, prevent damage to the wiring and components, and enhance the overall safety of the trailer.
Connector Types
Within the context of “Trailer Light Wiring Diagram 4 Wire,” connector types play a critical role in ensuring proper connection and protecting against environmental factors. Electrical connectors are responsible for establishing and maintaining reliable electrical connections between different components of the trailer light wiring system. The choice of connector type directly affects the system’s performance, reliability, and longevity.
Properly selected and installed connectors ensure a secure and stable connection between the trailer and tow vehicle. They prevent loose connections, which can lead to intermittent lighting failures, voltage drop, and even electrical fires. Moreover, connectors provide a barrier against moisture, dirt, and other environmental elements that can corrode electrical contacts and cause malfunctions.
Real-life examples of connector types used in “Trailer Light Wiring Diagram 4 Wire” include:
- Bullet Connectors: These simple and cost-effective connectors are commonly used for quick and easy connections. They consist of a male and female terminal that are crimped onto the wire ends and then plugged together.
- Blade Connectors: Also known as spade connectors, these connectors feature a flat blade terminal that slides into a matching female receptacle. They are commonly used for connecting wires to switches, relays, and other electrical components.
- Weatherproof Connectors: These specialized connectors are designed to withstand harsh environmental conditions, such as moisture, dust, and extreme temperatures. They are often used in outdoor applications, including trailer light wiring.
Understanding the importance of connector types in “Trailer Light Wiring Diagram 4 Wire” is crucial for ensuring the reliable and safe operation of trailer lighting systems. By choosing the appropriate connector types and installing them correctly, installers can minimize the risk of connection failures, prevent corrosion, and enhance the overall durability of the electrical system.
Splicing Techniques
In the context of “Trailer Light Wiring Diagram 4 Wire,” splicing techniques play a crucial role in maintaining electrical integrity and preventing short circuits. Splicing involves joining two or more wires together to create a continuous electrical path. Proper splicing techniques ensure that the connection is secure, has minimal resistance, and is protected from moisture and other environmental factors.
Without proper splicing, the electrical connections in the trailer light wiring system can become loose or corroded over time, leading to intermittent lighting failures, voltage drop, and even electrical fires. By following recommended splicing techniques, installers can create reliable and long-lasting electrical connections that meet safety standards and ensure the proper functioning of the trailer lights.
Real-life examples of splicing techniques used in “Trailer Light Wiring Diagram 4 Wire” include:
- Solder Splicing: This technique involves melting solder onto the twisted ends of two wires, creating a strong and permanent connection. Solder splicing is often used for critical connections that require high reliability.
- Crimp Splicing: This technique uses a special tool to crimp a metal sleeve onto the twisted ends of two wires, creating a secure and weatherproof connection. Crimp splicing is commonly used for quick and easy connections in automotive electrical systems.
- Heat Shrink Splicing: This technique involves covering the spliced wires with a heat shrink tube, which is then heated to shrink and create a waterproof and insulated seal.
Understanding the importance of splicing techniques in “Trailer Light Wiring Diagram 4 Wire” is crucial for ensuring the safety, reliability, and longevity of trailer lighting systems. By using proper splicing techniques, installers can minimize the risk of electrical failures, prevent corrosion, and enhance the overall performance of the electrical system.
Testing Procedures
Within the context of “Trailer Light Wiring Diagram 4 Wire,” testing procedures play a critical role in ensuring that the electrical system is functioning correctly and safely. These procedures involve a series of steps and checks to verify the integrity of the wiring, connections, and components.
- Continuity Testing: This test uses a multimeter to check for continuity, or the uninterrupted flow of electrical current, through the wires. It ensures that there are no breaks or faults in the wiring that could prevent the lights from functioning.
- Voltage Testing: This test uses a voltmeter to measure the voltage at various points in the circuit to ensure that the correct voltage is reaching the lights. It helps identify any issues with the power supply or wiring that could cause the lights to be dim or not function at all.
- Ground Testing: This test checks the connection between the electrical system and the trailer’s frame, which serves as the ground. A poor ground connection can cause electrical problems, such as flickering lights or even electrical fires.
- Light Function Testing: This test involves manually activating the turn signals, brake lights, and tail lights to visually inspect their operation. It helps identify any bulbs that are burned out or any issues with the wiring that are preventing the lights from functioning properly.
These testing procedures are essential for ensuring the safety and reliability of the trailer lighting system. By following proper testing procedures, installers and technicians can identify and correct any issues with the wiring, ensuring that the trailer lights are functioning correctly and meeting all applicable safety standards.
Load Capacity
Within the context of “Trailer Light Wiring Diagram 4 Wire,” load capacity plays a critical role in ensuring that the electrical system can support the power demands of the trailer lights without overloading the wiring or components. Load capacity refers to the maximum amount of electrical power that the wiring system can safely handle, and it must be carefully considered during the design and installation of the lighting system.
- Wire Gauge: The thickness of the wire used in the wiring harness affects its load capacity. Thicker wires (lower AWG numbers) can carry more current and have a higher load capacity.
- Number of Lights: The number of lights connected to the wiring system affects the total load capacity. More lights require more current, so a wiring system with a higher load capacity is needed.
- Bulb Wattage: The wattage of the bulbs used in the trailer lights affects the load capacity. Higher wattage bulbs draw more current, so a wiring system with a higher load capacity is needed.
- Circuit Protection: The type and rating of circuit protection devices, such as fuses or circuit breakers, used in the wiring system affect the load capacity. Circuit protection devices are designed to protect the wiring and components from damage in the event of an overload.
Understanding the concept of load capacity is crucial for designing and installing a safe and reliable trailer light wiring system. By carefully considering the load capacity of the wiring and components, installers can ensure that the system can support the power demands of the trailer lights without compromising safety or functionality.
Compliance with Regulations
Within the context of “Trailer Light Wiring Diagram 4 Wire,” compliance with regulations plays a critical role in ensuring the safety and legality of the trailer lighting system. Adhering to industry standards and regulations helps to prevent electrical hazards, accidents, and legal issues.
- DOT Compliance: The U.S. Department of Transportation (DOT) sets forth specific requirements for trailer lighting systems, including the number, placement, and color of lights. Compliance with DOT regulations ensures that the trailer is visible and meets minimum safety standards.
- SAE Standards: The Society of Automotive Engineers (SAE) develops voluntary standards for automotive lighting and electrical systems. SAE standards provide guidance on wire gauge, connector types, and other aspects of trailer light wiring, promoting uniformity and safety.
- Local Regulations: Many states and municipalities have their own regulations for trailer lighting systems. These regulations may vary from the DOT and SAE standards, so it is important to check local laws before installing or operating a trailer.
- Insurance Coverage: Insurance companies may require that trailers be equipped with compliant lighting systems. Failure to comply with regulations could void insurance coverage in the event of an accident.
Compliance with regulations is not only a legal obligation but also a safety imperative. By adhering to industry standards and regulations, installers and owners can ensure that their trailer lighting systems are safe, reliable, and meet all applicable requirements.
Compatibility with Tow Vehicle and Trailer
Within the context of “Trailer Light Wiring Diagram 4 Wire,” compatibility between the tow vehicle and trailer is crucial for ensuring proper communication between their respective electrical systems. This compatibility involves matching the electrical characteristics and protocols of both the tow vehicle and the trailer to enable seamless data exchange and control of the trailer’s lighting system.
For instance, the tow vehicle must have an electrical connector that is compatible with the trailer’s plug. This ensures that the electrical signals from the tow vehicle, such as those for turn signals, brake lights, and taillights, can be transmitted to the trailer’s lighting system. Similarly, the trailer’s electrical system must be designed to receive and interpret these signals correctly.
Real-life examples of compatibility issues can include mismatched connectors, incorrect wiring, or differences in electrical protocols. These issues can lead to malfunctioning lights, safety hazards, and potential legal violations. By ensuring compatibility between the tow vehicle and trailer, installers can prevent these issues and ensure the safe and reliable operation of the trailer lighting system.
Understanding the importance of compatibility in “Trailer Light Wiring Diagram 4 Wire” has practical applications in various scenarios. For instance, it enables the use of different trailer models with a single tow vehicle, provided that they are all compatible. Additionally, it facilitates the troubleshooting of electrical issues by narrowing down potential causes to compatibility problems between the tow vehicle and trailer.


![[DIAGRAM] 4 Wire Trailer Diagram](https://i0.wp.com/www.offroaders.com/wp/wp-content/uploads/2017/02/trailer-wiring-4-wire.jpg?w=665&ssl=1)

Related Posts


