Definition and ExampleA Mercury 14 Pin Wiring Harness Diagram is a schematic representation of the wiring connections within a Mercury outboard motor. It provides a comprehensive layout of the electrical system, indicating the location, function, and connectivity of each wire. This diagram serves as a valuable reference for troubleshooting electrical issues, ensuring proper operation and preventing potential hazards.
Importance, Benefits, and Historical ContextWiring harness diagrams are crucial for maintaining and servicing Mercury outboard motors. They help technicians identify and trace electrical faults, localize the source of problems, and facilitate efficient repairs. By providing a visual representation of the wiring system, diagrams simplify troubleshooting processes and reduce downtime.Historically, wiring harness diagrams have evolved in parallel with the advancements in outboard motor technology. As outboard motors became more complex, so did their electrical systems, necessitating more detailed and comprehensive diagrams. Today, Mercury 14 Pin Wiring Harness Diagrams are an indispensable tool for marine technicians and boat owners alike.
Transition to Main Article TopicsIn the following article, we will delve deeper into the specifics of Mercury 14 Pin Wiring Harness Diagrams. We will discuss the components and connections they depict, explain how to interpret them effectively, and provide practical tips for using them in real-world scenarios. Our aim is to empower you with the knowledge and understanding to confidently diagnose and resolve electrical issues in your Mercury outboard motor.
Understanding the essential aspects of a Mercury 14 Pin Wiring Harness Diagram is paramount for effectively maintaining and troubleshooting Mercury outboard motors. These diagrams provide a comprehensive representation of the electrical system, enabling technicians and boat owners to identify, trace, and resolve electrical faults. Here are eight key aspects to consider:
- Components: Diagrams depict the various electrical components within the outboard motor, including sensors, switches, relays, and actuators.
- Connections: They show how these components are interconnected, indicating the flow of electrical current throughout the system.
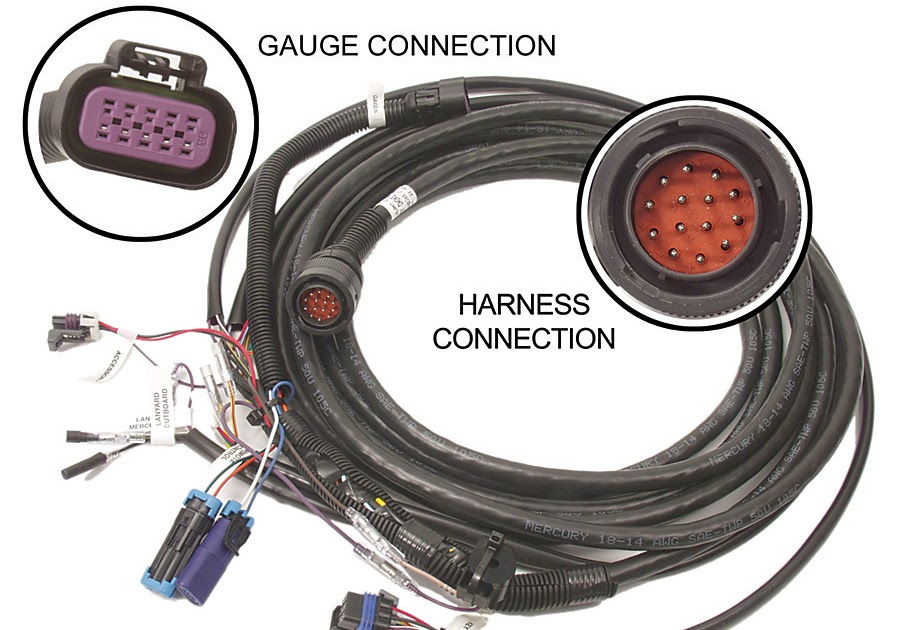
- Pinouts: Diagrams specify the function and purpose of each pin on the 14-pin connector, facilitating proper wiring and troubleshooting.
- Color Coding: Wires are color-coded to simplify identification and tracing, reducing the risk of misconnections.
- Grounding: Diagrams indicate proper grounding points, ensuring electrical safety and minimizing interference.
- Testing Points: Diagrams may include designated test points for voltage and continuity checks, aiding in fault diagnosis.
- Troubleshooting: Diagrams serve as a valuable troubleshooting tool, guiding technicians through systematic steps to identify and resolve electrical issues.
- Maintenance: By following the diagram, technicians can perform routine maintenance tasks, such as inspecting connections and replacing faulty components.
These aspects are interconnected and provide a comprehensive understanding of the Mercury 14 Pin Wiring Harness Diagram. By comprehending these aspects, individuals can effectively utilize the diagram for troubleshooting, maintenance, and ensuring the optimal performance of their Mercury outboard motor.
Components
The components depicted in a Mercury 14 Pin Wiring Harness Diagram play a crucial role in the electrical system of the outboard motor. These components include sensors, switches, relays, and actuators, each serving a specific function:
- Sensors: Monitor various parameters such as temperature, pressure, and speed, providing critical information to the engine control module (ECM).
- Switches: Allow the operator to control the motor’s functions, such as starting, stopping, and shifting.
- Relays: Act as electronic switches, controlling the flow of high-current loads, such as the starter motor.
- Actuators: Convert electrical signals into mechanical actions, such as adjusting the throttle position or trim angle.
The Mercury 14 Pin Wiring Harness Diagram provides a comprehensive view of how these components are interconnected, enabling technicians to understand the electrical system’s overall operation. By comprehending the function and placement of each component, technicians can effectively troubleshoot electrical issues and ensure the motor’s optimal performance.
For instance, if a sensor malfunctions, the ECM may not receive accurate information, leading to engine performance problems. By referring to the wiring diagram, a technician can quickly identify the faulty sensor and replace it, restoring proper engine operation.
In conclusion, the components depicted in a Mercury 14 Pin Wiring Harness Diagram are critical for the proper functioning of the outboard motor’s electrical system. Understanding the role and interconnections of these components through the diagram empowers technicians to diagnose and resolve electrical issues efficiently, ensuring the safe and reliable operation of the motor.
Connections
The connections within a Mercury 14 Pin Wiring Harness Diagram are crucial for understanding the flow of electrical current and the overall operation of the outboard motor’s electrical system. These connections establish pathways for the transmission of electrical signals and power between various components, such as sensors, switches, relays, and actuators.
Each connection in the diagram represents a specific electrical circuit, designed to perform a particular function. For example, the connection between the ignition switch and the starter solenoid completes the circuit that allows the starter motor to engage and crank the engine. Similarly, the connection between the throttle position sensor and the ECM provides the ECM with information about the throttle position, enabling it to adjust the fuel mixture and ignition timing accordingly.
By tracing the connections in the diagram, technicians can visualize the flow of electrical current throughout the system and identify any potential breaks or faults. This understanding is critical for troubleshooting electrical issues, as it allows technicians to isolate the affected circuit and pinpoint the source of the problem. For instance, if the outboard motor fails to start, the technician can refer to the wiring diagram to check the continuity of the circuit between the ignition switch and the starter solenoid, identifying any loose connections or faulty components that may be preventing the starter motor from engaging.
Furthermore, the connections in the Mercury 14 Pin Wiring Harness Diagram provide valuable insights for planning modifications or upgrades to the electrical system. By understanding the existing connections and the electrical requirements of the new components, technicians can determine the necessary wiring modifications to ensure proper functionality and avoid potential electrical hazards.
In summary, the connections depicted in a Mercury 14 Pin Wiring Harness Diagram are essential for understanding the flow of electrical current and troubleshooting electrical issues within the outboard motor’s electrical system. By tracing and analyzing these connections, technicians can effectively diagnose and resolve electrical faults, ensuring the safe and reliable operation of the motor.
Pinouts
Within the comprehensive layout of a Mercury 14 Pin Wiring Harness Diagram, pinouts play a critical role in ensuring proper wiring and efficient troubleshooting. These diagrams specify the function and purpose of each pin within the 14-pin connector, providing valuable information for technicians and boat owners alike.
- Wire Identification: Pinouts clearly label each pin with its corresponding wire color, making it easier to identify and trace wires throughout the harness. This simplifies the installation and maintenance process, reducing the risk of misconnections.
- Signal and Power Distribution: Pinouts indicate the type of signal or power carried by each pin, such as sensor data, power supply, or ground connections. This information is crucial for understanding the flow of electrical signals and power within the system.
- Connector Compatibility: Pinouts ensure compatibility between the 14-pin connector and other components in the electrical system. By specifying the pin arrangement and mating connector type, technicians can confidently connect and disconnect components without causing damage or electrical faults.
- Troubleshooting Aid: Pinouts serve as a valuable troubleshooting tool. By referencing the pinouts, technicians can quickly identify the specific pin associated with a malfunctioning component, enabling them to isolate the issue and perform targeted repairs.
In summary, the pinouts within a Mercury 14 Pin Wiring Harness Diagram provide essential information for proper wiring, efficient troubleshooting, and maintaining the integrity of the outboard motor’s electrical system. By understanding the function and purpose of each pin, technicians can effectively diagnose and resolve electrical issues, ensuring the safe and reliable operation of the motor.
Color Coding
Within the context of Mercury 14 Pin Wiring Harness Diagrams, color coding plays a critical role in ensuring accurate wiring and efficient troubleshooting. Wires are assigned specific colors based on their function or signal type, providing a visual cue that simplifies the identification and tracing of individual wires throughout the harness.
This color coding system is a crucial component of Mercury 14 Pin Wiring Harness Diagrams for several reasons:
- Reduced Risk of Misconnections: By using different colors for different wires, the likelihood of accidentally connecting wires incorrectly is significantly reduced. This is especially important in complex wiring harnesses with numerous wires, as it prevents potential electrical faults and ensures proper system operation.
- Simplified Troubleshooting: Color coding aids in troubleshooting electrical issues by allowing technicians to quickly identify and trace specific wires associated with malfunctioning components. This targeted approach saves time and effort during the diagnostic process.
- Enhanced Wiring Efficiency: Color coding enables technicians to quickly identify and connect wires during the installation or maintenance of the wiring harness. This reduces installation time and minimizes the risk of errors.
Real-life examples of color coding within Mercury 14 Pin Wiring Harness Diagrams include:
- Red wires typically indicate power supply connections.
- Black wires are commonly used for ground connections.
- Blue wires may represent sensor signal wires.
- Yellow wires are often used for data transmission.
Understanding the color coding system used in Mercury 14 Pin Wiring Harness Diagrams is essential for proper wiring, efficient troubleshooting, and maintaining the integrity of the outboard motor’s electrical system. By adhering to the color coding guidelines, technicians can ensure accurate and reliable electrical connections, reducing downtime and enhancing the overall performance of the motor.
Grounding
Grounding plays a critical role in the safety and reliability of any electrical system, including those found in Mercury outboard motors. Mercury 14 Pin Wiring Harness Diagrams provide clear and accurate information on proper grounding points, ensuring that the electrical system functions as intended and potential hazards are minimized.
Electrical grounding involves connecting a circuit to the ground (earth) to provide a safe path for electrical current to flow. This prevents the buildup of excess voltage and reduces the risk of electrical shock or damage to equipment. In a Mercury outboard motor, the grounding system is designed to protect both the motor itself and the individuals operating it.
The Mercury 14 Pin Wiring Harness Diagram specifies the designated grounding points within the electrical system. These points are typically connected to the negative terminal of the battery or to a dedicated grounding bus. By following the diagram and connecting the wires accordingly, technicians can ensure that all components are properly grounded.
Proper grounding has several key benefits in the context of Mercury outboard motors:
- Electrical Safety: Proper grounding diverts stray electrical current away from the motor and its components, minimizing the risk of electrical shock or damage to sensitive electronic devices.
- Reduced Interference: Grounding helps to minimize electrical interference between different components within the system. This ensures reliable operation and prevents potential malfunctions caused by electromagnetic noise.
- Voltage Stabilization: Grounding provides a stable reference point for voltage, ensuring that all components receive the correct voltage levels for optimal performance.
Real-life examples of grounding within a Mercury 14 Pin Wiring Harness Diagram include the connection of the negative battery terminal to the engine block and the grounding of the ECM (engine control module) to the grounding bus.
Understanding the importance of grounding and following the guidelines provided in the Mercury 14 Pin Wiring Harness Diagram are essential for ensuring the electrical safety, reliability, and optimal performance of Mercury outboard motors. By adhering to proper grounding practices, technicians and boat owners can prevent potential hazards, extend the life of electrical components, and maintain the overall integrity of the electrical system.
Testing Points
Within the comprehensive Mercury 14 Pin Wiring Harness Diagram, designated test points play a crucial role in facilitating efficient fault diagnosis and troubleshooting. These test points provide technicians with strategic access to specific points within the electrical system, enabling them to perform voltage and continuity checks for quick and accurate problem identification.
- Identification and Accessibility: Mercury 14 Pin Wiring Harness Diagrams clearly indicate the location and purpose of each test point. This allows technicians to easily identify and access these points, saving time and effort during the diagnostic process.
- Voltage Measurements: Test points enable technicians to measure voltage levels at specific locations within the electrical system. By comparing the measured voltage to expected values, technicians can identify potential issues such as voltage drops, shorts, or open circuits.
- Continuity Checks: Test points also facilitate continuity checks, allowing technicians to verify the electrical continuity of wires, connectors, and components. This helps identify breaks, loose connections, or faulty components that may disrupt the flow of electrical current.
- Targeted Troubleshooting: By utilizing test points, technicians can focus their troubleshooting efforts on specific areas of the electrical system. This targeted approach minimizes downtime and enhances the efficiency of the diagnostic process.
In summary, the inclusion of designated test points within Mercury 14 Pin Wiring Harness Diagrams is an invaluable asset for technicians. These test points provide convenient and precise access to critical points within the electrical system, allowing for accurate voltage and continuity checks. By leveraging these test points, technicians can quickly identify and resolve electrical faults, ensuring optimal performance, reliability, and safety of the outboard motor.
Troubleshooting
Within the realm of electrical system maintenance and repair, troubleshooting plays a pivotal role in identifying and resolving issues efficiently. Mercury 14 Pin Wiring Harness Diagrams are indispensable tools that empower technicians with a comprehensive understanding of the electrical system, enabling them to perform systematic troubleshooting.
The connection between troubleshooting and Mercury 14 Pin Wiring Harness Diagrams is deeply intertwined. These diagrams provide a visual representation of the electrical system’s components, connections, and pinouts, serving as a roadmap for technicians to trace and analyze electrical circuits. By studying the diagram, technicians can identify potential trouble spots, such as loose connections, damaged wires, or faulty components.
Real-life examples of troubleshooting using Mercury 14 Pin Wiring Harness Diagrams abound. For instance, if an outboard motor experiences intermittent starting issues, the technician can refer to the diagram to trace the starting circuit. By systematically checking the continuity of wires, connections, and components along the circuit, the technician can pinpoint the exact location of the fault, whether it’s a loose connection at the battery terminal or a faulty starter solenoid.
The practical significance of understanding the connection between troubleshooting and Mercury 14 Pin Wiring Harness Diagrams lies in the ability to diagnose and resolve electrical issues swiftly and accurately. By leveraging the diagram as a troubleshooting tool, technicians can minimize downtime, reduce repair costs, and enhance the overall reliability of the outboard motor.
In summary, Mercury 14 Pin Wiring Harness Diagrams are invaluable troubleshooting tools that guide technicians through systematic steps to identify and resolve electrical issues. By understanding the connection between troubleshooting and these diagrams, technicians can effectively maintain and repair outboard motors, ensuring optimal performance and safety.
Maintenance
Within the context of maintaining complex electrical systems, Mercury 14 Pin Wiring Harness Diagrams play a pivotal role in enabling technicians to perform routine maintenance tasks efficiently and effectively. These diagrams provide a comprehensive visual representation of the electrical system, including the location of components, the flow of electrical current, and the connections between different components.
By having access to the Mercury 14 Pin Wiring Harness Diagram, technicians can systematically inspect electrical connections, identify loose or damaged wires, and locate faulty components. This proactive approach to maintenance helps prevent potential electrical issues, prolongs the lifespan of the electrical system, and ensures the overall reliability and safety of the outboard motor.
Real-life examples of maintenance tasks guided by Mercury 14 Pin Wiring Harness Diagrams include:
- Inspecting and cleaning battery terminals to prevent corrosion and ensure proper electrical contact.
- Checking the tightness of wire connections to avoid loose connections and potential arcing.
- Replacing faulty sensors or actuators based on diagnostic trouble codes and the diagram’s component identification.
- Upgrading or modifying the electrical system by adding accessories or replacing outdated components, using the diagram as a reference for compatibility and proper installation.
Understanding the connection between maintenance and Mercury 14 Pin Wiring Harness Diagrams is critical for technicians to perform routine maintenance tasks with precision and efficiency. By leveraging the detailed information provided in these diagrams, technicians can proactively identify and address potential issues, minimizing downtime, reducing repair costs, and enhancing the overall performance of the outboard motor.
In summary, Mercury 14 Pin Wiring Harness Diagrams are indispensable tools for technicians performing maintenance on electrical systems. These diagrams provide a comprehensive visual representation of the electrical system, enabling technicians to inspect connections, replace faulty components, and perform other maintenance tasks with accuracy and efficiency. By utilizing these diagrams, technicians can ensure the longevity, reliability, and safety of the outboard motor’s electrical system.


Related Posts


