Leviton 3 Way Switch Wiring Instructions guide the installation and wiring of a three-way switch, a type of electrical switch that allows for the control of a single light fixture from two different locations. A three-way switch is commonly used to control lighting in stairwells, hallways, and other areas where it is convenient to turn lights on or off from multiple points.
Wiring a three-way switch involves connecting the switch to the light fixture and power source using electrical wires. The Leviton 3 Way Switch Wiring Instructions provide detailed steps on how to make these connections, ensuring the proper functionality and safety of the lighting system. The instructions typically include a wiring diagram, which is a visual representation of the electrical connections, and specific instructions for connecting the wires to the switch terminals.
Properly wiring a three-way switch is essential for ensuring that the light fixture operates correctly. Incorrect wiring can lead to electrical hazards, such as short circuits or electrical fires. By following the Leviton 3 Way Switch Wiring Instructions, homeowners or electricians can safely and effectively install and wire a three-way switch, providing convenient and reliable lighting control.
The Leviton 3 Way Switch Wiring Instructions encompass various aspects that are crucial for understanding the installation and wiring of a three-way switch. These aspects play a vital role in ensuring the proper functionality and safety of the lighting system.
- Wiring Diagram: A visual representation of the electrical connections, providing a clear understanding of the wiring layout.
- Terminal Identification: Identifying the terminals on the switch where the wires are connected, ensuring correct wiring.
- Wire Stripping: Proper stripping of the wire insulation, exposing the conductor for secure connections.
- Wire Connection: Establishing solid electrical connections between the wires and the switch terminals, ensuring proper current flow.
- Grounding: Connecting the grounding wire to the switch and electrical box, providing protection against electrical shocks.
- Power Source: Identifying the power source and connecting the switch accordingly, ensuring the proper flow of electricity.
- Light Fixture Connection: Wiring the switch to the light fixture, allowing for control of the lighting.
- Multiple Switch Control: Understanding how to wire multiple three-way switches to control a single light fixture from different locations.
- Safety Precautions: Emphasizing the importance of following safety guidelines while working with electricity and electrical components.
These aspects collectively provide a comprehensive understanding of the Leviton 3 Way Switch Wiring Instructions. By considering these aspects, homeowners or electricians can safely and effectively install and wire a three-way switch, ensuring reliable and convenient lighting control.
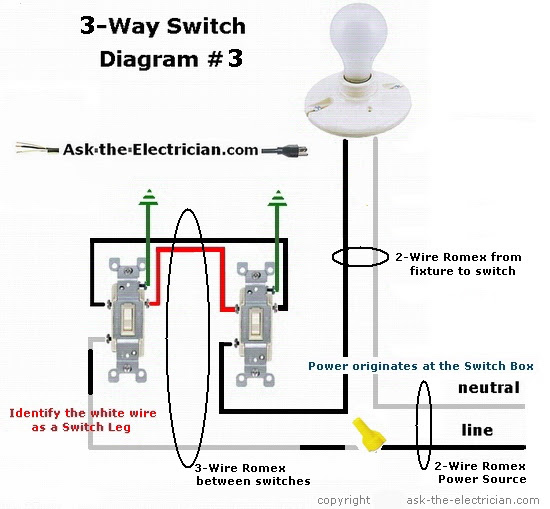
Wiring Diagram
A wiring diagram is a crucial component of the Leviton 3 Way Switch Wiring Instructions, providing a visual representation of the electrical connections necessary for proper switch installation and functionality. It serves as a roadmap, guiding electricians and homeowners through the wiring process, ensuring a safe and effective installation.
The wiring diagram included in the Leviton 3 Way Switch Wiring Instructions typically consists of symbols and lines that represent the electrical components and their connections. These symbols include circles for light fixtures, triangles for switches, and lines for wires. By studying the diagram, individuals can easily identify the correct terminals on the switch where the wires should be connected, ensuring proper current flow and switch operation.
For instance, the wiring diagram might illustrate how the traveler wires (which carry power between the two switches) should be connected to the appropriate terminals on each switch, and how the common wire (which carries power to the light fixture) should be connected. Additionally, the diagram might show the connection of the ground wire, which is essential for safety.
Understanding wiring diagrams is a fundamental skill for electrical work, and the diagram provided in the Leviton 3 Way Switch Wiring Instructions is a valuable tool for ensuring the safe and proper installation of a three-way switch. By following the diagram carefully, individuals can avoid electrical hazards and ensure that the switch operates correctly.
Terminal Identification
Terminal identification is a critical aspect of the Leviton 3 Way Switch Wiring Instructions. It involves identifying the specific terminals on the switch where the wires should be connected to ensure proper functionality and safety. Incorrect terminal identification can lead to electrical hazards, such as short circuits or electrical fires. Therefore, understanding the different terminals and their corresponding connections is essential for successful switch installation and operation.
- Common Terminal: The common terminal, typically marked with a black screw, is where the power source wire is connected. It supplies power to both the switch and the light fixture.
- Traveler Terminals: Three-way switches have two traveler terminals, usually marked with brass screws. These terminals are used to connect the wires that carry power between the two switches, allowing for control of the light fixture from multiple locations.
- Ground Terminal: The ground terminal, marked with a green screw, is where the grounding wire is connected. The grounding wire provides a path for fault current to flow to the ground, protecting against electrical shocks.
- Neutral Terminal: Some three-way switches may have a neutral terminal, marked with a white screw. The neutral wire, which carries the return current from the light fixture, is connected to this terminal.
Correctly identifying and connecting the wires to the appropriate terminals is crucial for ensuring the proper operation of the three-way switch. By following the Leviton 3 Way Switch Wiring Instructions and carefully identifying the terminals, individuals can safely and effectively install and wire a three-way switch, providing convenient and reliable lighting control.
Wire Stripping
Within the context of the Leviton 3 Way Switch Wiring Instructions, wire stripping plays a critical role in ensuring safe and effective electrical connections. Proper stripping of the wire insulation exposes the conductor, allowing for a secure connection between the wire and the switch terminal. Inadequate or improper wire stripping can lead to loose connections, arcing, and potential electrical hazards.
- Stripping Length: The length of the wire that needs to be stripped depends on the type of connection being made and the size of the wire. The Leviton 3 Way Switch Wiring Instructions typically specify the appropriate stripping length for each connection.
- Stripping Tool: Using the correct wire stripping tool is essential for ensuring clean and precise stripping. There are various types of wire strippers available, such as automatic strippers, manual strippers, and pliers-type strippers.
- Avoiding Nicking: When stripping the wire insulation, it is important to avoid nicking or cutting into the conductor. This can weaken the wire and compromise the integrity of the connection.
- Multiple Wires: In some cases, multiple wires may need to be stripped and connected together. In such instances, it is important to ensure that the stripped portions of the wires are twisted together securely before making the connection.
Proper wire stripping is a fundamental aspect of electrical work and is essential for the safe and reliable operation of electrical systems. By following the Leviton 3 Way Switch Wiring Instructions and carefully stripping the wires according to the specified guidelines, individuals can ensure secure connections and minimize the risk of electrical hazards.
Wire Connection
Within the context of the Leviton 3 Way Switch Wiring Instructions, wire connection holds paramount importance as it directly affects the switch’s functionality and overall safety. Establishing solid electrical connections between the wires and the switch terminals ensures proper current flow, preventing electrical hazards and ensuring reliable switch operation.
The Leviton 3 Way Switch Wiring Instructions provide detailed guidelines on how to make these connections securely. Improper wire connection can lead to loose connections, arcing, and potential electrical fires. Therefore, following the instructions carefully and ensuring proper wire connection is crucial for the safe and effective operation of the three-way switch.
In practical terms, solid wire connection involves stripping the insulation off the wire ends, twisting the exposed conductors together, and securing them under the switch terminals using screws. The Leviton 3 Way Switch Wiring Instructions specify the appropriate wire stripping length and tightening torque for each connection, ensuring optimal current flow and preventing loose connections.
Understanding the importance of wire connection and following the Leviton 3 Way Switch Wiring Instructions empower homeowners and electricians to make safe and reliable electrical connections. This not only ensures the proper functioning of the three-way switch but also contributes to the overall safety and longevity of the electrical system.
Grounding
Grounding plays a vital role in the Leviton 3 Way Switch Wiring Instructions by ensuring the safe operation of the electrical system. It involves connecting the grounding wire to the switch and electrical box, creating a path for fault current to flow to the ground. This connection provides protection against electrical shocks by preventing the buildup of dangerous voltage on the switch or other components.
The Leviton 3 Way Switch Wiring Instructions emphasize the importance of proper grounding, as it is a critical component for ensuring the safety of the electrical system. Without proper grounding, there is a risk of electrical shocks, which can be extremely dangerous and even life-threatening.
In practical terms, grounding involves connecting the bare copper or green-insulated grounding wire to the grounding screw on the switch and to the grounding terminal in the electrical box. This connection creates a continuous path for fault current to flow to the ground, preventing it from flowing through the switch or other components.
Understanding the importance of grounding and following the Leviton 3 Way Switch Wiring Instructions are essential for ensuring the safe installation and operation of the three-way switch. Proper grounding helps prevent electrical hazards and provides peace of mind, knowing that the electrical system is operating safely and efficiently.
Power Source
Within the Leviton 3 Way Switch Wiring Instructions, identifying the power source and connecting the switch accordingly are crucial steps for establishing a properly functioning electrical system. The power source provides the electrical current necessary to operate the switch and the connected lighting fixture. Correctly identifying and connecting to the power source ensures the switch can effectively control the flow of electricity, allowing users to turn the light on and off as desired.
- Matching Voltage and Current: The power source should match the voltage and current requirements of the switch and lighting fixture. Using an incompatible power source can damage the components or pose safety hazards.
- Circuit Breaker or Fuse Protection: The power source should be protected by a circuit breaker or fuse of appropriate amperage. This protection device prevents excessive current flow that could overheat the wiring or cause electrical fires.
- Wire Size and Type: The wires used to connect the switch to the power source should be of the appropriate size and type for the current draw. Using undersized or incorrect wires can lead to voltage drop, overheating, or even fire.
- Grounding: The power source should be properly grounded to provide a safe path for fault current to flow. This grounding connection helps protect against electrical shocks and ensures the safe operation of the electrical system.
By carefully following the Leviton 3 Way Switch Wiring Instructions regarding the power source, homeowners and electricians can ensure that the switch is properly connected to a compatible and safe power source. This attention to detail contributes to the overall reliability, safety, and functionality of the electrical system.
Light Fixture Connection
Within the comprehensive framework of the Leviton 3 Way Switch Wiring Instructions, the proper connection of the switch to the light fixture plays a pivotal role in establishing a functional and controllable lighting system. This connection allows users to seamlessly turn the light on and off, creating the desired ambiance and illuminating their surroundings. To fully grasp the significance of this aspect, let’s delve into specific facets and components involved in wiring the switch to the light fixture.
- Wire Selection: Choosing the appropriate wire is crucial. The wire should be sized correctly to handle the current draw of the light fixture and be suitable for the environment in which it will be installed.
- Connection Method: There are two common methods for connecting the switch to the light fixture: pigtailing and direct wiring. Pigtailing involves connecting short wires to the switch and light fixture, which are then joined together. Direct wiring involves connecting the wires directly from the switch to the light fixture.
- Terminal Identification: Correctly identifying the terminals on both the switch and the light fixture is essential. Each terminal typically has a specific function, such as line, load, and ground. Matching the wires to the corresponding terminals ensures proper circuit operation.
- Grounding: Establishing a proper ground connection is paramount for safety. The ground wire provides a path for fault current to flow, protecting against electrical shocks and ensuring the safe operation of the lighting system.
Understanding and carefully executing these aspects of light fixture connection are fundamental to the successful installation and operation of a three-way switch. By following the Leviton 3 Way Switch Wiring Instructions and adhering to best practices, homeowners and electricians can ensure a reliable and safe lighting system that meets their specific needs and preferences.
Multiple Switch Control
Within the framework of the Leviton 3 Way Switch Wiring Instructions, the concept of multiple switch control holds immense significance. It involves the strategic use of multiple three-way switches to enable the control of a single light fixture from various locations, offering enhanced convenience and flexibility in lighting management.
To fully grasp the connection between multiple switch control and the Leviton 3 Way Switch Wiring Instructions, it is essential to recognize that wiring multiple three-way switches is a critical component of achieving this control. The Leviton 3 Way Switch Wiring Instructions provide detailed guidance on how to wire these switches correctly, ensuring proper functionality and safe operation.
In practical terms, multiple switch control finds applications in various settings. For instance, in a staircase, three-way switches can be installed at the top and bottom of the stairs, allowing individuals to turn the lights on or off from either location. This eliminates the need to walk the entire staircase in darkness or to leave the lights on unnecessarily.
The Leviton 3 Way Switch Wiring Instructions empower homeowners and electricians with the knowledge and expertise to implement multiple switch control effectively. By following these instructions, they can create lighting systems that are both convenient and safe, enhancing the functionality and livability of their spaces.
Safety Precautions
Within the context of the Leviton 3 Way Switch Wiring Instructions, safety precautions hold paramount importance. Working with electricity and electrical components requires adherence to specific guidelines to prevent potential hazards and ensure the safety of individuals and the electrical system. The Leviton 3 Way Switch Wiring Instructions emphasize these precautions, providing clear instructions and guidance to ensure that the installation and wiring of the three-way switch are conducted safely and effectively.
- Electrical Hazards: Electricity poses inherent hazards, including electrical shock, burns, and fires. Understanding these hazards and taking appropriate precautions are crucial.
- Protective Equipment: Wearing appropriate protective equipment, such as insulated gloves and safety glasses, minimizes the risk of electrical shock and eye injuries.
- Circuit Breaker or Fuse Protection: Ensuring that the circuit is protected by a properly rated circuit breaker or fuse prevents overloading and potential electrical fires.
- Wiring Inspection: Inspecting the wires and connections before energizing the circuit helps identify and correct any issues that could lead to electrical problems.
Following these safety precautions outlined in the Leviton 3 Way Switch Wiring Instructions is not only a matter of compliance but also a matter of personal safety and the integrity of the electrical system. By adhering to these guidelines, homeowners and electricians can confidently perform the installation and wiring of the switch, ensuring a safe and reliable lighting control system.


Related Posts


