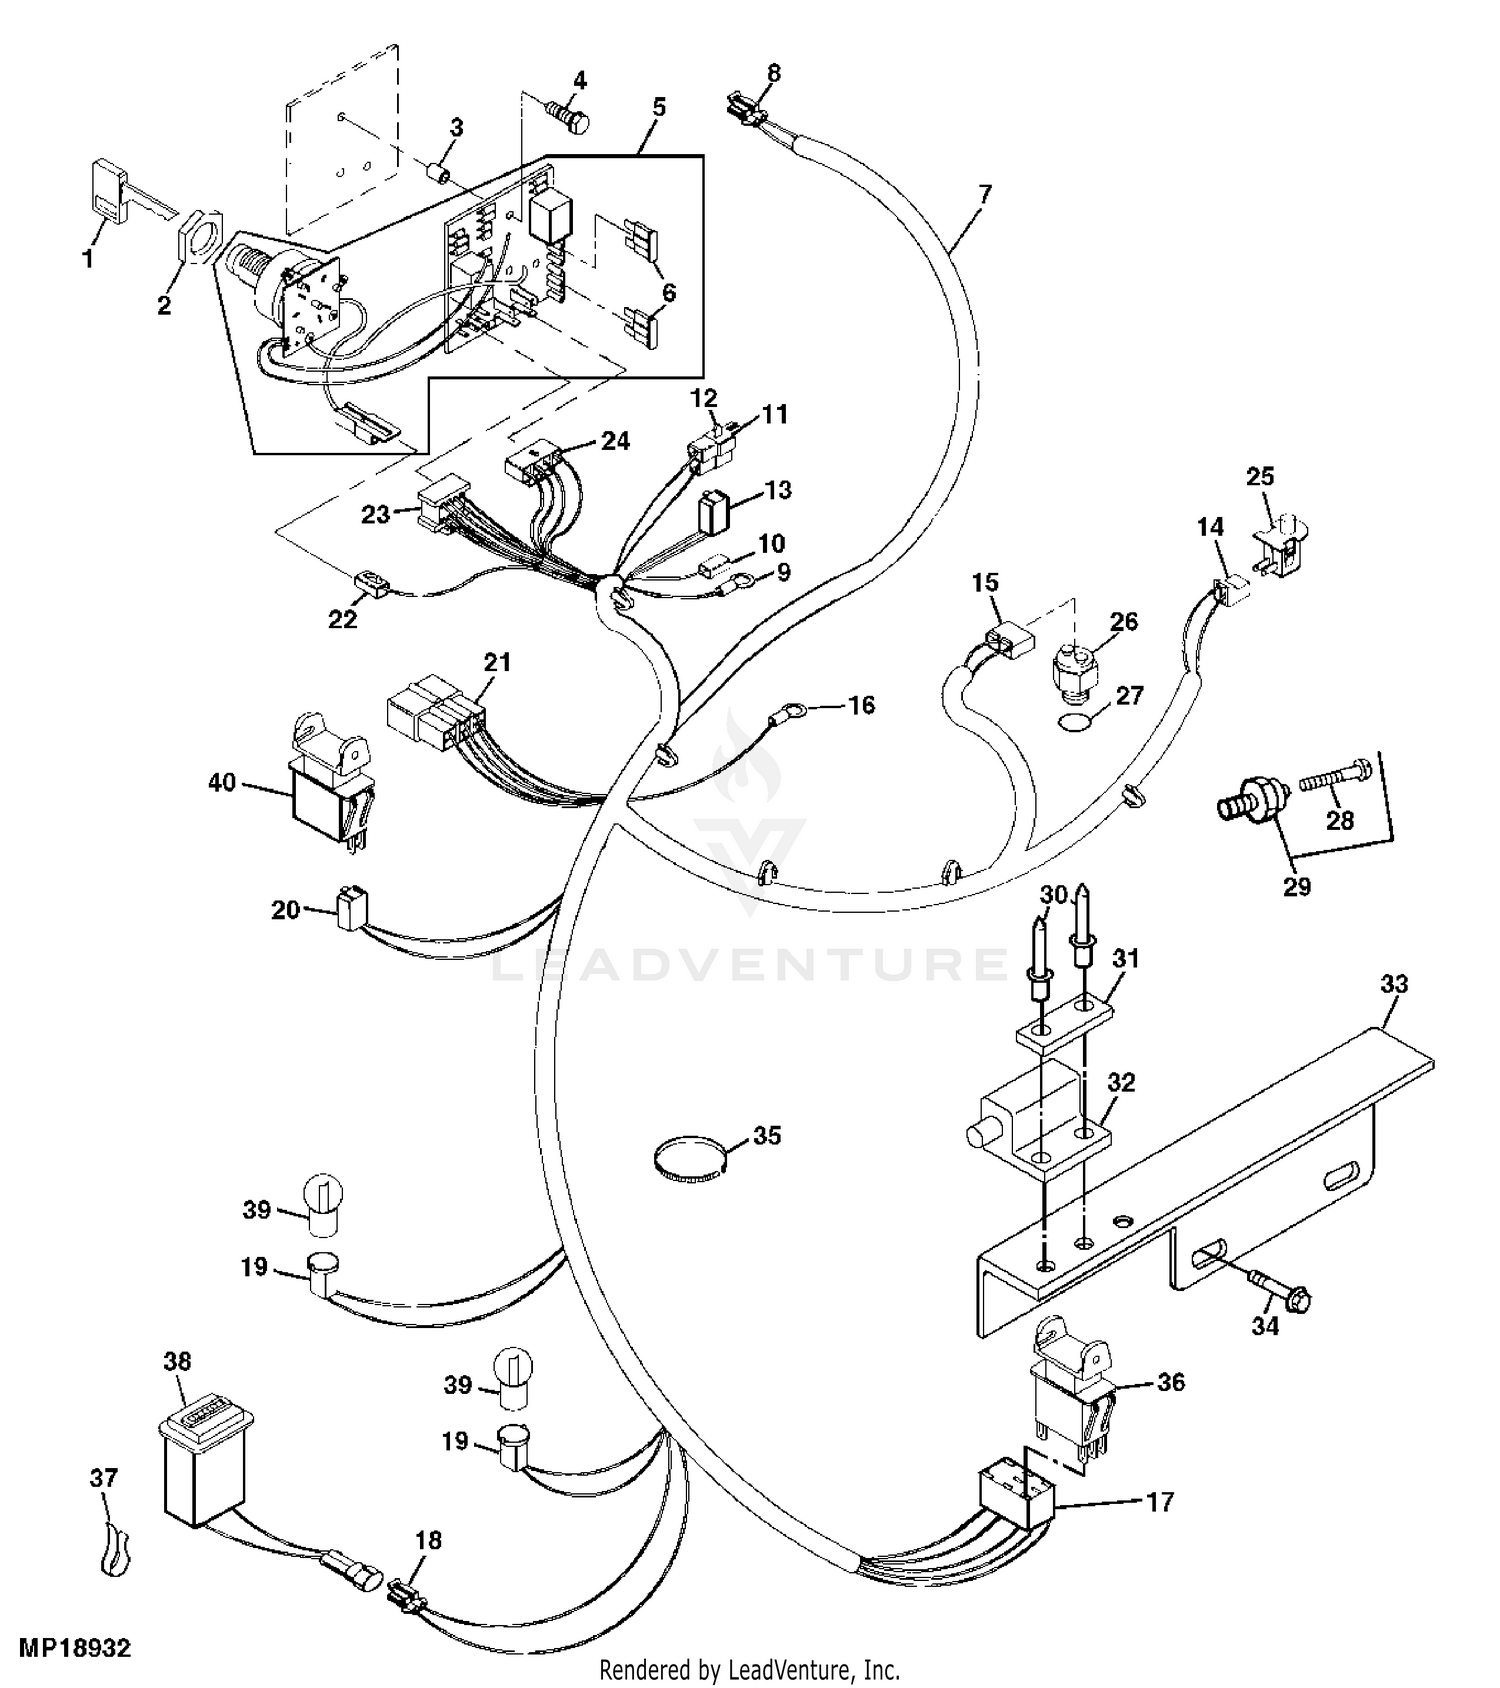
A John Deere 345 Wiring Diagram is a technical document that illustrates the electrical system of the John Deere 345 lawn tractor. It provides a detailed visual representation of the electrical components, their connections, and the flow of electricity throughout the system.
Wiring diagrams are crucial for troubleshooting electrical issues, performing repairs, and modifying the electrical system. They enable technicians and homeowners to locate and identify electrical problems quickly and accurately, reducing downtime and ensuring the safe operation of the tractor.
The John Deere 345 Wiring Diagram has evolved over time to reflect technological advancements and changes in the tractor’s electrical system. For instance, earlier versions used simple line diagrams, while modern diagrams incorporate color-coded wiring and detailed schematics. These enhancements have improved the clarity and accessibility of the information, making it more useful for professionals and enthusiasts alike. As we delve into this article, we will explore the components of a John Deere 345 Wiring Diagram, its applications, and its significance in maintaining the optimal performance of the tractor.
The John Deere 345 Wiring Diagram is crucial for understanding and troubleshooting the electrical system of the John Deere 345 lawn tractor. Delving into its different dimensions and key aspects, we find:
- Circuit Identification: The diagram clearly delineates the various electrical circuits within the tractor, allowing technicians to trace the flow of electricity and identify potential issues.
- Component Location: It provides a visual representation of the location of electrical components, such as fuses, relays, and switches, simplifying the process of inspection and repair.
- Wire Color Coding: The diagram uses a standardized color-coding system for wires, making it easier to identify and trace specific circuits.
- Connector Pinouts: It details the pin assignments for electrical connectors, ensuring proper mating and preventing misconnections.
- Grounding Points: The diagram indicates the grounding points for the electrical system, which are essential for proper circuit operation and safety.
- Diagnostic Procedures: Some wiring diagrams include diagnostic procedures, guiding technicians through a step-by-step process to identify and resolve electrical problems.
- Safety Precautions: The diagram may include safety precautions and warnings related to working on the electrical system, emphasizing the importance of proper handling and avoiding electrical hazards.
- Updates and Revisions: The wiring diagram is updated and revised over time to reflect changes in the electrical system, ensuring accuracy and relevance for troubleshooting and repairs.
These aspects, when considered together, empower technicians and homeowners with a comprehensive understanding of the John Deere 345 electrical system. From identifying circuit malfunctions to locating components and ensuring proper connections, the wiring diagram serves as an invaluable resource for maintaining the optimal performance and safety of the tractor.
Circuit Identification
Within the comprehensive John Deere 345 Wiring Diagram, circuit identification plays a pivotal role in troubleshooting and understanding the electrical system. By providing a roadmap of the various circuits, it enables technicians to trace the flow of electricity and pinpoint potential issues.
- Circuit Labeling: Each circuit within the diagram is clearly labeled, indicating its purpose and the components it powers. This labeling simplifies the process of identifying the specific circuit that is causing problems.
- Color Coding: The wiring diagram utilizes a standardized color-coding system to differentiate between different circuits. This visual cue allows technicians to quickly trace wires and identify their associated circuits.
- Fuse and Relay Locations: The diagram indicates the locations of fuses and relays within each circuit. These components protect the electrical system from overloads and malfunctions, and knowing their locations is crucial for troubleshooting and repair.
- Grounding Points: The diagram also identifies the grounding points for the electrical system. Proper grounding is essential for the safe and efficient operation of the tractor, and the wiring diagram helps ensure that all components are correctly grounded.
By providing detailed circuit identification, the John Deere 345 Wiring Diagram empowers technicians with the knowledge to diagnose and resolve electrical issues promptly and effectively. It serves as a valuable tool for maintaining the optimal performance and safety of the tractor.
Component Location
Within the comprehensive John Deere 345 Wiring Diagram, the aspect of component location plays a vital role in troubleshooting and maintaining the electrical system. By providing a clear visual representation of where electrical components are situated, the diagram greatly simplifies the process of inspection and repair.
- Fuse and Relay Identification: The diagram clearly identifies the location of fuses and relays within the electrical system. This information is crucial for troubleshooting electrical issues, as blown fuses or faulty relays can disrupt the operation of various components.
- Switch Identification: The diagram also indicates the location of switches, which control the operation of various electrical systems. Knowing the location of switches allows technicians to quickly identify and access them for troubleshooting or replacement.
- Connector Identification: The diagram provides a visual representation of electrical connectors and their locations. This information is essential for diagnosing connection issues, ensuring proper mating, and preventing misconnections.
- Component Accessibility: The diagram takes into account the accessibility of electrical components. It indicates whether components are easily accessible or require special tools or disassembly to reach, aiding in efficient troubleshooting and repair.
By providing a detailed representation of component location, the John Deere 345 Wiring Diagram empowers technicians with the knowledge to quickly locate, inspect, and repair electrical components. This information is critical for maintaining the optimal performance and safety of the tractor.
Wire Color Coding
Within the comprehensive John Deere 345 Wiring Diagram, the aspect of wire color coding plays a pivotal role in simplifying the identification and tracing of electrical circuits. By utilizing a standardized color-coding system, the diagram greatly enhances the efficiency and accuracy of electrical troubleshooting and repair.
- Circuit Differentiation: The color-coding system assigns unique colors to different circuits, allowing technicians to visually differentiate between them. This simplifies the process of tracing wires and identifying the specific circuit that is causing problems.
- Component Identification: The diagram also uses color coding to identify the wires connected to specific components. This information is crucial for troubleshooting issues related to individual components, as it allows technicians to quickly trace the wires and locate the source of the problem.
- Polarity Identification: In some cases, the color coding also indicates the polarity of wires, which is essential for proper electrical connections. Knowing the polarity ensures that wires are connected correctly, preventing potential damage to components.
- Consistency and Standardization: The standardized color-coding system ensures consistency across different John Deere 345 tractors, making it easier for technicians to work on multiple units. It also aligns with industry standards, facilitating collaboration and knowledge sharing among professionals.
In conclusion, the wire color coding in the John Deere 345 Wiring Diagram serves as a powerful tool for electrical troubleshooting and repair. By providing a visual cue to differentiate circuits, identify components, and determine polarity, the color coding greatly enhances the efficiency and accuracy of electrical work, contributing to the optimal performance and safety of the tractor.
Connector Pinouts
Within the realm of electrical systems, connectors play a crucial role in establishing reliable connections between different components. The John Deere 345 Wiring Diagram places great emphasis on providing detailed information about connector pinouts, which are essential for ensuring proper mating and preventing misconnections.
Connector pinouts specify the assignment of electrical signals to individual pins within a connector. This information is critical for technicians and engineers to correctly connect wires and ensure that electrical signals are transmitted accurately. Misconnections can lead to a variety of issues, including electrical shorts, component damage, and even safety hazards.
The John Deere 345 Wiring Diagram provides clear and concise pinout information for all electrical connectors used in the tractor. This information is typically presented in a tabular format, with each row representing a specific connector and its pin assignments. The table includes details such as the pin number, wire color, signal name, and a brief description of the signal’s function.
By adhering to the specified pinouts, technicians can ensure that electrical connectors are mated correctly, preventing misconnections and ensuring proper electrical connectivity. This is especially important in complex systems where multiple connectors and wires are involved, as even a single misconnection can disrupt the entire system’s operation.
In conclusion, the inclusion of connector pinouts in the John Deere 345 Wiring Diagram is a critical aspect of ensuring the proper functioning and safety of the tractor’s electrical system. By providing detailed information about pin assignments, the diagram empowers technicians and engineers to make reliable electrical connections, preventing misconnections and ensuring the optimal performance of the tractor.
Grounding Points
Within the intricate network of an electrical system, grounding points play a pivotal role in ensuring proper circuit operation and overall safety. The John Deere 345 Wiring Diagram places significant emphasis on providing detailed information about grounding points, empowering technicians and engineers to establish a robust electrical foundation for the tractor’s operation.
- Chassis Grounding: The chassis of the tractor serves as a common grounding point, providing a stable reference for electrical circuits. The wiring diagram specifies the locations where the electrical system connects to the chassis, ensuring proper grounding and minimizing electrical noise.
- Engine Grounding: The engine block also acts as a grounding point, particularly for circuits related to engine operation. The diagram indicates the specific locations where engine components connect to the grounding system, ensuring reliable electrical connections and optimal engine performance.
- Battery Grounding: The negative terminal of the battery is the central grounding point for the entire electrical system. The wiring diagram provides clear instructions on how to properly connect the battery to the grounding system, ensuring a secure electrical connection and preventing potential hazards.
- Additional Grounding Points: In addition to the main grounding points mentioned above, the wiring diagram may also indicate additional grounding points for specific components or circuits. These additional grounding points help to minimize electrical interference and ensure the proper functioning of sensitive electronic systems.
By adhering to the grounding point specifications outlined in the John Deere 345 Wiring Diagram, technicians and engineers can establish a solid electrical foundation for the tractor. Proper grounding prevents electrical malfunctions, reduces the risk of electrical fires, and ensures the reliable operation of all electrical systems. It is a critical aspect of maintaining the safety and performance of the tractor.
Diagnostic Procedures
Within the realm of electrical troubleshooting, diagnostic procedures play a vital role in pinpointing and resolving electrical issues efficiently and effectively. The John Deere 345 Wiring Diagram goes beyond simply providing a visual representation of the electrical system. It incorporates detailed diagnostic procedures that guide technicians through a structured process of identifying and resolving electrical problems.
- Symptom-Based Troubleshooting: The diagnostic procedures start by categorizing common electrical symptoms, such as no power, intermittent operation, or unusual noises. For each symptom, the diagram provides a series of step-by-step instructions that lead the technician through a process of elimination, checking components and circuits until the root cause of the problem is identified.
- Component Testing: The diagnostic procedures also include instructions for testing individual electrical components, such as fuses, relays, switches, and sensors. This involves using a multimeter or other diagnostic tools to measure voltage, resistance, and continuity, allowing the technician to determine whether a component is functioning properly or needs to be replaced.
- Circuit Analysis: In cases where the problem cannot be isolated to a specific component, the diagnostic procedures guide the technician through a process of circuit analysis. This involves tracing the flow of electricity through the circuit, checking for open circuits, short circuits, or incorrect connections.
- Advanced Diagnostics: For more complex electrical issues, the diagnostic procedures may include instructions for using specialized diagnostic tools, such as scan tools or oscilloscopes. These tools allow the technician to monitor electrical signals and waveforms, providing valuable insights into the behavior of the electrical system.
The inclusion of diagnostic procedures in the John Deere 345 Wiring Diagram empowers technicians with a systematic approach to electrical troubleshooting. By following the step-by-step instructions, they can quickly and accurately identify the source of electrical problems, reducing downtime and ensuring the reliable operation of the tractor. These diagnostic procedures are an invaluable resource for both experienced technicians and those who are new to electrical troubleshooting.
Safety Precautions
Within the realm of electrical systems, safety precautions are paramount to prevent accidents, injuries, and damage to equipment. The John Deere 345 Wiring Diagram places a strong emphasis on providing clear and comprehensive safety precautions, guiding technicians and users in the proper handling and maintenance of the electrical system.
- Electrical Hazard Warnings: The diagram prominently displays warnings about the potential electrical hazards associated with working on the electrical system. These warnings emphasize the importance of wearing appropriate protective gear, such as insulated gloves and safety glasses, to minimize the risk of electrical shock.
- Component Identification: The diagram clearly identifies electrical components that pose a potential safety hazard, such as high-voltage capacitors and exposed terminals. This information helps users to recognize and avoid these components, reducing the risk of accidental contact and electrical discharge.
- Grounding Instructions: The diagram provides detailed instructions on how to properly ground the electrical system. Proper grounding is essential for preventing electrical shocks and ensuring the safe operation of the tractor. The diagram specifies the location of grounding points and provides clear instructions on how to connect the grounding wires.
- Maintenance Precautions: The diagram includes precautions related to the maintenance and repair of the electrical system. It advises users to disconnect the battery before performing any electrical work and to use proper tools and techniques to avoid damaging electrical components or creating electrical hazards.
By incorporating these safety precautions into the John Deere 345 Wiring Diagram, technicians and users are equipped with the knowledge and guidance necessary to work on the electrical system safely and effectively. These precautions help to prevent accidents, protect against electrical hazards, and ensure the continued safe operation of the tractor.
Updates and Revisions
The John Deere 345 Wiring Diagram is a dynamic document that undergoes periodic updates and revisions to keep pace with the evolving electrical system of the John Deere 345 tractor. These updates and revisions are crucial for maintaining the accuracy and relevance of the diagram, ensuring its continued usefulness for troubleshooting and repairs.
- Component Changes: As new electrical components are introduced or existing components are modified, the wiring diagram is updated to reflect these changes. This ensures that technicians have the most current information when diagnosing and repairing electrical issues.
- Circuit Modifications: The electrical system may undergo modifications to improve performance or functionality. The wiring diagram is revised to document these changes, providing technicians with a clear understanding of the updated circuit design.
- Error Corrections: Occasionally, errors or omissions may be discovered in the wiring diagram. Updates are released to correct these errors, ensuring the accuracy and reliability of the information provided.
- New Diagnostic Procedures: As new diagnostic techniques and tools are developed, the wiring diagram may be updated to include these procedures. This helps technicians stay up-to-date with the latest troubleshooting methods.
These updates and revisions play a vital role in maintaining the effectiveness of the John Deere 345 Wiring Diagram. By keeping the diagram current with the latest changes to the electrical system, technicians are empowered to diagnose and repair electrical issues accurately and efficiently, ensuring the optimal performance and safety of the tractor.


Related Posts


