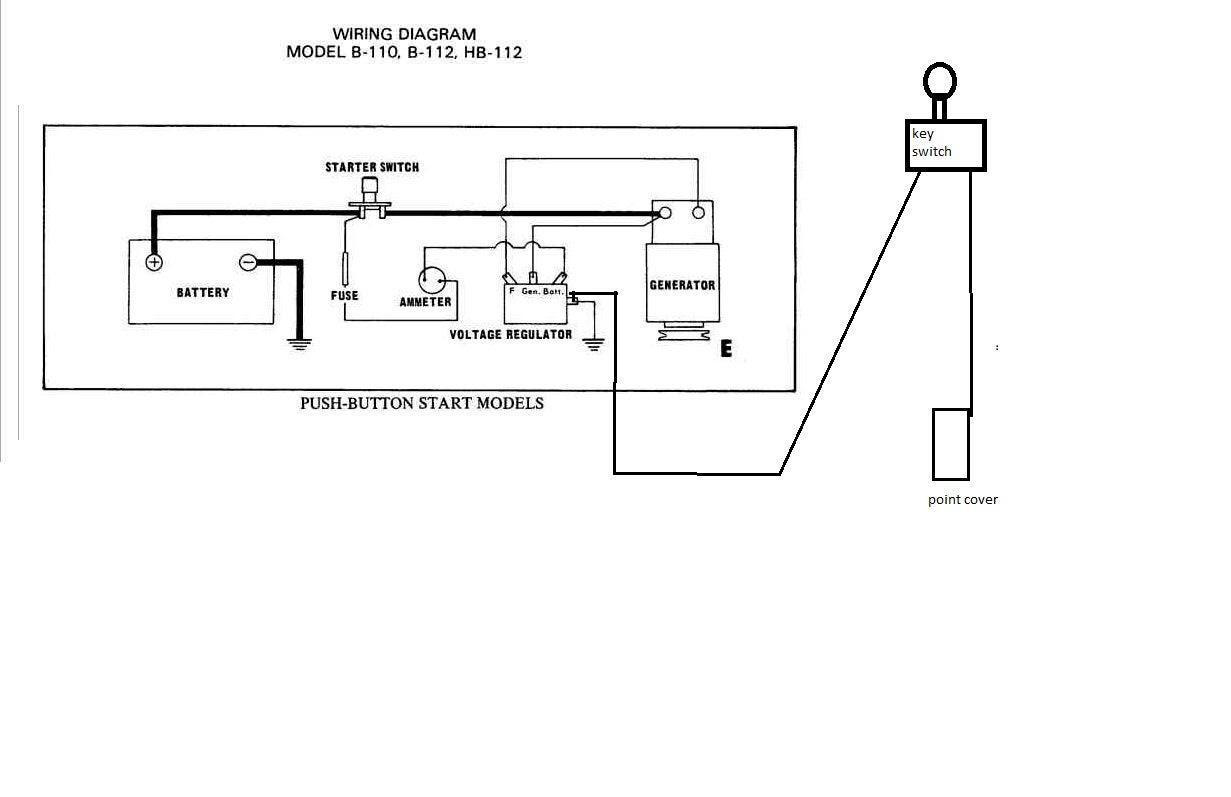
A “Predator 670 Wiring Diagram” is a detailed schematic that illustrates the electrical connections and components within Polaris’ Predator 670 all-terrain vehicle. It provides a visual representation of the wiring system, aiding in troubleshooting, repairs, and modifications.
Wiring diagrams are crucial for understanding the electrical architecture of a vehicle and ensuring safe and reliable operation. They facilitate the diagnosis and repair of electrical faults, minimize downtime, and enable customization and upgrades to the electrical system. A significant historical development in automotive wiring diagrams was the adoption of computer-aided design (CAD) software, which streamlined the creation and accuracy of these diagrams.
This article delves into the specifics of the Predator 670 Wiring Diagram, providing a thorough guide to its components, connections, and interpretation. It aims to empower users with the knowledge and understanding necessary to maintain, troubleshoot, and modify their Predator 670’s electrical system effectively.
Understanding the essential aspects of a “Predator 670 Wiring Diagram” is crucial for anyone working with the electrical system of this all-terrain vehicle. These aspects provide a comprehensive view of the diagram’s components, connections, and functionality.
- Components: Relays, fuses, switches, connectors
- Connections: Wires, terminals, splices
- Circuits: Lighting, ignition, charging
- Symbols: Standard electrical symbols
- Colors: Wire color coding
- Gauges: Wire thickness
- Locations: Component placement
- Troubleshooting: Fault diagnosis
These aspects are interconnected and provide a holistic understanding of the wiring diagram. For instance, knowing the components and their connections helps identify and troubleshoot electrical faults. Understanding the circuits allows for modifications and upgrades to the electrical system. Familiarity with symbols and colors aids in tracing wires and identifying connections. The diagram’s accuracy and completeness are essential for effective electrical work.
Components
In the context of a “Predator 670 Wiring Diagram,” components such as relays, fuses, switches, and connectors play a critical role in the proper functioning and safety of the all-terrain vehicle’s electrical system. These components act as the intermediaries between the electrical source, such as the battery, and the various electrical devices and circuits within the vehicle.
Relays are electromagnetic switches that use a small amount of current to control a larger amount of current. They are commonly used to switch high-power devices, such as headlights or winches, on and off. Fuses are designed to protect electrical circuits from damage by interrupting the flow of current when it exceeds a predetermined level. Switches allow the user to manually control the flow of current in a circuit, such as turning lights on or off. Connectors, including terminals and splices, provide a means of connecting wires together to create a complete circuit.
Understanding the relationship between these components and the “Predator 670 Wiring Diagram” enables effective troubleshooting, repair, and modification of the electrical system. By identifying the correct component and its location within the diagram, technicians can quickly diagnose and address electrical faults. Additionally, the diagram provides insights into how these components interact with each other and with the broader electrical system, allowing for informed decision-making during modifications or upgrades.
Connections
In the realm of “Predator 670 Wiring Diagram,” understanding the connections between wires, terminals, and splices is paramount. These fundamental components form the backbone of the all-terrain vehicle’s electrical system, enabling the flow of electricity and ensuring proper functionality of various electrical devices.
- Wires: The arteries of the electrical system, wires carry electrical current from the source (battery) to various components and devices. Their color coding and gauge (thickness) provide crucial information for tracing circuits and ensuring proper connections.
- Terminals: Acting as connection points, terminals provide a secure and reliable interface between wires and other components. They come in various forms, such as ring terminals, spade terminals, and bullet connectors, each suited for specific applications.
- Splices: When wires need to be joined together, splices provide a means of creating a secure and electrically sound connection. Soldered or crimped splices ensure proper current flow and prevent loose connections.
These interconnected elements form the foundation of the “Predator 670 Wiring Diagram.” By understanding their roles and relationships, technicians can effectively troubleshoot electrical faults, make repairs, and implement modifications to the electrical system. The diagram serves as a roadmap, guiding them through the intricate network of connections, ensuring the proper and safe operation of the all-terrain vehicle.
Circuits
In the intricate network of a “Predator 670 Wiring Diagram,” three fundamental circuits play a vital role in the all-terrain vehicle’s operation: lighting, ignition, and charging. These circuits are interconnected and interdependent, forming the backbone of the electrical system.
The lighting circuit illuminates the vehicle’s surroundings, enhancing visibility and safety during night or low-light conditions. It consists of headlights, taillights, brake lights, and turn signals, all connected to the battery and controlled by switches on the handlebars. A proper lighting circuit ensures clear visibility for the rider and alerts other vehicles on the road.
The ignition circuit, the heart of the electrical system, is responsible for starting the engine. It includes the ignition switch, battery, starter solenoid, and spark plugs. When the rider turns the ignition key, the circuit sends an electrical signal to the starter solenoid, engaging the starter motor to crank the engine. Once the engine starts, the ignition circuit continues to provide electricity to the spark plugs, creating the spark necessary for combustion.
The charging circuit maintains the battery’s charge to power the electrical system when the engine is running. It consists of the alternator, voltage regulator, and battery. The alternator generates electricity while the engine is running, and the voltage regulator ensures that the battery receives the correct voltage. A properly functioning charging circuit prevents the battery from draining and ensures that the electrical system has a reliable power source.
Understanding the relationship between these circuits and the “Predator 670 Wiring Diagram” is crucial for troubleshooting electrical faults, performing repairs, and customizing the electrical system. The diagram provides a visual representation of the circuits, their components, and their connections. By referencing the diagram, technicians and enthusiasts can trace circuits, identify faulty components, and make informed decisions about modifications.
Symbols
In the context of “Predator 670 Wiring Diagram,” “Symbols: Standard electrical symbols” play a critical role in conveying complex electrical information in a clear and concise manner. These standardized symbols represent various electrical components, connections, and functions, enabling technicians and enthusiasts to understand and interpret the diagram effectively.
- Component Symbols: These symbols represent specific electrical components, such as batteries, resistors, capacitors, and transistors. They provide a visual representation of the component’s function within the circuit.
- Connection Symbols: Lines and arrows indicate the flow of electricity and the connections between components. Different types of lines represent different types of connections, such as wires, buses, and grounds.
- Function Symbols: Symbols denote specific functions within the circuit, such as switches, fuses, and relays. These symbols indicate how the component affects the flow of electricity.
- Measurement Symbols: Symbols represent electrical measurements, such as voltage, current, and resistance. These symbols provide a means of specifying the electrical characteristics of the circuit.
The standardization of electrical symbols ensures consistency and clarity in wiring diagrams. By adhering to these standardized symbols, manufacturers and technicians can communicate complex electrical information across different platforms and applications. Understanding and interpreting these symbols is essential for effectively troubleshooting, repairing, and modifying the electrical system of the Predator 670 all-terrain vehicle.
Colors
In the realm of “Predator 670 Wiring Diagram,” “Colors: Wire color coding” stands as a critical component, providing a systematic approach to electrical system identification and troubleshooting. Color coding involves assigning specific colors to different types of wires, enabling technicians and enthusiasts to quickly identify and trace circuits, diagnose faults, and perform repairs efficiently.
The color coding scheme used in the “Predator 670 Wiring Diagram” is not arbitrary but follows industry standards and best practices. Each color is assigned a specific purpose or function, ensuring consistency across different circuits and components. For instance, red wires typically indicate power supply, black wires represent ground connections, and blue wires often denote lighting circuits. By adhering to these color-coding conventions, the diagram becomes a more intuitive and user-friendly resource for electrical work.
Real-life examples of color coding in the “Predator 670 Wiring Diagram” abound. The headlight circuit, for instance, consists of red wires for positive power, black wires for ground, and blue wires for the switch connection. Similarly, the ignition circuit utilizes red wires for power, black wires for ground, and yellow wires for signal transmission. These color-coded wires allow technicians to trace the flow of electricity throughout the circuit, identify faulty components, and make repairs with greater speed and accuracy.
Understanding the color coding system in the “Predator 670 Wiring Diagram” is not merely an academic exercise but has practical applications in troubleshooting, maintenance, and modification. By recognizing the color code of a particular wire, technicians can quickly identify its function and trace its path through the circuit. This knowledge enables them to pinpoint the source of electrical faults, replace damaged wires, and confidently make modifications to the electrical system. It also enhances communication among technicians, as the color coding provides a common language for describing and discussing electrical circuits.
Gauges
Within the intricate network of the “Predator 670 Wiring Diagram,” “Gauges: Wire thickness” plays a crucial role in ensuring the proper functioning and safety of the all-terrain vehicle’s electrical system. Wire gauge, measured in American Wire Gauge (AWG), directly correlates to the thickness or cross-sectional area of the wire. This seemingly technical aspect significantly impacts the electrical characteristics of the circuit, making it an essential component of the wiring diagram.
The relationship between wire gauge and the “Predator 670 Wiring Diagram” is primarily driven by the electrical current that flows through the wires. Thicker wires, with a lower AWG number, have a larger cross-sectional area and can accommodate a higher current flow without overheating or causing excessive voltage drop. Conversely, thinner wires, with a higher AWG number, have a smaller cross-sectional area and are suitable for lower current applications.
Real-life examples of the importance of wire gauge in the “Predator 670 Wiring Diagram” are evident throughout the electrical system. The main power wires, responsible for carrying high current from the battery to the major electrical components, typically use thicker wires (lower AWG) to handle the substantial current draw. In contrast, wires connecting switches or sensors, which carry relatively low current, can utilize thinner wires (higher AWG) without compromising functionality.
Understanding the relationship between wire gauge and the “Predator 670 Wiring Diagram” has practical applications in troubleshooting, maintenance, and modification of the electrical system. By referring to the wire gauge specifications in the diagram, technicians can ensure that the appropriate wire size is used for each circuit, preventing potential issues such as overheating, voltage drop, and electrical fires. Additionally, when modifying or upgrading the electrical system, understanding wire gauge allows for the selection of suitable wires that can handle the increased current demands.
Locations
In the intricate realm of the “Predator 670 Wiring Diagram,” “Locations: Component placement” stands as a fundamental aspect, shaping the functionality, accessibility, and overall integrity of the all-terrain vehicle’s electrical system. The precise placement of electrical components within the vehicle’s chassis directly influences the routing of wires, the accessibility of components for maintenance and repair, and the overall efficiency of the electrical system.
The “Predator 670 Wiring Diagram” serves as a detailed roadmap, guiding technicians and enthusiasts in understanding the physical layout of electrical components within the vehicle. By referencing the diagram, they can visualize the exact location of each component, trace the path of wires, and identify potential areas of interference or conflict. This knowledge is critical for troubleshooting electrical faults, performing maintenance tasks, and making modifications to the electrical system.
For instance, knowing the location of the battery, starter solenoid, and ignition switch is essential for diagnosing starting problems. Similarly, understanding the placement of lighting components, such as headlights, taillights, and turn signals, is crucial for ensuring proper illumination and signaling. By understanding the “Locations: Component placement” aspect of the wiring diagram, technicians can quickly identify and address electrical issues, minimizing downtime and ensuring the safe and reliable operation of the Predator 670 all-terrain vehicle.
Troubleshooting
Within the intricate network of the “Predator 670 Wiring Diagram,” “Troubleshooting: Fault diagnosis” stands as a critical aspect, empowering technicians and enthusiasts with the knowledge and tools to identify, diagnose, and resolve electrical issues within the all-terrain vehicle’s electrical system. The wiring diagram serves as a comprehensive guide, providing valuable insights into the electrical components, their connections, and their placement within the vehicle’s chassis.
- Electrical Components: The wiring diagram allows technicians to identify and locate specific electrical components, such as relays, fuses, switches, and sensors, within the vehicle’s electrical system. This knowledge is essential for troubleshooting, as it enables technicians to visually trace the flow of electricity and identify potential points of failure.
- Circuit Analysis: The diagram provides a visual representation of the electrical circuits within the Predator 670, enabling technicians to analyze the flow of current and identify potential breaks or shorts in the circuit. This analysis helps pinpoint the root cause of electrical faults and guides the troubleshooting process.
- Real-Life Scenarios: The wiring diagram serves as a valuable reference for troubleshooting real-life electrical issues. For example, if the headlights are not functioning, technicians can refer to the diagram to trace the circuit, identify potential faulty components, such as a blown fuse or a loose connection, and resolve the issue.
- Modification Implications: When modifying the electrical system of the Predator 670, the wiring diagram becomes indispensable. It allows technicians to assess the impact of modifications on the existing electrical system, ensuring that changes are made safely and without compromising the integrity of the vehicle’s electrical architecture.
In conclusion, “Troubleshooting: Fault diagnosis” is an essential aspect of the “Predator 670 Wiring Diagram,” providing a systematic approach to identifying, diagnosing, and resolving electrical faults. By understanding the electrical components, circuit analysis, real-life scenarios, and modification implications, technicians can effectively maintain and repair the electrical system of the Predator 670 all-terrain vehicle, ensuring its optimal performance and reliability.


Related Posts


