Ring Floodlight Wiring Diagram is a step-by-step guide that illustrates the proper wiring connections for installing a Ring Floodlight camera. It provides clear instructions on connecting the power supply, ground wire, and other necessary wires to ensure the camera functions correctly and safely.
Proper wiring is crucial for the Ring Floodlight camera to operate effectively and provide surveillance. By adhering to the wiring diagram, users can avoid improper connections that may lead to electrical hazards, camera malfunctions, or reduced functionality. The diagram also ensures efficient and reliable operation of the camera, allowing users to monitor their property securely.
The Ring Floodlight Wiring Diagram has become increasingly relevant due to the widespread adoption of home security systems. As homeowners seek enhanced protection for their properties, they turn to devices like the Ring Floodlight camera to deter crime and improve safety. The wiring diagram empowers users to install the camera themselves, saving on professional installation costs while ensuring the system operates as intended.
The Ring Floodlight Wiring Diagram plays a pivotal role in understanding the electrical connections necessary for the proper functioning of the security camera. It provides a clear and step-by-step guide to ensure a safe and efficient installation. Here are 10 key aspects to consider when examining the Ring Floodlight Wiring Diagram:
- Power Source: Understanding the power requirements and identifying the compatible power source for the Ring Floodlight camera.
- Electrical Safety: Adhering to electrical safety codes and guidelines to prevent electrical hazards during installation.
- Grounding: Ensuring proper grounding of the camera to protect against electrical surges and ensure stable operation.
- Wire Gauge: Selecting the appropriate wire gauge that can handle the electrical load of the Ring Floodlight camera.
- Wire Type: Choosing the correct type of wire that is suitable for outdoor use and can withstand harsh weather conditions.
- Connection Points: Identifying the connection points on the camera and the power source and making secure connections.
- Testing: Verifying the electrical connections using a multimeter or other testing equipment to ensure proper functionality.
- Troubleshooting: Understanding common wiring issues and having a troubleshooting guide to resolve any problems that may arise.
- Maintenance: Regular inspection and maintenance of the wiring connections to ensure the continued reliability of the camera.
- Compliance: Ensuring that the wiring diagram and installation comply with local building codes and electrical standards.
These aspects are interconnected and crucial for the successful installation and operation of the Ring Floodlight camera. By carefully considering each aspect and following the wiring diagram accurately, users can ensure the camera’s optimal performance, reliability, and longevity.
Power Source
Within the context of the Ring Floodlight Wiring Diagram, the Power Source aspect plays a critical role in ensuring the camera’s reliable operation. It encompasses both understanding the power requirements of the camera and selecting the appropriate power source that meets those requirements.
- Voltage Requirements: The Ring Floodlight camera requires a specific voltage range to function properly. The wiring diagram specifies the required voltage, typically 120 volts AC (alternating current) or 240 volts AC, depending on the model.
- Power Consumption: Different models of the Ring Floodlight camera have varying power consumption. The wiring diagram provides information on the camera’s power consumption, which is crucial for selecting an appropriate power source with adequate capacity.
- Power Source Options: The wiring diagram outlines the compatible power source options for the Ring Floodlight camera. These options may include connecting the camera to a standard electrical outlet, using a power adapter, or integrating it with an existing doorbell wiring system.
- Safety Considerations: The wiring diagram emphasizes the importance of adhering to electrical safety codes and guidelines. It provides instructions to ensure proper grounding of the camera to protect against electrical hazards and ensure stable operation.
Understanding the power requirements and identifying the compatible power source are foundational steps in the Ring Floodlight Wiring Diagram. By carefully considering these aspects, users can ensure that the camera receives the necessary power to function effectively and safely.
Electrical Safety
Within the context of the Ring Floodlight Wiring Diagram, Electrical Safety takes paramount importance in ensuring the safe and reliable operation of the camera. Adhering to established electrical safety codes and guidelines is a critical component of the wiring diagram, serving as a comprehensive guide to prevent electrical hazards during installation.
Electrical safety codes and guidelines are established by regulatory bodies to minimize the risks associated with electricity. These codes and guidelines provide specific requirements for the installation of electrical equipment, including the Ring Floodlight camera. By following these guidelines, users can ensure that the camera is installed correctly, reducing the chances of electrical accidents, fires, and other hazards.
One of the most important aspects of electrical safety in the context of the Ring Floodlight Wiring Diagram is proper grounding. Grounding provides a path for excess electricity to flow safely into the earth, protecting users from electrical shocks and preventing damage to the camera. The wiring diagram outlines the steps for proper grounding, ensuring that the camera is effectively grounded.
Another crucial aspect of electrical safety is the use of appropriate wire gauge and type. The wiring diagram specifies the recommended wire gauge and type based on the power requirements of the Ring Floodlight camera. Using the correct wire gauge and type ensures that the wires can safely handle the electrical load, preventing overheating and potential fires.
By adhering to electrical safety codes and guidelines, the Ring Floodlight Wiring Diagram empowers users to install the camera safely and securely. It provides a framework for proper wiring practices, reducing the risks associated with electricity and ensuring the camera’s optimal performance.
Grounding
In the context of the Ring Floodlight Wiring Diagram, grounding plays a crucial role in ensuring the camera’s safe and reliable operation. It protects the camera from electrical surges and ensures stable operation by providing a safe path for excess electricity to flow into the earth.
- Grounding Electrode: The grounding electrode is a metal rod or plate that is driven into the ground. It provides a low-resistance path for electricity to flow into the earth.
- Grounding Conductor: The grounding conductor is a wire that connects the grounding electrode to the camera. It carries excess electricity from the camera to the grounding electrode.
- Grounding Terminal: The grounding terminal is a point on the camera where the grounding conductor is connected. It provides a secure connection between the camera and the grounding system.
- Importance of Grounding: Proper grounding protects the camera from electrical surges and ensures stable operation. It prevents electrical shocks, reduces the risk of fire, and improves the camera’s overall performance and lifespan.
By ensuring proper grounding of the Ring Floodlight camera, users can enhance the camera’s safety and reliability, ensuring its optimal performance and longevity.
Wire Gauge
Within the context of the Ring Floodlight Wiring Diagram, selecting the appropriate wire gauge is crucial for ensuring the camera’s safe and reliable operation. The wire gauge refers to the thickness of the electrical wire, and it plays a critical role in determining the wire’s current-carrying capacity.
The Ring Floodlight Wiring Diagram specifies the recommended wire gauge based on the camera’s power requirements. Using a wire gauge that is too thin can lead to overheating and potential fire hazards, while using a wire gauge that is too thick can be unnecessarily expensive and bulky.
For example, if the Ring Floodlight camera requires a wire gauge of 14 AWG (American Wire Gauge), using a thinner gauge, such as 16 AWG, may not be able to handle the electrical load, leading to overheating and potential damage to the camera. Conversely, using a thicker gauge, such as 12 AWG, would be overkill and may not be necessary for the camera’s power requirements.
Therefore, carefully selecting the appropriate wire gauge based on the Ring Floodlight Wiring Diagram is essential for ensuring the camera’s optimal performance and longevity, while also adhering to electrical safety standards and minimizing potential hazards.
Wire Type
Within the context of the Ring Floodlight Wiring Diagram, selecting the correct wire type is crucial for ensuring the camera’soperation and longevity, especially in outdoor environments.
The Ring Floodlight Wiring Diagram specifies the recommended wire type based on the camera’s power requirements and the outdoor installation conditions. Using a wire type that is not suitable for outdoor use can lead to premature failure of the camera, poor performance, and potential safety hazards.
For example, if the Ring Floodlight camera is installed outdoors, it is essential to choose a wire type that is resistant to moisture, UV radiation, and extreme temperatures. Using a wire type that is not weather-resistant can result in corrosion, insulation damage, and potential electrical faults.
Therefore, carefully selecting the appropriate wire type based on the Ring Floodlight Wiring Diagram is critical for ensuring the camera’s optimal performance, durability, and safety in outdoor environments.
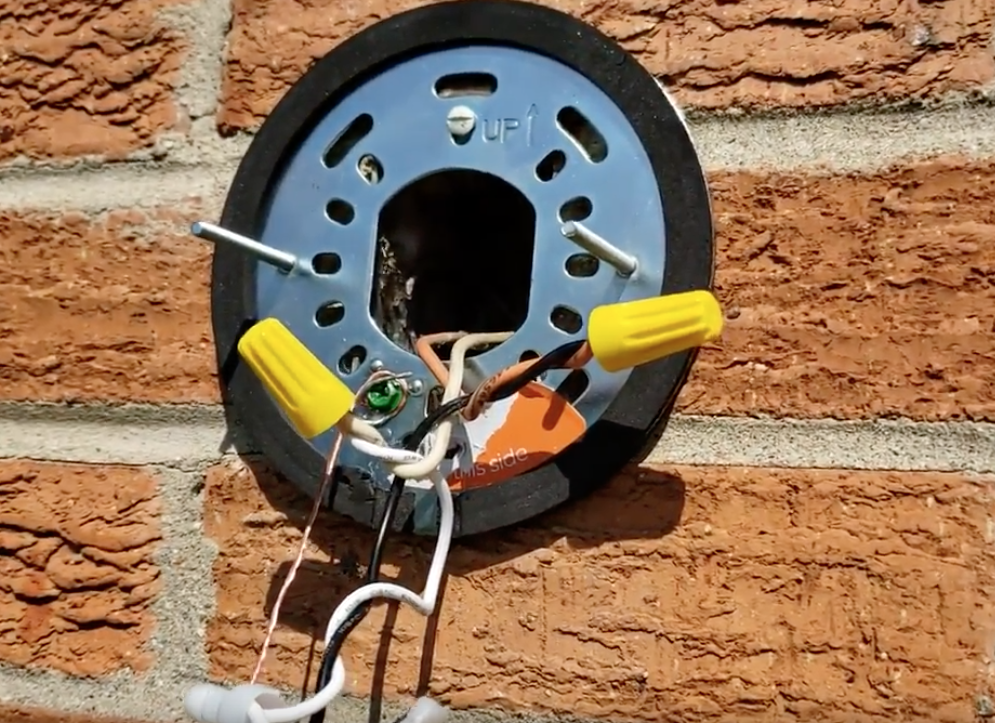
Connection Points
Within the context of the Ring Floodlight Wiring Diagram, identifying the connection points on the camera and the power source and making secure connections is a critical component for ensuring the proper functioning and safety of the security camera system.
The Ring Floodlight Wiring Diagram provides a detailed guide for users to follow when installing their camera, including clear instructions on identifying and connecting the wires to the correct terminals on both the camera and the power source. Failing to make secure connections can lead to a variety of problems, including power outages, intermittent operation, and even electrical hazards.
For example, if the power wires are not properly connected to the camera’s terminals, the camera may not receive the necessary power to operate correctly. This can result in the camera failing to record footage or respond to motion detection events. In some cases, loose or improperly connected wires can also cause electrical shorts, which can damage the camera or even pose a fire hazard.
Therefore, it is essential for users to carefully follow the instructions in the Ring Floodlight Wiring Diagram when making connections. By taking the time to identify the correct connection points and make secure connections, users can ensure that their security camera system operates reliably and safely.
Testing
Testing the electrical connections of a Ring Floodlight camera, using a multimeter or other testing equipment, is a critical step in ensuring the proper functionality and safety of the security camera system. The Ring Floodlight Wiring Diagram provides detailed instructions on how to test the electrical connections, and failing to do so can lead to a variety of problems.
One of the most important reasons for testing the electrical connections is to ensure that the camera is receiving the correct voltage. If the voltage is too low, the camera may not be able to operate properly, and if the voltage is too high, it could damage the camera. Testing the voltage can also help to identify any loose or faulty connections, which could lead to intermittent operation or even electrical hazards.
Another reason for testing the electrical connections is to ensure that the camera is properly grounded. Grounding provides a path for excess electricity to flow safely into the earth, protecting the camera from electrical surges and other hazards. Testing the ground connection can help to identify any problems with the grounding system, which could compromise the safety of the camera and the users.
Testing the electrical connections of a Ring Floodlight camera is a simple process that can be completed in a few minutes using a multimeter or other testing equipment. By following the instructions in the Ring Floodlight Wiring Diagram, users can ensure that their camera is properly installed and operating safely.
Troubleshooting
Within the context of the Ring Floodlight Wiring Diagram, troubleshooting is a critical component that empowers users to resolve any wiring issues that may arise during installation or subsequent operation of the security camera system.
The Ring Floodlight Wiring Diagram provides comprehensive instructions for installing the camera, but even with careful planning and execution, problems can occur. A troubleshooting guide helps users identify and address these issues effectively, minimizing downtime and ensuring the camera operates optimally.
For instance, if the camera fails to power on, the troubleshooting guide can guide users through a series of steps to check the power source, wiring connections, and other potential causes. By following the troubleshooting guide, users can systematically eliminate potential issues and identify the root cause of the problem.
Troubleshooting common wiring issues is essential for maintaining a reliable and secure surveillance system. By understanding the potential problems and having a troubleshooting guide at hand, users can quickly resolve any issues that may arise, ensuring the Ring Floodlight camera operates as intended.
Maintenance
Within the context of the Ring Floodlight Wiring Diagram, regular inspection and maintenance of the wiring connections play a pivotal role in ensuring the continued reliability of the security camera system. The Ring Floodlight Wiring Diagram provides comprehensive instructions for installing the camera, but even with careful planning and execution, problems can occur over time due to factors such as environmental conditions, wear and tear, or accidental damage.
Regular inspection of the wiring connections allows users to identify any potential issues early on, such as loose connections, corrosion, or damage to the insulation. By promptly addressing these issues, users can prevent them from escalating into more serious problems that could compromise the camera’s functionality or safety.
For instance, if a loose connection is left unattended, it could lead to intermittent power supply to the camera, resulting in dropped connections or even complete failure. Similarly, corrosion or damage to the insulation can increase the risk of electrical shorts or fires, posing a significant safety hazard.
Therefore, regular inspection and maintenance of the wiring connections are critical components of the Ring Floodlight Wiring Diagram, empowering users to proactively maintain the reliability and longevity of their security camera system.
Compliance
Within the context of the Ring Floodlight Wiring Diagram, compliance with local building codes and electrical standards is of paramount importance and is deeply intertwined with the overall integrity and safety of the security camera system. The Ring Floodlight Wiring Diagram provides comprehensive instructions for installing the camera, but adhering to local building codes and electrical standards is essential for ensuring a safe and code-compliant installation.
Local building codes and electrical standards are established by regulatory bodies to ensure the safety and reliability of electrical installations within a specific jurisdiction. These codes and standards cover various aspects of electrical work, including wiring methods, grounding requirements, and electrical safety measures. By complying with these codes and standards, users can minimize the risk of electrical hazards, fires, and other safety concerns.
For example, local building codes may require the use of specific types of wire for outdoor installations, such as weather-resistant wire or conduit. Electrical standards may also specify the minimum wire gauge that can be used for a particular application, based on the electrical load of the device being installed. Failure to comply with these codes and standards could result in an unsafe installation that poses a risk to both the property and its occupants.
Therefore, the Ring Floodlight Wiring Diagram emphasizes the importance of compliance with local building codes and electrical standards as a critical component of the installation process. By carefully following these codes and standards, users can ensure that their camera is installed safely and in accordance with local regulations, giving them peace of mind and protecting their property and loved ones.


Related Posts


