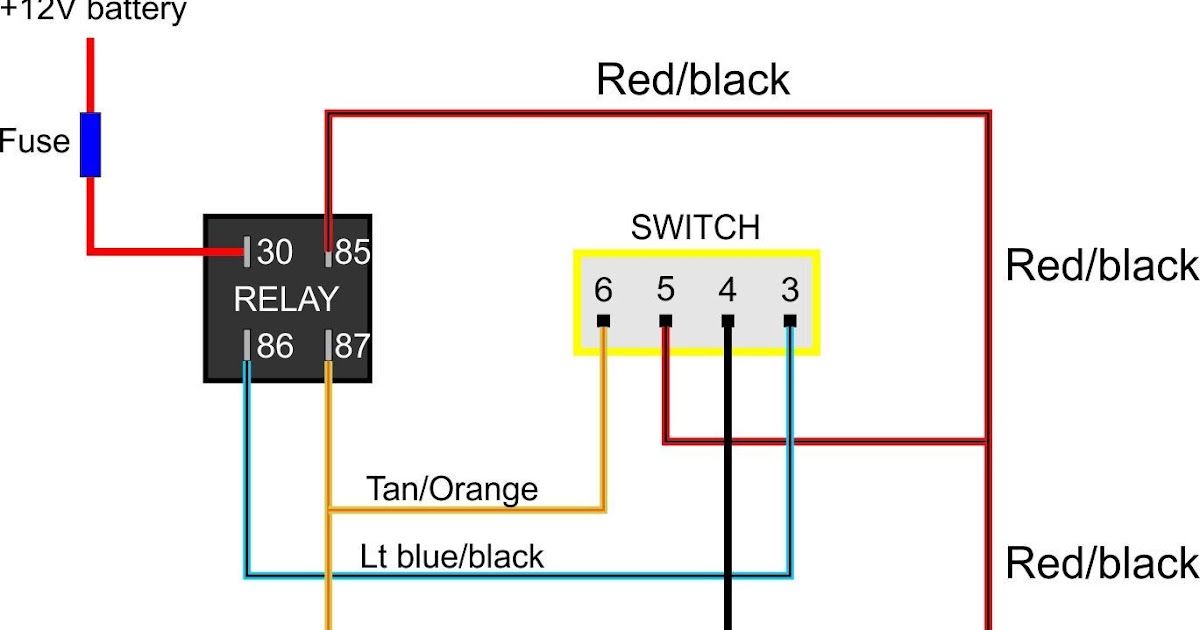
A 6 Pin Relay Wiring Diagram outlines the electrical connections for a specific relay with six terminals. It provides a visual representation of the relay’s internal circuitry, identifying the purpose and function of each terminal.
This diagram is essential for understanding the relay’s operation and ensuring its proper installation. It enables users to connect external devices, such as switches and power sources, to the relay’s terminals, creating a complete electrical circuit. By following the wiring diagram, users can control the flow of electricity through the relay, enabling it to perform tasks like switching on or off various electrical devices.
Relays play a vital role in industrial automation, power distribution, and telecommunications systems. They provide electrical isolation between different circuits, allowing for safe and efficient control of high-power devices. Historically, the invention of the electromagnetic relay in the 19th century marked a significant advancement in electrical engineering.
The key aspects of a 6 Pin Relay Wiring Diagram are essential for understanding the functionality and implementation of this important electrical component. By examining its individual elements, we gain a comprehensive understanding of its role in various electrical systems.
- Terminals: The six terminals of the relay, each serving a specific purpose in the electrical circuit.
- Coil: The electromagnetic coil that activates the relay when energized.
- Contacts: The electrical contacts that open or close when the relay is activated, controlling the flow of electricity.
- Contact Arrangement: The specific configuration of the contacts, determining the switching behavior of the relay.
- Voltage Rating: The maximum voltage that can be applied to the relay’s coil without causing damage.
- Current Rating: The maximum current that can flow through the relay’s contacts without causing damage.
- Switching Capacity: The maximum power that the relay’s contacts can switch without failure.
- Isolation: The electrical isolation between the input and output circuits provided by the relay.
- Mounting: The physical means by which the relay is secured in place, such as through-hole or surface mount.
- Applications: The various applications where 6 Pin Relays are commonly used, such as industrial automation, power distribution, and telecommunications.
These key aspects provide a comprehensive understanding of the 6 Pin Relay Wiring Diagram, enabling users to effectively design, install, and troubleshoot relay-based electrical systems. By carefully considering each aspect, engineers can ensure the proper functioning and reliability of their electrical designs.
Terminals
Within the context of a “6 Pin Relay Wiring Diagram”, the terminals play a crucial role in defining the electrical connections and functionality of the relay. Each terminal serves a specific purpose, enabling the relay to interact with external devices and perform its intended switching operations.
- Coil Terminals: These terminals provide the electrical connection to the relay’s coil, which generates a magnetic field when energized. The coil terminals are typically labeled with a “+” and “-” sign, indicating the polarity of the voltage that should be applied.
- Normally Open (NO) Contacts: These terminals represent the contacts that are open when the relay is de-energized. When the relay is energized, the NO contacts close, allowing current to flow through them.
- Normally Closed (NC) Contacts: These terminals represent the contacts that are closed when the relay is de-energized. When the relay is energized, the NC contacts open, interrupting the current flow through them.
- Common Terminal: This terminal provides a common connection point for either the NO or NC contacts, depending on the relay’s switching configuration. The common terminal is typically labeled with the letter “C”.
These terminals, along with their specific purposes, form the foundation of a 6 Pin Relay Wiring Diagram. By understanding the function of each terminal, engineers can properly connect the relay to external devices and design electrical circuits that leverage the relay’s switching capabilities effectively.
Coil
Within the context of a “6 Pin Relay Wiring Diagram”, the coil plays a pivotal role in understanding the relay’s operation and functionality. The coil is an electromagnetic component that converts electrical energy into mechanical energy, causing the relay’s contacts to open or close.
When a voltage is applied to the coil terminals, an electric current flows through the coil’s windings, generating a magnetic field. This magnetic field attracts a movable armature, which in turn actuates the relay’s contacts. The specific action of the contacts, whether they open or close, depends on the relay’s design and switching configuration.
The coil is a critical component of the 6 Pin Relay Wiring Diagram as it provides the means to control the relay’s switching operation. By applying or removing voltage to the coil, the flow of current through the coil is initiated or interrupted, causing the relay’s contacts to change state accordingly.
In real-life applications, the coil of a 6 Pin Relay is often connected to a control circuit, such as a programmable logic controller (PLC) or a microprocessor-based system. The control circuit provides the necessary voltage to energize the coil, enabling the relay to perform its intended switching function within a larger electrical system.
Understanding the relationship between the coil and the 6 Pin Relay Wiring Diagram is essential for designing and implementing relay-based control systems. By carefully considering the coil’s characteristics, such as its voltage rating, current consumption, and response time, engineers can ensure the proper operation and reliability of their electrical designs.
Contacts
Within the context of a “6 Pin Relay Wiring Diagram”, the contacts play a central role in understanding the relay’s switching functionality and its impact on the electrical circuit. The contacts are physical terminals that make or break the electrical connection between two conductors, enabling the control of current flow through the relay.
The operation of the contacts is directly linked to the activation of the relay’s coil. When a voltage is applied to the coil, it generates a magnetic field that attracts an armature, causing the contacts to change state. This state change can either open or close the electrical connection, depending on the relay’s design and switching configuration.
The contacts are a critical component of the 6 Pin Relay Wiring Diagram as they represent the physical interface between the relay’s internal switching mechanism and the external electrical circuit. By understanding the behavior and characteristics of the contacts, engineers can design circuits that effectively utilize the relay’s switching capabilities.
In real-life applications, the contacts of a 6 Pin Relay are often used to control the flow of electricity to various devices or components. For instance, in a power distribution system, a relay’s contacts may be used to switch on or off a high-power load, such as an electric motor or a lighting circuit.
Understanding the relationship between the contacts and the 6 Pin Relay Wiring Diagram is essential for designing and implementing relay-based control systems. By carefully considering the contact’s characteristics, such as their current and voltage ratings, contact material, and switching speed, engineers can ensure the proper operation and reliability of their electrical designs.
Contact Arrangement
Within the context of “6 Pin Relay Wiring Diagram”, the contact arrangement holds immense significance as it defines the switching behavior and functionality of the relay. The contact arrangement refers to the specific configuration of the relay’s contacts, determining whether they operate as normally open (NO) or normally closed (NC), and how they interact with each other when the relay is activated.
- Number of Contacts: The number of contacts in a 6 Pin Relay Wiring Diagram typically ranges from two to four, providing various options for switching configurations. The contacts can be a combination of NO and NC contacts, allowing for diverse control possibilities.
- Contact Form: The contact form describes the arrangement of the contacts within the relay. Common contact forms include SPST (single-pole single-throw), SPDT (single-pole double-throw), and DPDT (double-pole double-throw), each offering distinct switching capabilities.
- Contact Material: The material used for the contacts plays a crucial role in determining the relay’s durability, current-carrying capacity, and resistance to wear and tear. Common contact materials include silver, gold, and tungsten, each with its own advantages and applications.
- Contact Rating: The contact rating specifies the maximum current and voltage that the contacts can safely handle without compromising their integrity. Exceeding the contact rating can lead to contact damage or failure.
Understanding the contact arrangement is essential for designing and implementing relay-based control systems. By carefully considering the number of contacts, contact form, contact material, and contact rating, engineers can select the appropriate relay for their specific application and ensure reliable switching performance.
Voltage Rating
Within the context of “6 Pin Relay Wiring Diagram”, the voltage rating holds critical importance as it defines the electrical limits of the relay’s coil. The voltage rating specifies the maximum voltage that can be applied to the relay’s coil without causing damage to its internal components, ensuring safe and reliable operation.
The voltage rating is a crucial factor to consider when designing and implementing relay-based control systems. Exceeding the voltage rating can lead to coil burnout, insulation breakdown, and potential damage to the entire relay. Therefore, careful attention must be paid to selecting a relay with an appropriate voltage rating for the intended application.
Real-life examples of voltage rating considerations in 6 Pin Relay Wiring Diagrams can be found in various electrical systems. For instance, in automotive applications, relays are used to control high-power loads such as headlights and starter motors. These relays must have voltage ratings that can withstand the electrical demands of the vehicle’s electrical system.
Understanding the relationship between voltage rating and 6 Pin Relay Wiring Diagrams is essential for designing and implementing safe and reliable electrical systems. By adhering to the voltage ratings specified in the wiring diagram, engineers can ensure that the relay’s coil operates within its intended electrical parameters, preventing damage and ensuring optimal performance.
Current Rating
Within the context of “6 Pin Relay Wiring Diagram”, the current rating holds immense significance as it defines the electrical limits of the relay’s contacts. The current rating specifies the maximum amount of current that can flow through the relay’s contacts without causing damage or excessive wear, ensuring reliable switching performance.
The current rating is a critical component of “6 Pin Relay Wiring Diagram” as it determines the relay’s ability to handle the electrical load connected to its contacts. Exceeding the current rating can lead to contact overheating, arcing, and premature failure. Therefore, careful consideration must be given to selecting a relay with an appropriate current rating for the intended application.
Real-life examples of current rating considerations in “6 Pin Relay Wiring Diagrams” can be found in various electrical systems. For instance, in industrial automation, relays are used to control high-power motors and other electrical devices. These relays must have current ratings that can withstand the inrush currents and steady-state currents of the connected loads.
Understanding the relationship between current rating and “6 Pin Relay Wiring Diagrams” is essential for designing and implementing safe and reliable electrical systems. By adhering to the current ratings specified in the wiring diagram, engineers can ensure that the relay’s contacts operate within their intended electrical parameters, preventing damage, minimizing downtime, and ensuring optimal performance.
Switching Capacity
Within the realm of “6 Pin Relay Wiring Diagram”, the concept of Switching Capacity holds significant importance. It refers to the maximum amount of electrical power that the relay’s contacts can handle without experiencing damage or premature failure. Understanding and considering Switching Capacity is crucial for designing reliable electrical systems that utilize 6 Pin Relays.
- Contact Material: The material composition of the relay’s contacts directly influences their Switching Capacity. Materials like silver and gold alloys offer superior conductivity and durability, enabling higher Switching Capacities.
- Contact Design: The physical design of the contacts, including their shape, size, and surface area, impacts Switching Capacity. Larger contact surfaces and specialized designs can enhance current-carrying capabilities.
- Electrical Load: The nature of the electrical load connected to the relay’s contacts affects Switching Capacity. Inductive loads, such as motors, generate higher inrush currents, requiring relays with higher Switching Capacities.
- Environmental Factors: Operating conditions, such as temperature, humidity, and vibration, can influence Switching Capacity. Extreme environments may necessitate relays with higher ratings to ensure reliable performance.
By carefully considering these facets of Switching Capacity and selecting relays with appropriate ratings, engineers can design robust and reliable electrical systems that meet the demands of their applications. Neglecting Switching Capacity can lead to premature relay failure, circuit malfunctions, and potential safety hazards. Therefore, thorough understanding and proper consideration of Switching Capacity are essential in the context of “6 Pin Relay Wiring Diagram”.
Isolation
Within the context of “6 Pin Relay Wiring Diagram”, Isolation stands as a crucial aspect, ensuring the safe and effective operation of the relay. Isolation refers to the electrical separation between the input and output circuits of the relay, preventing unwanted current flow and maintaining distinct signal paths. Understanding and implementing Isolation are essential for designing reliable and robust electrical systems.
- Coil-Contact Isolation: The physical design of the relay ensures that the coil and contacts are electrically isolated from each other. This isolation prevents voltage spikes or transients from the coil from reaching the output contacts, protecting sensitive electronic components connected to them.
- Contact Isolation: The relay’s contacts are designed to be isolated from each other, preventing current flow between different output circuits. This isolation is critical in applications where multiple circuits need to be controlled independently, such as in power distribution systems or industrial automation.
- Input-Output Isolation: The relay provides complete electrical isolation between the input and output circuits. This isolation ensures that faults or short circuits in the output circuit do not affect the input circuit, enhancing the overall safety and reliability of the system.
- Dielectric Materials: The relay’s internal construction employs dielectric materials, such as plastic or ceramic, to maintain electrical isolation between different components. These materials prevent current leakage and ensure the integrity of the isolation barriers.
Proper consideration of Isolation in “6 Pin Relay Wiring Diagram” is paramount for safety, reliability, and optimal performance of the relay. It allows for the safe integration of relays into complex electrical systems, facilitating the control and protection of various circuits and devices. Neglecting Isolation can compromise the integrity of the system, leading to potential hazards and malfunctions.
Mounting
Within the context of “6 Pin Relay Wiring Diagram”, the method of mounting plays a crucial role in ensuring the secure and reliable operation of the relay. Mounting refers to the physical means by which the relay is fixed in place, allowing for proper electrical connections and mechanical stability.
-
Through-Hole Mounting:
Through-hole mounting involves inserting the relay’s pins through holes in a printed circuit board (PCB) or mounting panel. The pins are then soldered to pads on the other side of the board, creating a permanent and robust connection. -
Surface Mount Technology (SMT):
SMT involves soldering the relay directly onto the surface of a PCB without the use of through-holes. This method offers advantages such as reduced board space, higher production efficiency, and improved reliability due to the elimination of potential solder joint defects. -
Panel Mount:
Panel mount relays are designed to be installed on the front panel of an enclosure or equipment rack. They feature mounting flanges or brackets that allow for secure attachment and easy access to the relay’s terminals. -
DIN Rail Mount:
DIN rail mount relays are specifically designed to snap onto standard DIN rails, commonly used in industrial control systems. This method provides a convenient and standardized approach to mounting multiple relays within a control panel.
The choice of mounting method depends on factors such as the PCB design, space constraints, production requirements, and the desired level of security and reliability. Understanding the different mounting options and their implications is essential for selecting the appropriate relay and ensuring optimal performance in a given application.
Applications
The diverse applications of 6 Pin Relays highlight their versatility and importance in electrical systems. Their ability to control and isolate circuits makes them essential components in a wide range of industries and applications.
- Industrial Automation: In factories and manufacturing plants, 6 Pin Relays play a crucial role in automating processes and machinery. They are used to control motors, solenoids, and other electrical devices, enabling precise and efficient operation of production lines.
- Power Distribution: Within electrical power systems, 6 Pin Relays are employed to monitor and protect circuits. They can be configured to trip and isolate faulty sections of the grid, preventing power outages and ensuring the stability of the electrical network.
- Telecommunications: In telecommunication systems, 6 Pin Relays are used for signal routing and switching. They can be found in telephone exchanges and communication networks, facilitating the transmission and reception of data and voice signals.
- Consumer Electronics: 6 Pin Relays are also commonly found in consumer electronic devices, such as home appliances and entertainment systems. They are used to control various functions like power switching, mode selection, and safety features.
These applications demonstrate the widespread use of 6 Pin Relays and underscore their significance in modern electrical systems. Their ability to reliably control and isolate circuits makes them indispensable components in a variety of industries and devices.


Related Posts


