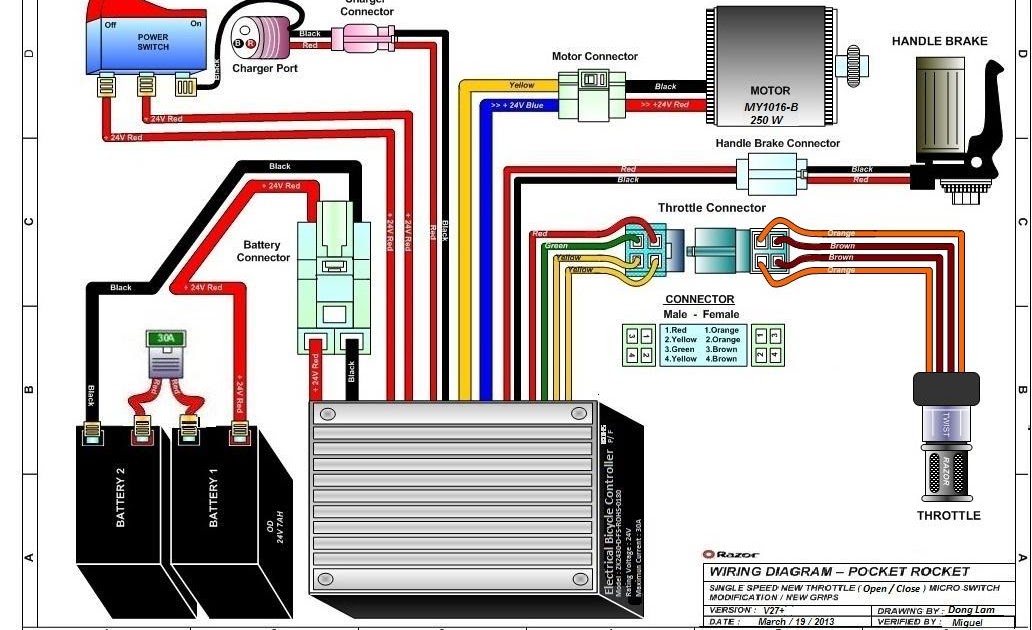
A 49cc 2 Stroke Pocket Bike Wiring Diagram is a schematic representation of the electrical connections in a 49cc 2-stroke pocket bike. It provides a visual guide to the wiring system, enabling users to understand how different electrical components are interconnected and to troubleshoot electrical problems.
The wiring diagram is crucial for ensuring the proper functioning and safety of the pocket bike. It helps identify the correct wire connections for components such as the battery, ignition switch, throttle, and lights. Understanding the wiring diagram empowers users to make modifications or repairs to the electrical system as needed.
Historically, the development of pocket bike wiring diagrams has paralleled the evolution of these vehicles. As pocket bikes became more sophisticated, their electrical systems grew more complex, necessitating detailed wiring diagrams to ensure proper operation and maintenance. These diagrams have become indispensable tools for both casual users and mechanics.
The key aspects of a 49cc 2 Stroke Pocket Bike Wiring Diagram are crucial for understanding its functionality and ensuring the proper operation and maintenance of the pocket bike. Here are 10 key aspects to consider:
- Components: The wiring diagram identifies all the electrical components in the pocket bike, including the battery, ignition switch, throttle, lights, and more.
- Connections: The diagram shows how these components are interconnected, providing a visual representation of the electrical system.
- Wire colors: The wiring diagram typically uses color-coded wires to distinguish between different circuits and functions.
- Fuses: The diagram indicates the location and amperage of fuses, which protect the electrical system from overcurrent.
- Grounding: The diagram shows how the electrical system is grounded, which is essential for safety and proper functioning.
- Troubleshooting: The wiring diagram can be used to troubleshoot electrical problems, by identifying potential faults and guiding the user to the correct components.
- Modifications: The diagram can be used as a guide for making modifications to the electrical system, such as adding accessories or upgrading components.
- Maintenance: The wiring diagram can assist in performing maintenance tasks, such as checking wire connections and replacing faulty components.
- Safety: Understanding the wiring diagram is important for ensuring the safe operation of the pocket bike, by identifying potential electrical hazards.
- Customization: The wiring diagram can be used to customize the electrical system to suit specific needs or preferences.
These aspects are interconnected and essential for understanding the 49cc 2 Stroke Pocket Bike Wiring Diagram. By comprehending these aspects, users can effectively troubleshoot problems, make modifications, and maintain the electrical system of their pocket bike, ensuring its optimal performance and safety.
Components
The wiring diagram of a 49cc 2 Stroke Pocket Bike serves as a comprehensive guide to the electrical system, identifying and depicting the interconnections of its various components. Understanding these components is essential for troubleshooting, maintenance, and modifications.
- Battery: The battery is the power source for the electrical system, providing electricity to start the engine and operate various electrical components.
- Ignition Switch: The ignition switch controls the flow of electricity to the ignition system, allowing the engine to start and run.
- Throttle: The throttle controls the speed of the engine by regulating the flow of air and fuel into the carburetor.
- Lights: The wiring diagram specifies the connections for the headlight, taillight, and turn signals, ensuring proper illumination and visibility.
These components, along with others such as fuses, relays, and switches, work together to ensure the safe and efficient operation of the pocket bike’s electrical system. The wiring diagram provides a roadmap for understanding and managing these components, enabling users to diagnose problems, make modifications, and maintain the electrical system effectively.
Connections
The connections in a 49cc 2 Stroke Pocket Bike Wiring Diagram are crucial for the proper functioning of the electrical system. The diagram provides a visual representation of how the various electrical components are interconnected, enabling users to understand the flow of electricity and troubleshoot any issues.
Without a clear understanding of these connections, it would be challenging to diagnose and repair electrical problems. The diagram serves as a roadmap for tracing circuits and identifying faulty components. For instance, if the headlight is not working, the diagram can guide the user to check the connections between the headlight, the ignition switch, and the battery.
Moreover, the connections in the wiring diagram are essential for ensuring the safety of the pocket bike. Incorrect connections can lead to electrical shorts or fires. The diagram provides a clear guide to ensure that all connections are made correctly, minimizing the risk of electrical hazards.
In conclusion, the connections in a 49cc 2 Stroke Pocket Bike Wiring Diagram are vital for understanding the electrical system, troubleshooting problems, and ensuring the safe operation of the pocket bike. The diagram provides a visual representation of the electrical connections, enabling users to trace circuits, identify faulty components, and make necessary repairs or modifications.
Wire colors
In the context of a 49cc 2 Stroke Pocket Bike Wiring Diagram, wire colors play a crucial role in organizing and simplifying the electrical system. The use of color-coded wires helps to distinguish between different circuits and functions, making it easier to trace connections, troubleshoot problems, and perform maintenance.
- Standardized Color Codes: Wiring diagrams often adhere to standardized color codes, where specific colors are assigned to particular functions. For instance, red wires typically indicate positive connections, black wires represent negative or ground connections, and blue wires may signify lighting circuits.
- Simplified Troubleshooting: Color-coded wires aid in troubleshooting electrical issues by allowing users to quickly identify and isolate faulty circuits. By following the colored wires, it becomes easier to pinpoint the source of a problem, whether it’s a loose connection, a blown fuse, or a malfunctioning component.
- Efficient Maintenance: Color-coded wires facilitate maintenance tasks by providing a visual guide to the electrical system. When replacing components or making modifications, users can easily identify the correct wires to connect, reducing the risk of errors and ensuring proper functionality.
- Enhanced Safety: Color-coded wires contribute to the safety of the pocket bike by preventing incorrect connections. By following the designated color scheme, users can minimize the chances of electrical shorts or other hazards that could compromise the safety of the rider or damage the bike.
In conclusion, the use of color-coded wires in a 49cc 2 Stroke Pocket Bike Wiring Diagram is essential for organizing the electrical system, simplifying troubleshooting, enabling efficient maintenance, and enhancing safety. By following the standardized color codes, users can effectively navigate the electrical system, diagnose problems, and maintain the pocket bike in optimal condition.
Fuses
In the realm of 49cc 2 Stroke Pocket Bike Wiring Diagrams, fuses play a critical role in safeguarding the electrical system from potential damage caused by overcurrent. These diagrams provide essential information about the location and amperage of fuses, enabling users to understand their function and perform necessary maintenance tasks.
-
Protection from Overloads:
Fuses act as protective devices, safeguarding the electrical system from overloads that could lead to damage or even fire. When the current flowing through a circuit exceeds the fuse’s rated amperage, the fuse “blows,” interrupting the circuit and preventing further damage. -
Specific Amperage Ratings:
Each fuse is designed to handle a specific amperage, which is indicated on the fuse itself. This rating determines the maximum amount of current that the fuse can safely handle before blowing. Choosing the correct amperage fuse is crucial to ensure proper protection without causing unnecessary interruptions. -
Easy Identification:
Wiring diagrams clearly indicate the location of fuses, making it easy for users to identify and access them when needed. This simplifies troubleshooting and fuse replacement, ensuring that the electrical system remains protected. -
Preventive Maintenance:
Regularly checking and replacing fuses is an essential part of pocket bike maintenance. By adhering to the fuse specifications provided in the wiring diagram, users can proactively prevent electrical problems and extend the lifespan of the electrical system.
In conclusion, understanding the role of fuses in a 49cc 2 Stroke Pocket Bike Wiring Diagram is paramount for ensuring the safety and longevity of the electrical system. By carefully following the diagram’s specifications, users can effectively protect their pocket bikes from overcurrent conditions, minimizing the risk of damage and maximizing the riding experience.
Grounding
In the context of a 49cc 2 Stroke Pocket Bike Wiring Diagram, grounding plays a crucial role in ensuring the electrical system’s safety and functionality. It provides a common reference point for electrical circuits, preventing voltage fluctuations and potential hazards.
-
Frame Grounding
In many pocket bikes, the electrical system is grounded to the frame. This means that the metal frame of the bike acts as a conductor, providing a path for electrical current to flow back to the negative terminal of the battery. -
Dedicated Ground Wire
Some pocket bikes utilize a dedicated ground wire to connect the electrical system to a grounding point on the frame or engine. This wire ensures a reliable and low-resistance connection, minimizing voltage drops and potential interference. -
Multiple Grounding Points
For added safety and stability, some wiring diagrams may incorporate multiple grounding points. This redundant grounding provides alternative paths for current flow, enhancing the overall reliability of the electrical system. -
Safety Implications
Proper grounding is crucial for preventing electrical shocks and ensuring the safe operation of the pocket bike. Without proper grounding, stray electrical currents can accumulate, increasing the risk of electrical hazards and damage to components.
In summary, grounding plays a vital role in a 49cc 2 Stroke Pocket Bike Wiring Diagram. By providing a common reference point and preventing voltage fluctuations, grounding ensures the safety and proper functioning of the electrical system, minimizing the risk of electrical hazards and maximizing the riding experience.
Troubleshooting
In the context of a 49cc 2 Stroke Pocket Bike Wiring Diagram, troubleshooting plays a pivotal role in diagnosing and resolving electrical issues. The wiring diagram serves as an essential tool for this process, providing a roadmap of the electrical system’s connections and components.
When an electrical problem arises, the wiring diagram enables users to methodically trace circuits, identify potential faults, and pinpoint the malfunctioning component. This systematic approach saves time and effort compared to randomly checking components without a clear understanding of the system’s layout.
For instance, if the pocket bike’s headlight is not functioning, the wiring diagram can guide the user in checking the connections from the battery to the headlight switch, and then to the headlight itself. By following the diagram, the user can quickly isolate the faulty component or connection, whether it be a loose wire, a blown fuse, or a malfunctioning switch.
The ability to troubleshoot electrical problems using the wiring diagram empowers users to maintain and repair their pocket bikes with greater confidence. By understanding the electrical system’s intricacies, they can proactively address issues, minimize downtime, and ensure the pocket bike’s optimal performance.
Modifications
Within the context of a 49cc 2 Stroke Pocket Bike Wiring Diagram, modifications refer to alterations or additions made to the electrical system to enhance its functionality or suit specific preferences. The wiring diagram serves as a crucial guide for these modifications, providing a clear understanding of the system’s connections and components.
-
Adding Accessories
The wiring diagram guides users in integrating additional electrical accessories, such as lights, horns, or charging ports. It specifies the appropriate connections and wire gauges to ensure compatibility and prevent overloading the electrical system.
-
Upgrading Components
The diagram assists in upgrading existing electrical components, such as replacing the stock ignition coil with a performance coil or installing a higher-output stator to generate more power. It ensures proper compatibility and wiring configurations for optimal performance.
-
Customizing Lighting
For aesthetic or visibility enhancements, the wiring diagram aids in modifying the lighting system. Users can add custom LED lights, wire them to existing switches, and adjust the wiring to achieve desired lighting effects.
-
Performance Enhancements
The diagram enables modifications aimed at improving the pocket bike’s performance. It guides in installing aftermarket ignition systems, re-jetting carburetors, and making electrical adjustments to optimize engine performance and responsiveness.
These modifications empower users to tailor their pocket bikes to their specific needs and preferences. By utilizing the wiring diagram as a guide, they can confidently make electrical modifications, enhance the functionality of their pocket bikes, and maximize their riding experience.
Maintenance
A 49cc 2 Stroke Pocket Bike Wiring Diagram plays a vital role in facilitating maintenance tasks. It provides a detailed visual representation of the electrical system’s connections and components, enabling users to troubleshoot and resolve electrical issues with ease.
The wiring diagram serves as a comprehensive guide for performing regular maintenance tasks, such as:
- Checking Wire Connections: The diagram allows users to visually inspect wire connections for signs of damage, corrosion, or loose contacts. Regular checks can prevent electrical malfunctions and ensure the reliability of the electrical system.
- Replacing Faulty Components: When electrical components fail, the wiring diagram guides users in identifying and replacing them. It provides information on the location, specifications, and wiring connections of each component, enabling efficient and accurate repairs.
- Troubleshooting Electrical Problems: The diagram aids in diagnosing and resolving electrical problems. By tracing the electrical circuits and identifying potential fault points, users can quickly pinpoint the root cause of the issue and make necessary repairs.
In summary, the wiring diagram is an essential tool for maintaining the electrical system of a 49cc 2 Stroke Pocket Bike. It empowers users to perform maintenance tasks effectively, troubleshoot problems, and ensure the optimal performance of their pocket bikes.
Safety
When it comes to 49cc 2 Stroke Pocket Bikes, the wiring diagram serves as a crucial component in ensuring the safe operation of the vehicle. By providing a detailed visual representation of the electrical system’s connections and components, the wiring diagram empowers users to identify and address potential electrical hazards, minimizing the risk of accidents or injuries.
Understanding the wiring diagram allows users to:
- Identify Potential Hazards: The diagram helps users recognize potential electrical hazards, such as loose connections, damaged wires, or overloaded circuits. By visually tracing the circuits and components, they can proactively identify areas that may pose a safety risk.
- Prevent Electrical Fires: Electrical fires are a major concern in pocket bikes. The wiring diagram enables users to identify and correct electrical faults that could lead to overheating, sparking, or fires. Proper maintenance and adherence to the wiring diagram’s specifications can significantly reduce the risk of electrical fires.
- Ensure Proper Grounding: Grounding is essential for the safe operation of the electrical system. The wiring diagram provides information on grounding points and connections, ensuring that the electrical system is properly grounded to prevent electrical shocks or damage to components.
In summary, understanding the wiring diagram of a 49cc 2 Stroke Pocket Bike is paramount for ensuring the safe operation of the vehicle. By identifying potential electrical hazards, preventing electrical fires, and ensuring proper grounding, users can minimize the risk of accidents or injuries, maximizing their riding experience.
Customization
Within the realm of 49cc 2 Stroke Pocket Bike Wiring Diagrams, customization plays a significant role in tailoring the electrical system to meet specific requirements and preferences. The wiring diagram serves as a blueprint, empowering users to modify and enhance the electrical components to suit their unique needs.
-
Performance Enhancements
Enthusiasts can leverage the wiring diagram to optimize the ignition system, fuel injection, and other electrical components to boost engine performance and responsiveness. Customizing these parameters allows riders to fine-tune their pocket bikes for increased speed and acceleration.
-
Lighting Modifications
The wiring diagram provides a roadmap for customizing the lighting system. Users can add auxiliary lights, change the color of existing lights, or install custom lighting patterns to enhance visibility and personalize the aesthetics of their pocket bikes.
-
Accessory Integration
The wiring diagram guides the integration of additional electrical accessories, such as GPS devices, charging ports, or audio systems. By carefully following the diagram, users can ensure proper connections and compatibility, expanding the functionality of their pocket bikes.
-
Safety Features
Customization can also extend to safety features. The wiring diagram enables users to add or modify electrical components related to braking systems, turn signals, or anti-theft devices, enhancing the overall safety and peace of mind while riding.
In essence, the customization aspect of a 49cc 2 Stroke Pocket Bike Wiring Diagram empowers users to tailor their electrical systems to match their individual preferences, performance goals, and safety requirements. By understanding the wiring diagram and applying their creativity, riders can transform their pocket bikes into truly unique and personalized machines.


Related Posts


