A “4 Ohm To 1 Ohm Wiring Diagram” outlines the electrical connections between a 4 Ohm speaker and a 1 Ohm amplifier. In practice, this is often used in car audio systems to achieve increased sound output and power handling.
This specific wiring configuration is significant because it allows for more efficient use of the amplifier’s power and improved overall sound quality. Historically, the development of high-powered car audio amplifiers led to the need for impedance matching between speakers and amplifiers, making this wiring technique increasingly relevant.
This article will delve deeper into the technical details, advantages, and considerations involved in implementing a 4 Ohm To 1 Ohm Wiring Diagram for car audio systems. It will provide a comprehensive understanding of this essential aspect of car audio system design and optimization.
In the context of “4 Ohm To 1 Ohm Wiring Diagram,” understanding the key aspects is crucial for optimizing car audio system performance. These aspects encompass various dimensions related to the wiring diagram, impacting its functionality and effectiveness.
- Impedance Matching: Ensures efficient power transfer between amplifier and speaker.
- Power Handling: Maximizes power output while minimizing distortion.
- Sound Quality: Improves clarity, reduces noise, and enhances overall listening experience.
- Wiring Configuration: Outlines specific connections for achieving 4 Ohm to 1 Ohm conversion.
- Amplifier Compatibility: Ensures compatibility between the amplifier and the speaker’s impedance.
- Speaker Specifications: Considers the speaker’s power handling capacity and impedance.
- Car Audio System Design: Integrates the wiring diagram into the overall system design.
- Safety Considerations: Adheres to electrical safety guidelines to prevent damage or hazards.
These aspects are interconnected and play a vital role in achieving optimal performance from a 4 Ohm To 1 Ohm Wiring Diagram implementation. Understanding their significance enables enthusiasts to design and optimize car audio systems that deliver exceptional sound quality, increased power output, and enhanced listening experiences.
Impedance Matching
In the context of a 4 Ohm To 1 Ohm Wiring Diagram, impedance matching plays a critical role in ensuring efficient power transfer between the amplifier and the speaker. Impedance, measured in ohms, represents the resistance of a circuit to the flow of alternating current. In an audio system, the amplifier’s output impedance should match the speaker’s impedance to maximize power transfer and minimize distortion.
When impedance matching is achieved, the amplifier can deliver its full power to the speaker without encountering excessive resistance. This results in increased sound output, improved sound quality, and reduced strain on the amplifier. Conversely, if the impedance is mismatched, power transfer is compromised, leading to reduced sound output, increased distortion, and potential damage to the amplifier or speaker.
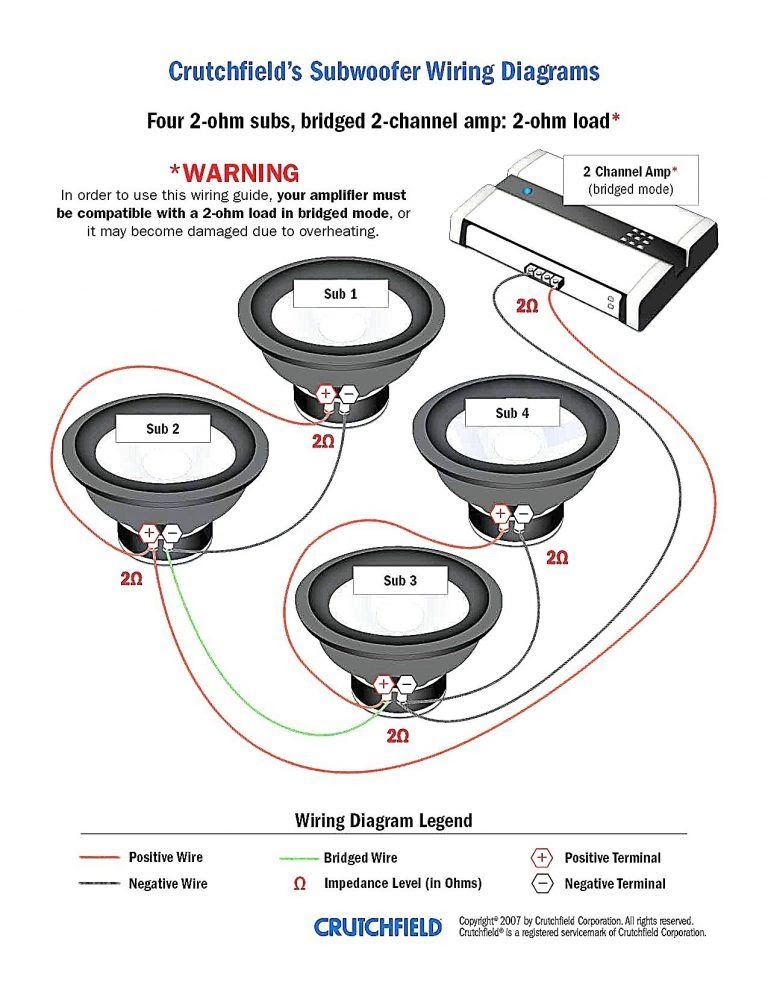
In a 4 Ohm To 1 Ohm Wiring Diagram, the impedance matching is achieved by connecting multiple speakers in parallel. This effectively reduces the overall impedance of the circuit to 1 Ohm, which matches the amplifier’s output impedance. This configuration allows the amplifier to deliver its full power to the speakers, resulting in increased sound output and improved sound quality.
Understanding the connection between impedance matching and a 4 Ohm To 1 Ohm Wiring Diagram is essential for designing and optimizing car audio systems. Proper impedance matching ensures efficient power transfer, maximizes sound output, and enhances the overall listening experience.
Power Handling
In a car audio system, power handling refers to the ability of the speakers to handle the power output of the amplifier without causing damage or distortion. When using a 4 Ohm To 1 Ohm Wiring Diagram, power handling becomes a critical factor due to the increased power output that is possible.
By reducing the overall impedance of the circuit to 1 Ohm, the amplifier is able to deliver more power to the speakers. This increased power output can result in louder sound and improved sound quality. However, if the speakers are not able to handle this increased power, they may become damaged or produce distorted sound.
Therefore, when using a 4 Ohm To 1 Ohm Wiring Diagram, it is important to ensure that the speakers are capable of handling the increased power output. This can be done by checking the speaker’s power handling specifications and making sure that they are compatible with the amplifier’s power output.
By carefully considering power handling when using a 4 Ohm To 1 Ohm Wiring Diagram, it is possible to maximize power output while minimizing distortion and ensuring that the speakers are not damaged.
Sound Quality
In the context of a 4 Ohm To 1 Ohm Wiring Diagram, sound quality plays a pivotal role in enhancing the overall listening experience. By reducing the impedance of the circuit to 1 Ohm, the amplifier is able to deliver more power to the speakers, resulting in increased sound output. However, increased power output alone does not guarantee improved sound quality.
A 4 Ohm To 1 Ohm Wiring Diagram can significantly improve sound quality by increasing clarity, reducing noise, and enhancing the overall listening experience. This is because the lower impedance allows the amplifier to better control the speakers, resulting in tighter bass response, clearer mids, and more detailed highs. Additionally, the reduced impedance helps to reduce noise and distortion, resulting in a cleaner and more enjoyable sound.
Real-life examples of the improved sound quality provided by a 4 Ohm To 1 Ohm Wiring Diagram can be heard in car audio systems. By implementing this wiring configuration, car audio enthusiasts can experience a noticeable improvement in the clarity, richness, and overall sound quality of their music. The increased power output and improved control over the speakers result in a more immersive and enjoyable listening experience.
Understanding the connection between sound quality and a 4 Ohm To 1 Ohm Wiring Diagram is crucial for anyone looking to optimize their car audio system. By carefully considering the impact of impedance on sound quality, it is possible to achieve a significant improvement in the overall listening experience.
Wiring Configuration
In the context of a 4 Ohm To 1 Ohm Wiring Diagram, the wiring configuration plays a critical role in achieving the desired impedance conversion. This wiring configuration outlines the specific connections that need to be made between the amplifier and the speakers to reduce the overall impedance of the circuit to 1 Ohm.
The importance of the wiring configuration cannot be overstated. Without the correct wiring configuration, it is impossible to achieve the desired impedance conversion and obtain the benefits associated with a 4 Ohm To 1 Ohm Wiring Diagram. The specific wiring configuration depends on the number and type of speakers being used, as well as the amplifier’s output impedance.
Real-life examples of wiring configurations for a 4 Ohm To 1 Ohm Wiring Diagram can be found in car audio systems. In a typical car audio system, multiple 4 Ohm speakers are connected in parallel to achieve a 1 Ohm load. This wiring configuration allows the amplifier to deliver more power to the speakers, resulting in increased sound output and improved sound quality.
Understanding the wiring configuration for a 4 Ohm To 1 Ohm Wiring Diagram is essential for anyone looking to implement this configuration in their own car audio system. By carefully following the specific connections outlined in the wiring configuration, it is possible to achieve the desired impedance conversion and enjoy the benefits of increased power output and improved sound quality.
Amplifier Compatibility
Within the context of “4 Ohm To 1 Ohm Wiring Diagram,” amplifier compatibility plays a crucial role in ensuring the efficient and safe operation of the audio system. Amplifier compatibility encompasses various aspects related to matching the amplifier’s output impedance with the speaker’s impedance to achieve optimal performance.
-
Impedance Matching
Matching the amplifier’s output impedance to the speaker’s impedance is essential for maximizing power transfer and minimizing distortion. A 4 Ohm To 1 Ohm Wiring Diagram utilizes multiple speakers connected in parallel to achieve a 1 Ohm load, ensuring compatibility with amplifiers designed for 1 Ohm operation.
-
Power Handling
Amplifier compatibility considers the power handling capabilities of both the amplifier and the speakers. Using a 4 Ohm To 1 Ohm Wiring Diagram with an amplifier that exceeds the speakers’ power handling capacity can lead to damage or premature failure.
-
Speaker Protection
Amplifier compatibility includes protection features to safeguard the speakers from damage caused by excessive power, overloads, or short circuits. Amplifiers with built-in protection circuits help prevent speaker damage in the event of abnormal conditions.
-
Sound Quality
Proper amplifier compatibility contributes to enhanced sound quality by minimizing distortion and ensuring a clean, accurate sound reproduction. Matching the amplifier’s output impedance to the speaker’s impedance reduces impedance mismatch, which can cause frequency response irregularities and reduced clarity.
Understanding amplifier compatibility is key to designing and implementing a 4 Ohm To 1 Ohm Wiring Diagram effectively. By carefully considering the impedance matching, power handling capabilities, speaker protection features, and impact on sound quality, it is possible to achieve a harmonious integration between the amplifier and speakers, resulting in an optimized audio system performance.
Speaker Specifications
In the context of a 4 Ohm To 1 Ohm Wiring Diagram, speaker specifications play a critical role in ensuring the safe and efficient operation of the audio system. Speaker specifications encompass various parameters, including power handling capacity and impedance, which must be carefully considered when implementing this wiring configuration.
The power handling capacity of a speaker refers to its ability to withstand the electrical power delivered by the amplifier without sustaining damage. Exceeding the speaker’s power handling capacity can lead to distortion, premature failure, or even complete destruction of the speaker. When using a 4 Ohm To 1 Ohm Wiring Diagram, it is important to select speakers that have a power handling capacity that is compatible with the amplifier’s output power.
Speaker impedance is another crucial specification that must be considered in a 4 Ohm To 1 Ohm Wiring Diagram. Impedance represents the resistance of the speaker to the flow of electrical current. Matching the amplifier’s output impedance to the speaker’s impedance is essential for maximizing power transfer and minimizing distortion. In a 4 Ohm To 1 Ohm Wiring Diagram, multiple speakers are connected in parallel to achieve a total impedance of 1 Ohm, which matches the amplifier’s output impedance and ensures efficient power transfer.
Real-life examples of the importance of speaker specifications in a 4 Ohm To 1 Ohm Wiring Diagram can be found in car audio systems. Car audio enthusiasts often use this wiring configuration to increase the power output and improve the sound quality of their systems. By carefully selecting speakers with appropriate power handling capacity and impedance, they can ensure that their speakers can handle the increased power and that the system operates at its optimal performance.
Understanding the connection between speaker specifications and a 4 Ohm To 1 Ohm Wiring Diagram is essential for anyone looking to implement this configuration in their own audio system. By carefully considering the power handling capacity and impedance of the speakers, it is possible to ensure the safe and efficient operation of the system, maximizing power transfer, minimizing distortion, and enjoying high-quality sound.
Car Audio System Design
Within the context of “4 Ohm To 1 Ohm Wiring Diagram,” car audio system design plays a critical role in integrating the wiring diagram into the overall system architecture. This integration encompasses various aspects related to system components, power distribution, sound quality optimization, and safety considerations.
-
Component Selection
Car audio system design involves selecting appropriate components, such as amplifiers, speakers, and wiring, that are compatible with the 4 Ohm To 1 Ohm Wiring Diagram. This includes matching the power handling capacity of the speakers to the amplifier’s output power and ensuring that the wiring can handle the increased current flow.
-
Power Distribution
The design must consider the power distribution throughout the system, taking into account the increased power demands of the 4 Ohm To 1 Ohm Wiring Diagram. This may involve upgrading the electrical system, using larger gauge wiring, and incorporating additional power distribution components.
-
Sound Quality Optimization
Car audio system design aims to optimize sound quality by carefully integrating the 4 Ohm To 1 Ohm Wiring Diagram. This includes selecting speakers with appropriate frequency response and dispersion characteristics and tuning the system to achieve a balanced and immersive sound experience.
-
Safety Considerations
Safety is paramount in car audio system design. The integration of the 4 Ohm To 1 Ohm Wiring Diagram must adhere to electrical safety standards, including proper grounding, circuit protection, and heat dissipation management.
Understanding the integration of the 4 Ohm To 1 Ohm Wiring Diagram into the overall car audio system design is essential for achieving optimal performance and maintaining system integrity. By carefully considering component selection, power distribution, sound quality optimization, and safety considerations, it is possible to design and implement a car audio system that delivers exceptional sound quality, increased power output, and a safe and enjoyable listening experience.
Safety Considerations
In the context of “4 Ohm To 1 Ohm Wiring Diagram,” safety considerations play a critical role in ensuring the safe and reliable operation of the audio system. By adhering to electrical safety guidelines, it is possible to prevent damage to equipment, electrical hazards, and potential injuries.
The increased power output and lower impedance associated with a 4 Ohm To 1 Ohm Wiring Diagram necessitate careful attention to safety considerations. This includes using appropriate gauge wiring to handle the increased current flow, properly grounding the system to prevent electrical shocks, and installing circuit protection devices to safeguard against overloads and short circuits.
Real-life examples of safety considerations in a 4 Ohm To 1 Ohm Wiring Diagram include using high-quality OFC (oxygen-free copper) wiring to minimize resistance and heat buildup, installing inline fuses or circuit breakers to protect the amplifier and speakers from excessive current, and ensuring that all electrical connections are secure and insulated to prevent short circuits.
Understanding the connection between safety considerations and a 4 Ohm To 1 Ohm Wiring Diagram is essential for anyone looking to implement this configuration safely and effectively. By adhering to electrical safety guidelines, it is possible to mitigate risks, ensure the longevity of the audio system, and enjoy high-quality sound without compromising safety.


Related Posts


