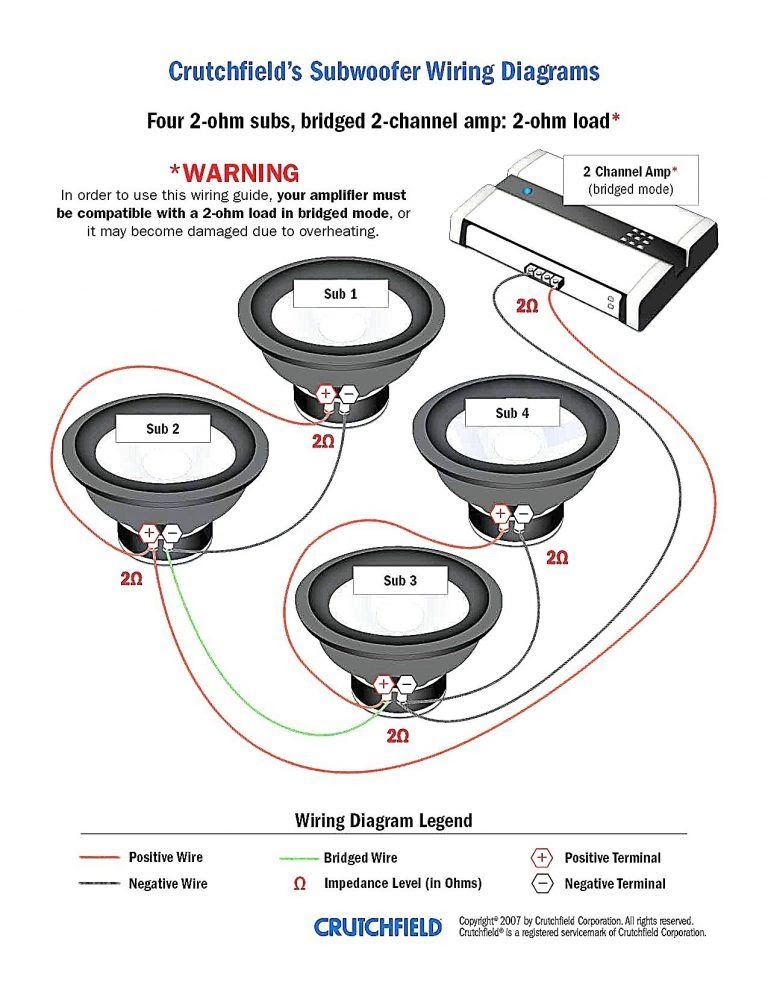
A “2 Ohm Dvc Wiring Diagram” depicts the electrical connections for a dual voice coil (DVC) woofer with a 2 Ohm impedance. It provides a clear representation of how to connect the woofer’s coils to an amplifier to achieve optimal performance. For instance, in a subwoofer box, two 4-Ohm DVC woofers can be wired in parallel using a 2 Ohm Dvc Wiring Diagram, resulting in a total impedance of 2 Ohms.
This type of wiring diagram is crucial for ensuring proper sound reproduction and preventing damage to the amplifier or woofers. Benefits include increased power handling, enhanced sound quality, and flexibility in system design. A major historical development was the introduction of low-impedance woofers, which enabled higher power output and greater efficiency.
As we delve deeper into this article, we will explore the intricacies of 2 Ohm DVC Wiring Diagrams, examining their significance in car audio systems and offering practical guidance for their implementation. By understanding these diagrams, audio enthusiasts can maximize the performance of their sound systems and enjoy a captivating listening experience.
Understanding the essential aspects of “2 Ohm Dvc Wiring Diagram” is paramount in the realm of car audio. These aspects form the cornerstone of properly connecting and configuring dual voice coil woofers with a 2 Ohm impedance.
- Topology: Schematic representation of electrical connections.
- Impedance: Electrical resistance of the woofer coils (2 Ohms).
- Power Handling: Maximum power the woofer can handle (increases with lower impedance).
- Sound Quality: Optimal sound reproduction when wired correctly.
- Efficiency: Ability of the woofer to convert electrical power into sound (higher efficiency with lower impedance).
- Wiring Options: Parallel or series connections to achieve desired impedance.
- Amplifier Compatibility: Matching the amplifier’s impedance to the woofer’s impedance.
- Enclosure Design: Impact of enclosure type and volume on woofer performance.
- System Tuning: Adjusting the system to optimize sound quality and performance.
These aspects are interconnected and influence each other. For instance, the wiring options determine the overall impedance of the woofer, which affects the power handling and efficiency. Proper system tuning ensures that the woofer operates within its optimal parameters, delivering exceptional sound quality. By delving into these aspects, audio enthusiasts can gain a comprehensive understanding of 2 Ohm Dvc Wiring Diagrams and harness their full potential for superior car audio experiences.
Topology
In the context of “2 Ohm Dvc Wiring Diagram,” topology refers to the specific arrangement and interconnection of electrical components, particularly the dual voice coils (DVCs) of a woofer. The schematic representation of these connections is crucial for understanding how the woofer will perform within an audio system.
The topology of a 2 Ohm Dvc Wiring Diagram dictates the overall impedance of the woofer, which is a critical factor in matching the woofer to an amplifier. By connecting the voice coils in parallel or series, the diagram determines the total electrical resistance of the woofer. This impedance must be carefully considered to ensure that the amplifier can provide sufficient power without overloading or damaging the woofer.
Real-life examples of topology in 2 Ohm Dvc Wiring Diagrams include:
- Parallel connection: The positive terminals of both voice coils are connected together, and the negative terminals are connected together. This results in a total impedance of 2 Ohms.
- Series connection: The positive terminal of one voice coil is connected to the negative terminal of the other voice coil, and the remaining terminals are connected to the amplifier. This results in a total impedance of 4 Ohms.
Understanding the topology of 2 Ohm Dvc Wiring Diagrams is essential for practical applications such as:
- System design: Determining the appropriate wiring configuration based on the desired impedance and power handling.
- Amplifier selection: Matching the amplifier’s impedance to the woofer’s impedance for optimal performance.
- Troubleshooting: Identifying and resolving issues related to improper wiring or component failure.
In summary, topology plays a critical role in 2 Ohm Dvc Wiring Diagrams by defining the electrical connections and determining the overall impedance of the woofer. Understanding the topology of these diagrams is essential for designing and implementing high-performance car audio systems.
Impedance
In the context of “2 Ohm Dvc Wiring Diagram,” impedance refers to the electrical resistance of the woofer’s voice coils. It is a crucial factor that directly affects the performance and compatibility of the woofer within an audio system.
- DC Resistance: The resistance of the voice coils when no audio signal is applied. It is typically measured in Ohms and is a key parameter for determining the woofer’s power handling capability.
- Impedance Curve: A graph that shows how the woofer’s impedance varies with frequency. It can reveal resonant frequencies and other characteristics that influence system tuning.
- Nominal Impedance: The standard impedance value assigned to a woofer, typically 2, 4, or 8 Ohms. It is used for matching the woofer to an amplifier and calculating system impedance.
- Complex Impedance: The combination of resistance and reactance in the voice coils. It is a vector quantity with both magnitude and phase, and it can affect the woofer’s frequency response and damping.
Understanding the impedance of a woofer is essential for designing and implementing a well-matched car audio system. By considering the DC resistance, impedance curve, nominal impedance, and complex impedance, audio enthusiasts can ensure that the woofer operates optimally, delivering the desired sound quality and performance.
Power Handling
Within the realm of “2 Ohm Dvc Wiring Diagram,” power handling refers to the maximum amount of electrical power that a woofer can safely dissipate without sustaining damage. It is a critical factor in determining the overall performance and reliability of the woofer within an audio system.
- Thermal Power Handling: The amount of power that the woofer can handle before its voice coil overheats. It is primarily determined by the size and material of the voice coil, as well as the cooling mechanisms in place.
- Mechanical Power Handling: The amount of power that the woofer can handle before its suspension or cone is damaged. It is influenced by the strength and durability of the woofer’s components, including the spider, surround, and cone material.
- Peak Power Handling: The maximum instantaneous power that the woofer can handle for a short duration. It is typically higher than the continuous power handling rating and is important for handling transients and high-impact audio content.
- Impedance and Power Handling: The impedance of the woofer plays a significant role in power handling. Lower impedance woofers, such as 2 Ohm DVC woofers, can handle more power than higher impedance woofers because they draw more current from the amplifier.
Understanding power handling is essential for selecting an appropriate woofer for a given application and ensuring that it is used within its safe operating limits. By considering the thermal, mechanical, and peak power handling capabilities of a woofer, audio enthusiasts can design and implement high-performance car audio systems that deliver exceptional sound quality and reliability.
Sound Quality
In the context of “2 Ohm Dvc Wiring Diagram,” achieving optimal sound quality is paramount. Proper wiring ensures that the woofer’s dual voice coils operate in harmony, delivering a cohesive and accurate sound reproduction.
- Frequency Response: The range of frequencies that the woofer can reproduce effectively. Correct wiring ensures a smooth and balanced frequency response, avoiding peaks or dips that can distort the sound.
- Clarity and Detail: Proper wiring minimizes distortion and phase issues, resulting in enhanced clarity and detail in the reproduced sound. Subtle nuances and intricate musical passages become more discernible.
- Imaging and Soundstage: Accurate wiring contributes to precise imaging and soundstage reproduction. Instruments and vocals are placed correctly within the soundstage, creating a realistic and immersive listening experience.
- Power Handling and Efficiency: Optimal wiring ensures that the woofer can handle more power without compromising sound quality. It also improves efficiency, allowing the woofer to produce higher sound levels with less distortion.
By adhering to proper wiring practices as outlined in “2 Ohm Dvc Wiring Diagram,” audio enthusiasts can harness the full potential of their woofers, unlocking exceptional sound quality characterized by accurate frequency response, clarity, imaging, and power handling. This meticulous approach lays the foundation for a truly immersive and enjoyable car audio experience.
Efficiency
Within the context of “2 Ohm Dvc Wiring Diagram,” understanding the concept of efficiency is crucial. Efficiency refers to the woofer’s ability to convert electrical power into sound energy effectively. A higher efficiency rating indicates that the woofer can produce a louder sound output with less electrical power input.
The impedance of a woofer plays a significant role in determining its efficiency. Lower impedance woofers, such as those used in “2 Ohm Dvc Wiring Diagrams,” are generally more efficient than higher impedance woofers. This is because lower impedance woofers draw more current from the amplifier, which results in increased power handling and sound output. However, it’s important to note that the efficiency of a woofer is influenced by various factors beyond impedance, including the design of the voice coil, magnet structure, and suspension system.
In a real-life scenario, a 2 Ohm Dvc Wiring Diagram can be utilized to connect two 4-Ohm DVC woofers in parallel, resulting in a total impedance of 2 Ohms. This configuration effectively increases the efficiency of the system, allowing the woofers to produce a louder sound output with the same amount of electrical power. This is particularly beneficial in car audio applications where space is limited, and maximizing sound output is desired.
Practical applications of understanding the relationship between efficiency and impedance in “2 Ohm Dvc Wiring Diagrams” extend to system design and optimization. By carefully selecting woofers with high efficiency ratings and implementing appropriate wiring configurations, audio enthusiasts can achieve optimal sound quality and performance from their car audio systems. This understanding empowers them to make informed decisions that enhance their listening experience.
Wiring Options
In the context of “2 Ohm Dvc Wiring Diagram,” understanding wiring options is crucial for achieving the desired impedance and optimizing system performance.
When dealing with dual voice coil (DVC) woofers, two primary wiring options exist: parallel and series connections. The choice between these options directly impacts the overall impedance of the woofer setup.
In a parallel connection, the positive terminals of both voice coils are connected together, and the negative terminals are connected together. This arrangement effectively halves the impedance of each voice coil, resulting in a total impedance equal to half of the individual voice coil impedance. For instance, connecting two 4-Ohm DVC woofers in parallel yields a total impedance of 2 Ohms, which aligns with the “2 Ohm” designation in the wiring diagram.
Conversely, in a series connection, the positive terminal of one voice coil is connected to the negative terminal of the other voice coil, and the remaining terminals are connected to the amplifier. This arrangement adds the impedances of the individual voice coils, resulting in a total impedance equal to the sum of the two impedances. Connecting two 4-Ohm DVC woofers in series would result in a total impedance of 8 Ohms, which is not typically used in “2 Ohm Dvc Wiring Diagrams.”
Selecting the appropriate wiring option is critical for matching the woofer impedance to the amplifier’s output impedance. Amplifiers are designed to operate within a specific impedance range, and using woofers with an impedance that falls outside this range can lead to reduced performance or even damage to the amplifier.
Understanding wiring options and their impact on impedance is essential for designing and implementing efficient and effective car audio systems. By carefully considering the impedance requirements of the amplifier and the desired impedance of the woofer setup, audio enthusiasts can optimize system performance and ensure a high-quality listening experience.
Amplifier Compatibility
Within the realm of “2 Ohm Dvc Wiring Diagram,” amplifier compatibility plays a pivotal role in ensuring optimal performance and safeguarding the integrity of the system. Matching the amplifier’s impedance to the woofer’s impedance is paramount for achieving a harmonious and efficient setup.
- Output Impedance: The amplifier’s internal resistance, measured in Ohms, that it presents to the woofer. Matching the woofer’s impedance to the amplifier’s output impedance ensures proper power transfer and prevents distortion or damage.
- Power Handling: Amplifiers are designed to deliver maximum power within a specific impedance range. Mismatched impedance can lead to reduced power output, inefficient operation, or even overheating and damage to the amplifier.
- Real-Life Example: A 2 Ohm Dvc Wiring Diagram involving two 4-Ohm DVC woofers wired in parallel results in a total impedance of 2 Ohms. To ensure compatibility, an amplifier with a stable output impedance of 2 Ohms or higher is required.
- System Efficiency: Matched impedance allows for efficient transfer of electrical power from the amplifier to the woofer, resulting in improved sound quality, reduced distortion, and enhanced overall system performance.
Understanding amplifier compatibility and meticulously adhering to impedance matching principles are crucial for achieving a well-tuned and reliable car audio system. By carefully considering the amplifier’s output impedance and the woofer’s impedance, audio enthusiasts can harness the full potential of their components, ensuring a captivating and immersive listening experience.
Enclosure Design
In the realm of “2 Ohm Dvc Wiring Diagram,” enclosure design plays a pivotal role in shaping the overall performance of the woofer setup. The type and volume of the enclosure directly influence the woofer’s frequency response, efficiency, and power handling capabilities, making it an integral component of the system’s design.
The enclosure acts as an acoustic environment for the woofer, affecting the way sound waves are generated and propagated. Different enclosure types, such as sealed, ported, and bandpass, have unique characteristics that alter the woofer’s performance. For instance, a sealed enclosure provides a tighter and more controlled bass response, while a ported enclosure offers a deeper and more extended low-end response. The volume of the enclosure also affects the woofer’s tuning frequency, with larger enclosures typically resulting in lower tuning frequencies.
Understanding the impact of enclosure design on woofer performance is essential for achieving the desired sound quality and output. By carefully selecting the appropriate enclosure type and volume, audio enthusiasts can optimize the woofer’s response to suit their specific preferences and listening environment. For example, a 2 Ohm Dvc Wiring Diagram involving two 4-Ohm DVC woofers in a sealed enclosure can yield a punchy and accurate bass response, ideal for music genres that emphasize clarity and precision. Conversely, the same woofers in a ported enclosure can produce a more powerful and deep bass response, suitable for genres that demand a strong low-end presence.
In conclusion, enclosure design is an integral aspect of “2 Ohm Dvc Wiring Diagram,” influencing the woofer’s performance in profound ways. By understanding the cause-and-effect relationship between enclosure design and woofer behavior, audio enthusiasts can make informed decisions in crafting their car audio systems. This understanding empowers them to tailor the sound output to their preferences, ensuring a truly immersive and customized listening experience.
System Tuning
In the realm of car audio, “System Tuning” refers to the meticulous process of adjusting various components and settings to achieve optimal sound quality and performance. It encompasses a wide range of factors, including crossover frequencies, equalizer adjustments, amplifier gain, and time alignment. Within the context of “2 Ohm Dvc Wiring Diagram,” system tuning plays a crucial role in harnessing the full potential of the woofer setup.
The 2 Ohm Dvc Wiring Diagram defines the electrical connections and impedance of the woofer system. However, system tuning allows for further refinement and customization based on the specific acoustics of the vehicle and the listener’s preferences. By adjusting the crossover frequencies, the system can be tailored to ensure smooth transitions between the woofer and other speakers, eliminating any gaps or overlaps in the frequency response. Equalizer adjustments enable fine-tuning of the sound to compensate for any resonances or deficiencies in the vehicle’s interior. Amplifier gain optimization ensures that the woofer receives the appropriate amount of power to deliver its full potential without distortion.
Real-life examples of system tuning within “2 Ohm Dvc Wiring Diagram” include adjusting the crossover frequency to prevent overlap between the woofer and midrange speakers, resulting in a more cohesive and natural soundstage. Additionally, using an equalizer to reduce excessive bass frequencies can minimize boomy or muddy sound, enhancing clarity and detail. Proper time alignment ensures that all speakers in the system are working together seamlessly, creating a precise and immersive listening experience.
Understanding the connection between “System Tuning: Adjusting the system to optimize sound quality and performance” and “2 Ohm Dvc Wiring Diagram” empowers audio enthusiasts to achieve a truly exceptional car audio system. By meticulously tuning the system, they can maximize the performance of their 2 Ohm Dvc Wiring Diagram setup, tailoring the sound output to their specific preferences and listening environment. This understanding not only enhances the enjoyment of music but also ensures that the system operates at its optimal level, delivering years of listening pleasure.


Related Posts


