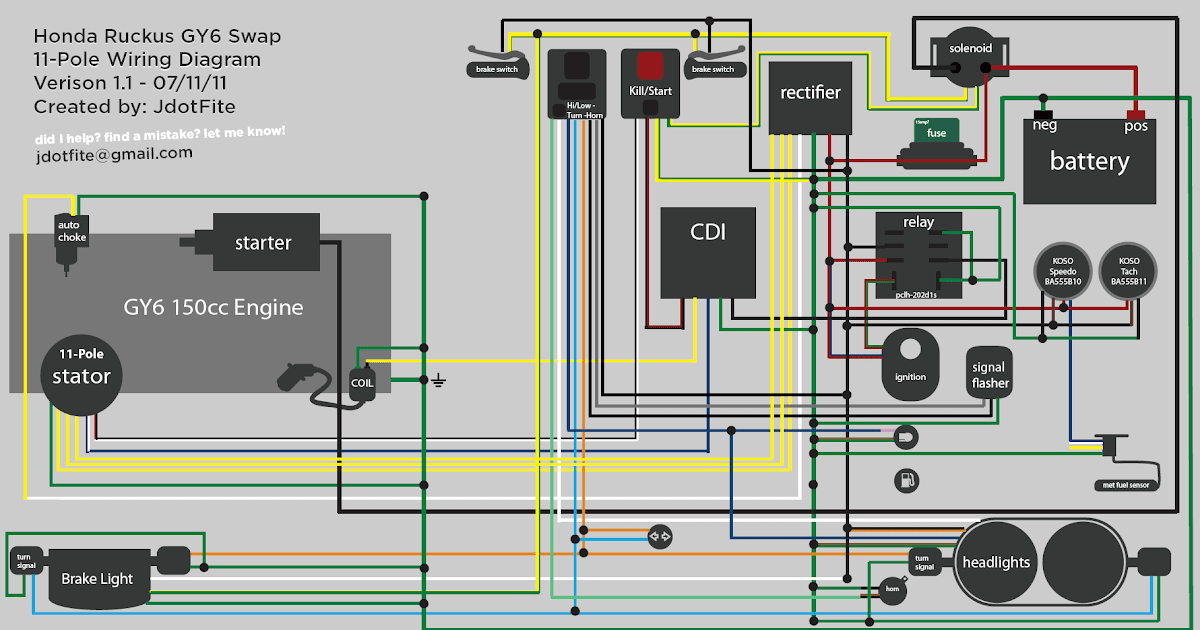
150cc Scooter Gy6 150cc Wiring Diagram: A 150cc Scooter Gy6 150cc wiring diagram is a visual representation of the electrical system of a 150cc scooter with a Gy6 engine. It shows the connections between the various electrical components, such as the battery, starter, ignition coil, and lights. An example of such a wiring diagram is provided by the manufacturer in the scooter’s user manual, often with different color codes to differentiate between wires and their purposes.
Importance, Benefits, and Historical Context: Understanding wiring diagrams is critical for troubleshooting and repairing electrical problems, ensuring the scooter operates safely. Skilled mechanics can use these diagrams to identify faulty electrical components and rectify issues, enhancing the scooter’s performance and longevity. The development of standardized wiring diagrams played a crucial role in the mass production and maintenance of scooters, allowing for easier replication and troubleshooting.
Transition to Main Article Topics: This article delves into the fundamentals of reading and interpreting 150cc Scooter Gy6 150cc wiring diagrams. It provides a comprehensive overview of the electrical system and its components, enabling readers to gain a deeper understanding of their scooter’s electrical intricacies, perform basic maintenance tasks, and effectively diagnose and resolve electrical malfunctions.
Essential Aspects of 150cc Scooter Gy6 150cc Wiring Diagram: A wiring diagram is a crucial component for understanding the electrical system of a 150cc Scooter Gy6 150cc. It provides a visual representation of the connections between the various electrical components, such as the battery, starter, ignition coil, and lights. Understanding these aspects is essential for troubleshooting and repairing electrical problems, ensuring the safe and optimal operation of the scooter.
- Components: Understanding the function and location of each electrical component is crucial for accurate diagnosis and repair.
- Connections: Identifying the connections between components ensures proper electrical flow and functionality.
- Color Coding: Many wiring diagrams use color coding to differentiate between wires for easy identification and tracing.
- Symbols: Standardized symbols are used to represent electrical components and their connections.
- Grounding: Proper grounding is essential for electrical safety and stability.
- Circuit Protection: Understanding the types and locations of circuit protection devices, such as fuses and relays, is important for troubleshooting.
- Troubleshooting: Wiring diagrams are invaluable for systematically troubleshooting electrical issues.
- Customization: For advanced users, wiring diagrams can guide modifications or additions to the electrical system.
In summary, a deep understanding of the essential aspects of a 150cc Scooter Gy6 150cc wiring diagram empowers scooter owners and mechanics to maintain, diagnose, and resolve electrical issues effectively, maximizing the scooter’s performance and safety. These aspects are interconnected and provide a comprehensive view of the electrical system, enabling users to confidently navigate its complexities.
Components
The accurate diagnosis and repair of electrical issues in a 150cc Scooter Gy6 150cc heavily rely on a comprehensive understanding of the function and location of each electrical component. A 150cc Scooter Gy6 150cc Wiring Diagram serves as a detailed roadmap for navigating the electrical system, but its effectiveness hinges upon the user’s ability to identify and comprehend the individual components. Without this fundamental knowledge, troubleshooting and repair efforts become significantly more challenging and prone to errors.
Consider a real-life scenario where a scooter experiences a sudden loss of power. By referring to the wiring diagram, a mechanic can trace the electrical circuit to identify the potential source of the issue. However, if the mechanic lacks a clear understanding of the components involved, such as the battery, starter, or ignition coil, they may struggle to pinpoint the root cause and implement an effective repair. This highlights the critical role of component understanding in accurate diagnosis and subsequent repair.
Furthermore, a thorough grasp of component functionality and placement empowers individuals to perform basic maintenance tasks, such as replacing a faulty bulb or fuse. By following the wiring diagram and understanding the location of each component, users can efficiently identify and access the necessary parts, minimizing downtime and ensuring the scooter’s optimal performance. In summary, a comprehensive understanding of electrical components forms the cornerstone for successful troubleshooting, repair, and maintenance of a 150cc Scooter Gy6 150cc, making it an indispensable aspect of the wiring diagram’s utility.
Connections
In the context of a 150cc Scooter Gy6 150cc Wiring Diagram, identifying the connections between components is paramount for ensuring proper electrical flow and functionality. These connections establish a network that allows electricity to travel from the battery to various electrical components, such as the ignition coil, starter, lights, and sensors. Without a clear understanding of these connections, troubleshooting and repairing electrical issues becomes extremely challenging.
For instance, consider a situation where the scooter’s headlight is not functioning. By referring to the wiring diagram, a mechanic can trace the electrical circuit to identify the components involved in powering the headlight. This involves understanding the connections between the battery, headlight switch, headlight relay, and the headlight itself. By examining these connections, the mechanic can determine if the issue lies in a faulty connection, a blown fuse, or a malfunctioning component.
Furthermore, a thorough comprehension of connections is crucial for modifications or additions to the electrical system. For example, if a rider wishes to install additional lighting or accessories, they must understand the existing electrical connections to ensure compatibility and avoid overloading the system. By carefully studying the wiring diagram and identifying the appropriate connections, enthusiasts can safely integrate new electrical components into their scooter’s electrical system.
In summary, the identification of connections between components is a fundamental aspect of understanding and working with a 150cc Scooter Gy6 150cc Wiring Diagram. It enables troubleshooting, repair, and modification of the electrical system, ensuring the scooter’s optimal performance and safety. Without a clear understanding of these connections, electrical issues can be difficult to diagnose and resolve, potentially leading to more severe problems or even compromising the rider’s safety.
Color Coding
In the context of a 150cc Scooter Gy6 150cc Wiring Diagram, color coding plays a vital role in simplifying the identification and tracing of wires, making it a critical component for understanding and working with the electrical system.
Color coding involves the use of standardized colors for different types of wires, providing a visual cue that aids in distinguishing between them. This simplifies the process of tracing wires throughout the electrical system, which is essential for troubleshooting, repair, and modification. For instance, power wires are typically red, ground wires are black, and signal wires may be various colors depending on their function. By following the color-coded wires, technicians can quickly identify the purpose and destination of each wire, reducing the time and effort required for electrical work.
Real-life examples of color coding within a 150cc Scooter Gy6 150cc Wiring Diagram include the use of red wires for the positive terminal of the battery, black wires for the negative terminal, and yellow wires for lighting circuits. These standardized color codes ensure consistency across different scooters, allowing mechanics and enthusiasts to easily identify and trace wires regardless of the specific model or manufacturer.
Understanding color coding is not only important for troubleshooting and repair but also for modifications or additions to the electrical system. By following the color-coded wires, users can safely integrate new electrical components into their scooter’s electrical system, ensuring compatibility and avoiding overloading or damage. This practical understanding empowers users to customize their scooters and enhance their functionality.
In summary, color coding is an essential aspect of a 150cc Scooter Gy6 150cc Wiring Diagram, providing a simplified and standardized method for identifying and tracing wires throughout the electrical system. This understanding is crucial for troubleshooting, repair, modification, and customization, enabling users to maintain and enhance their scooters’ electrical systems effectively and safely.
Symbols
In the context of a 150cc Scooter Gy6 150cc Wiring Diagram, the use of standardized symbols plays a critical role in conveying complex electrical information in a clear and concise manner. These symbols provide a universal language that simplifies the understanding and interpretation of wiring diagrams, regardless of language or technical background.
Standardized symbols represent electrical components and their connections, creating a visual representation of the electrical system. This allows users to easily identify and trace the flow of electricity through the scooter’s electrical system. For instance, a battery may be represented by a rectangle with positive and negative terminals, while a switch may be represented by a circle with two lines. By using these standardized symbols, wiring diagrams become more accessible and easier to interpret, facilitating troubleshooting, repair, and modification of the electrical system.
Real-life examples of standardized symbols within a 150cc Scooter Gy6 150cc Wiring Diagram include the use of a lightning bolt symbol to represent the ignition coil, a wavy line to represent a resistor, and a triangle with a line through it to represent ground. These symbols are universally recognized and understood by individuals familiar with electrical schematics, enabling effective communication and collaboration.
Understanding the standardized symbols used in a 150cc Scooter Gy6 150cc Wiring Diagram is crucial for various practical applications. It empowers users to troubleshoot electrical issues by visually tracing the flow of electricity and identifying potential problems. Additionally, it enables enthusiasts to modify or add electrical components to their scooters, ensuring compatibility and preventing damage to the electrical system. By comprehending these symbols, users gain the ability to maintain, repair, and customize their scooters’ electrical systems with confidence.
Grounding
Within the context of a 150cc Scooter Gy6 150cc Wiring Diagram, grounding plays a pivotal role in ensuring the safe and stable operation of the scooter’s electrical system. Proper grounding provides a reference point for electrical circuits, preventing voltage fluctuations and electrical hazards. It involves connecting electrical components to a common ground, typically the metal frame of the scooter, which acts as a conductor to dissipate electrical current safely.
- Electrical Safety: Proper grounding prevents electrical shocks by providing a safe path for excess current to flow, reducing the risk of electrocution and damage to electrical components.
- Voltage Stabilization: Grounding provides a stable reference point for electrical circuits, preventing voltage spikes and fluctuations that can disrupt the operation of sensitive electronic components.
- Noise Reduction: Grounding helps to reduce electrical noise and interference, improving the overall performance and reliability of the electrical system.
- Compatibility: Proper grounding ensures compatibility between different electrical components and accessories, preventing damage and malfunctions due to improper grounding.
Understanding and implementing proper grounding techniques is crucial for the safe and efficient operation of a 150cc Scooter Gy6 150cc. By ensuring that electrical components are correctly grounded, scooter owners and mechanics can prevent electrical hazards, protect sensitive electronic components, and maintain the overall integrity of the scooter’s electrical system.
Circuit Protection
Within the context of a 150cc Scooter Gy6 150cc Wiring Diagram, circuit protection plays a crucial role in safeguarding the electrical system from damage caused by overcurrent or short circuits. Circuit protection devices, such as fuses and relays, are strategically placed throughout the wiring diagram to interrupt the flow of electricity when it exceeds safe levels, preventing damage to sensitive electrical components and ensuring the safety of the rider.
Understanding the types and locations of circuit protection devices is critical for effective troubleshooting. Fuses, for example, are designed to break the circuit when the current exceeds a predetermined threshold, protecting downstream components from damage. Relays, on the other hand, are electromagnetic switches that use a small electrical current to control a larger electrical load, providing isolation and protection for high-power circuits. By identifying the location of these devices within the wiring diagram, technicians can quickly isolate and replace faulty circuit protection devices, restoring the electrical system to proper operation.
Real-life examples of circuit protection within a 150cc Scooter Gy6 150cc Wiring Diagram include the use of fuses to protect the ignition circuit, lighting circuits, and fuel injection system. Relays are commonly used to control the starter motor, headlights, and horn, ensuring that these high-power components are switched on and off safely. By understanding the location and function of these circuit protection devices, mechanics can efficiently diagnose and resolve electrical issues, minimizing downtime and ensuring the safe operation of the scooter.
In summary, understanding circuit protection is an essential aspect of interpreting a 150cc Scooter Gy6 150cc Wiring Diagram. Circuit protection devices play a vital role in safeguarding the electrical system from damage, and their proper identification and troubleshooting are crucial for maintaining the scooter’s performance and safety. By comprehending the types, locations, and functions of circuit protection devices, scooter owners and mechanics can effectively diagnose and resolve electrical issues, ensuring a reliable and enjoyable riding experience.
Troubleshooting
Wiring diagrams play a pivotal role in troubleshooting electrical issues in a 150cc Scooter Gy6 150cc. They provide a visual representation of the electrical system, enabling technicians to trace circuits, identify potential problems, and implement effective repairs.
- Component Identification: Wiring diagrams help identify electrical components and their connections, allowing technicians to pinpoint the source of electrical problems. For example, if a headlight is not functioning, the wiring diagram can guide the technician to the fuse or relay responsible for the headlight circuit.
- Circuit Tracing: Wiring diagrams enable technicians to trace electrical circuits, identifying open circuits, short circuits, or loose connections. This process involves following the path of wires and testing for continuity or voltage at various points in the circuit.
- Symptom Analysis: By analyzing the symptoms of an electrical issue, technicians can use wiring diagrams to narrow down the possible causes. For example, if a scooter experiences intermittent starting problems, the wiring diagram can help identify potential issues with the ignition switch, starter relay, or battery connections.
- Repair Validation: After implementing repairs, wiring diagrams can be used to verify the restoration of proper electrical function. By testing voltage and continuity at key points in the circuit, technicians can ensure that the repairs have been successful and that the electrical system is operating correctly.
In conclusion, wiring diagrams are indispensable tools for systematically troubleshooting electrical issues in a 150cc Scooter Gy6 150cc. By providing a visual representation of the electrical system and enabling the identification of components, tracing of circuits, analysis of symptoms, and validation of repairs, wiring diagrams empower technicians to diagnose and resolve electrical problems efficiently and effectively, ensuring the safe and reliable operation of the scooter.
Customization
Wiring diagrams are not only essential for troubleshooting and maintenance, but also serve as valuable guides for advanced users who seek to customize or modify their 150cc Scooter Gy6 150cc’s electrical system. By understanding the intricacies of the electrical system through the wiring diagram, users can make informed decisions about potential modifications and additions, ensuring compatibility and optimal performance.
- Accessory Integration: Wiring diagrams provide insights into the electrical system’s capacity and compatibility, allowing users to assess the feasibility of integrating additional accessories, such as heated grips, GPS devices, or auxiliary lighting, without overloading the system or compromising its stability.
- Performance Enhancements: Advanced users can leverage wiring diagrams to identify opportunities for performance enhancements. By understanding the electrical requirements of components like fuel injectors or ignition coils, modifications can be made to optimize fuel efficiency, ignition timing, or overall engine performance.
- Safety Upgrades: Wiring diagrams are essential for implementing safety upgrades, such as installing additional lighting, anti-theft devices, or brake lights. By ensuring proper integration into the electrical system, users can enhance the visibility, security, and overall safety of their scooter.
- Custom Aesthetics: For enthusiasts seeking to personalize their scooter’s aesthetics, wiring diagrams empower them to customize lighting configurations, add decorative elements, or modify the electrical system to accommodate unique visual modifications.
In conclusion, wiring diagrams are indispensable tools for advanced users who wish to customize or modify the electrical system of their 150cc Scooter Gy6 150cc. By providing a comprehensive understanding of the electrical system, wiring diagrams enable users to make informed decisions, ensuring compatibility, optimizing performance, enhancing safety, and achieving their desired aesthetic customizations. Whether it’s integrating accessories, boosting performance, or simply adding a personal touch, wiring diagrams empower users to tailor their scooter’s electrical system to their specific needs and preferences.


Related Posts


